What did u do to your raptor today?

Disclaimer: Links on this page pointing to Amazon, eBay and other sites may include affiliate code. If you click them and make a purchase, we may earn a small commission.

CoronaRaptor

FRF Addict
Joined
Dec 17, 2012
Posts
28,961
Reaction score
31,189
Location
CANADA
This had been bugging me for a few weeks now.

Z3RtGZ9.jpg

2TNQvMg.jpg

5Nw0OSJ.jpg

MYaY8ZM.jpg

gGmpBB5.jpg

Looks brand new.

3GeND1y.jpg

Super easy, 6x T25 Torx bolts, 2x 9mm bolts, a brillo pad and some flat black rattle can. Took 30 minutes, and that was with explaining what I was doing to a neighbor.
Yeah, that thing was ugly. Mine looks good still, they must of forgot to prime yours at the factory! Nice job!
 

badm0t0rfinger

Rocket Man
Supporting Member
Joined
Nov 30, 2014
Posts
1,678
Reaction score
3,712
Location
The Beach
Yeah, that thing was ugly. Mine looks good still, they must of forgot to prime yours at the factory! Nice job!

Perhaps. It only just started getting bad enough to bug me recently... could have used some self etching primer for the extra little bit, but I'm sure rattle can is good enough. I'm just glad the truck is holding up so well. I wonder if its just build quality, locations that I've lived while owning it or how **** I am about maintenance.

I get under the truck maybe 2 or 3 times a year and take a wire wheel to any surface rust then some more rattle can and fluid film.
 

CoronaRaptor

FRF Addict
Joined
Dec 17, 2012
Posts
28,961
Reaction score
31,189
Location
CANADA
Perhaps. It only just started getting bad enough to bug me recently... could have used some self etching primer for the extra little bit, but I'm sure rattle can is good enough. I'm just glad the truck is holding up so well. I wonder if its just build quality, locations that I've lived while owning it or how **** I am about maintenance.

I get under the truck maybe 2 or 3 times a year and take a wire wheel to any surface rust then some more rattle can and fluid film.
You're doing everything right. I like a clean undercarriage, that's why they invented toilet paper!
 

BenBB

FRF Supporting Member
Supporting Member
Joined
Apr 21, 2016
Posts
1,804
Reaction score
2,441
Location
Lots of different places
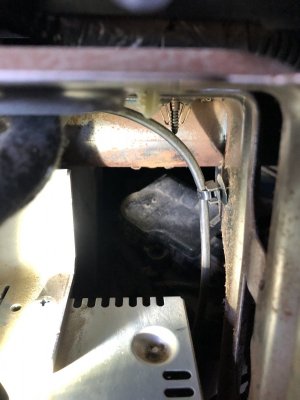
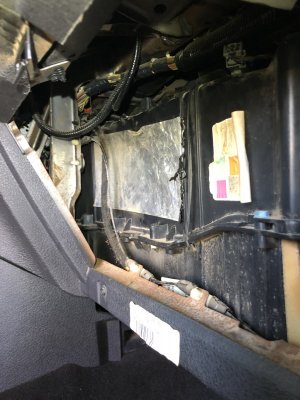
Upper blend door motor done, no more clicky clicky! So coulda been worse, it wasn't the bottom one, but the top one that controls passenger side hot/cold blend. Started through the glove box, can just see the little bastard at the red clip:
IMG_1278.JPEG
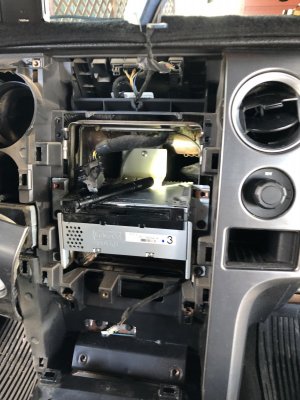
Got that screw out with an 8mm gearwrench, although the first few rounds you can't get the box end on it so have to use the open end. Few minor lacerations from sharp metal. I thought I might be able to get both screws out through here but no dice even with my skinny arms, the connector and the back screw was all I could do. Pulled the console back a few inches to get the radio screen out, once again thankful for @The Car Stereo Company 's Youtube how-to video, I only broke a fraction of the plastic tabs I would have without that walkthrough!! My '13 is slightly different as the center stack bezel has a 7mm screw at the top of each side. There that ****** is:
IMG_1280.JPEG
Zoomed in:
IMG_1279.JPEG
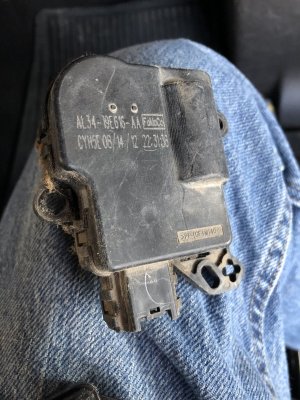
Yes, yes she's a filthy girl. Just the way I like 'em. Date code looks like it was factory original:
IMG_1281.JPEG
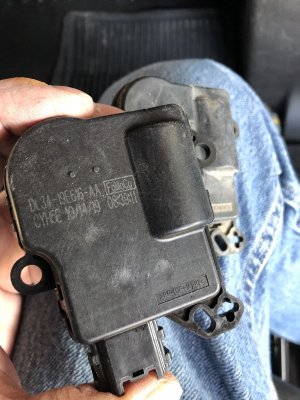
New one's 7 years newer, woot! And the shaft color is black on the new one, old one was white...
IMG_1282.JPEG
 

BenBB

FRF Supporting Member
Supporting Member
Joined
Apr 21, 2016
Posts
1,804
Reaction score
2,441
Location
Lots of different places
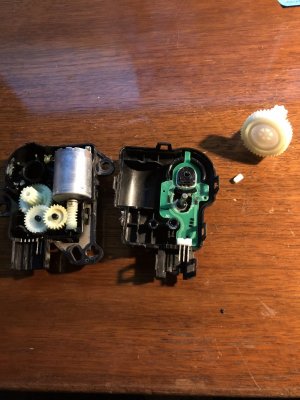
Well there's yer problem right there:
IMG_1289.JPEG
Little white plastic part was sheared off from the drive gear, found it in that black position sensor. Odd that it would break off like that, all it does is rotate inside that sensor, very little resistance, the torque is all on the driven gear and blend door shaft...
 

RC51TOFUMAN

Full Access Member
Joined
Feb 21, 2013
Posts
848
Reaction score
264
Location
in Thee OC
This had been bugging me for a few weeks now.

Z3RtGZ9.jpg

2TNQvMg.jpg

5Nw0OSJ.jpg

MYaY8ZM.jpg

gGmpBB5.jpg

Looks brand new.

3GeND1y.jpg

Super easy, 6x T25 Torx bolts, 2x 9mm bolts, a brillo pad and some flat black rattle can. Took 30 minutes, and that was with explaining what I was doing to a neighbor.
Mine is like that too
Thanks for the writeup

Sent from my SM-G991U using Tapatalk
 

The Car Stereo Company

aka grumpy car stereo guy and frf rolodex
Supporting Member
Joined
Jul 8, 2012
Posts
32,576
Reaction score
23,607
Location
here, on frf
Well there's yer problem right there:
View attachment 163202
Little white plastic part was sheared off from the drive gear, found it in that black position sensor. Odd that it would break off like that, all it does is rotate inside that sensor, very little resistance, the torque is all on the driven gear and blend door shaft...
glue it back together and put it back in the truck. return the other one
 
Top