Looks great, making progress!!
You are using an out of date browser. It may not display this or other websites correctly.
You should upgrade or use an alternative browser.
You should upgrade or use an alternative browser.
Rebuilding a 6.2 Engine
- Thread starter PD1744
- Start date
Disclaimer: Links on this page pointing to Amazon, eBay and other sites may include affiliate code. If you click them and make a purchase, we may earn a small commission.
The click you’re hearing as you turn the engine is most likely the timing chain jumping slightly when the cam returns to base circle on a couple of cylinders. That’s not a concern once the engine is running since there will be oil pressure applied to the tensioners to keep the chain tight and dampen the pulses from the valvetrain.ROCKER SHAFTS
Rocker shaft install was pretty fun. Goes like this:
Lube the cams, rollers, rocker tips, and valve tips with assembly lube. Since these are parts that have already had 150k miles to get to know each other, I wasn't too concerned here.
Turn the engine over so that the cam position on #1 would have the intake valve fully open.
Install bank 2 intake rocker shaft.
Tightening is 3 stage and same for all shaft assemblies:
-Stage 1: 89 lb-in
-Stage 2: 177 lb-in
-Stage 3: 60 degrees
Sequence on intake shafts look like this:View attachment 337120
Next, roll the engine over until the exhaust lobe on #1 is where the valve would be fully open.
Install bank 2 exhaust shaft.
Sequence on the exhaust side looks slightly different:
View attachment 337121
Bank 1 sequences are just mirrored about the crank plane.
Next roll the engine over until intake on #1 would be fully closed.
Install bank 1 intake shaft.
And finally roll the engine over until exhaust on #1 would be fully closed.
Install bank 1 exhaust shaft.
Done:
View attachment 337124
View attachment 337125
So yeah, it's pretty much an engine now. I rolled it over several times by hand and didn't experience anything catastrophic. Every once in a while I would hear this 'click' that seemed to come from the timing set. Sort of plasticky sounding. Not sure what to make of it.
The click you’re hearing as you turn the engine is most likely the timing chain jumping slightly when the cam returns to base circle on a couple of cylinders. That’s not a concern once the engine is running since there will be oil pressure applied to the tensioners to keep the chain tight and dampen the pulses from the valvetrain.
Thanks so much for that! I thought it was something like that and what you said makes sense. Appreciate you setting me at ease on it. I wasn’t overly concerned but good to know for sure.
Got a little bit further this past Friday
TIMING COVER
Found the P/N for the correct cam phaser oil filters. They are 9L8Z-6C683-A if anybody needs them.
Timing cover and VVT solenoids cleaned up and new seal and gaskets in place:
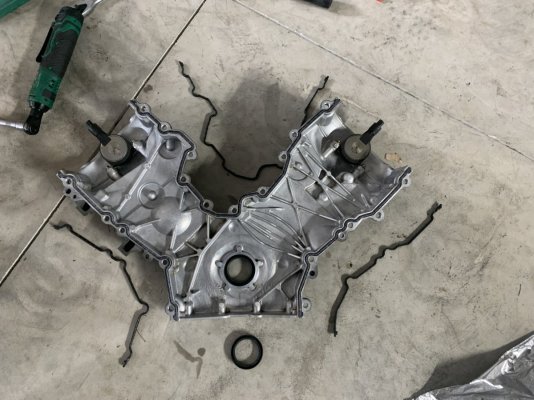
Install goes; dab some schmoo on the seams where the heads meet the block.
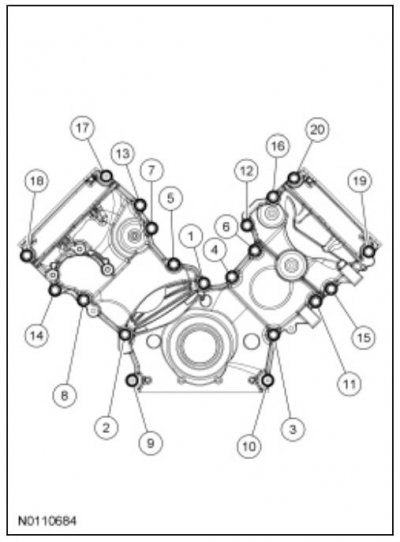
3 Stage torque sequence:
S1 - 89 lb-in
S2 - 177 lb-in
S3 - 45 degrees
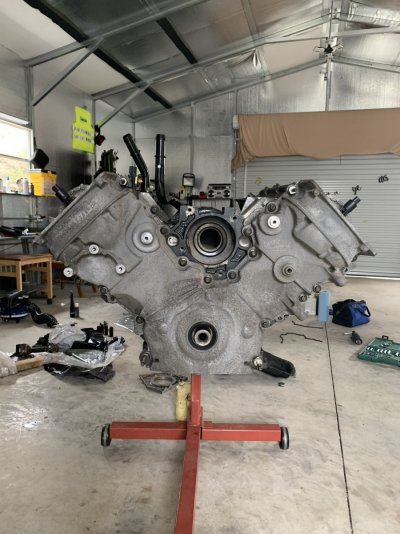
You'll need 3 different socket sizes. the larger studs go at the bottom and the smaller 2 at the top. and the left one in the below pic (passenger side) gets the radio ignition interference capacitor.
TIMING COVER
Found the P/N for the correct cam phaser oil filters. They are 9L8Z-6C683-A if anybody needs them.
Timing cover and VVT solenoids cleaned up and new seal and gaskets in place:

Install goes; dab some schmoo on the seams where the heads meet the block.
3 Stage torque sequence:
S1 - 89 lb-in
S2 - 177 lb-in
S3 - 45 degrees

You'll need 3 different socket sizes. the larger studs go at the bottom and the smaller 2 at the top. and the left one in the below pic (passenger side) gets the radio ignition interference capacitor.

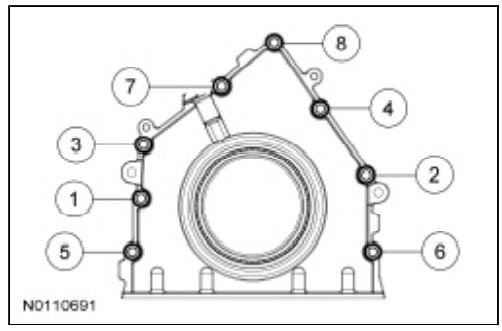
REAR COVER
Cleaned up with new rear main seal hammered home:
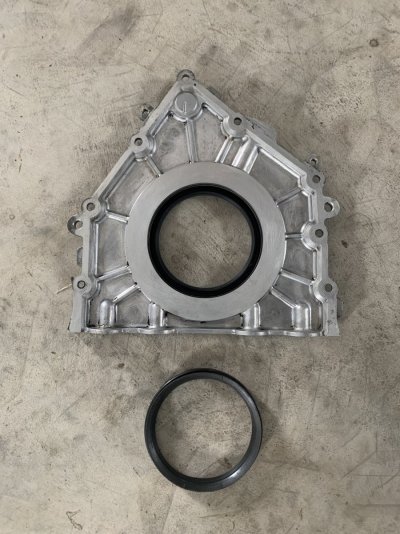
All schmoo on this one.
S1 - 89 lb-in
S2 - 45 degrees
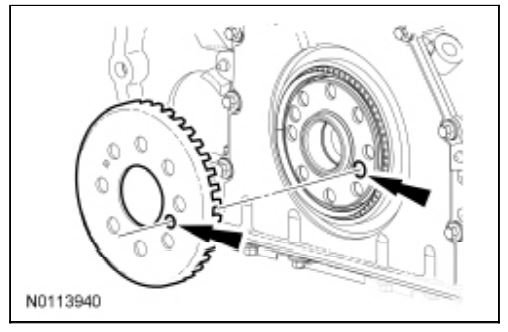
Install the crank sensor. Line up the ignition pulse ring like this:
Installed:
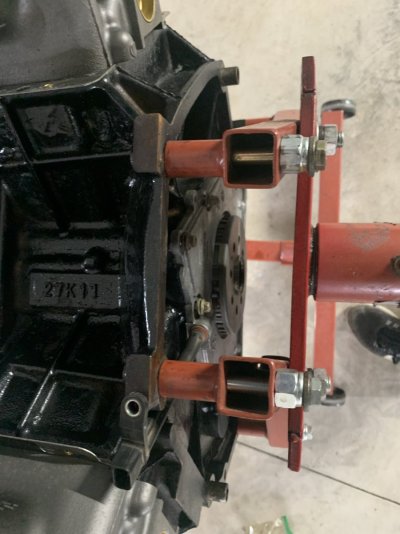
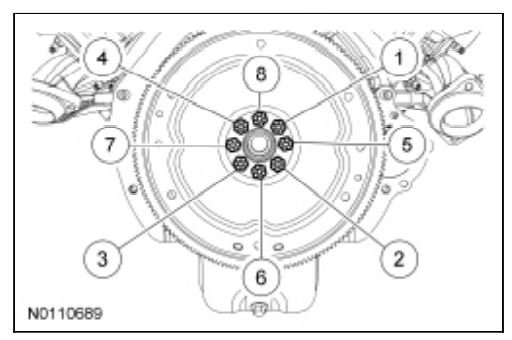
Couldn't get the flexplate installed yet obviously, but I need to order new bolts anyway. P/N M-6379. When you do, it's a 3 stage process
S1 - 177 lb-in
S2 - 26 lb-ft
S3 - 60 degrees
where you do 1-4 first and then 5-8.
Cleaned up with new rear main seal hammered home:

All schmoo on this one.
S1 - 89 lb-in
S2 - 45 degrees

Install the crank sensor. Line up the ignition pulse ring like this:

Installed:

Couldn't get the flexplate installed yet obviously, but I need to order new bolts anyway. P/N M-6379. When you do, it's a 3 stage process
S1 - 177 lb-in
S2 - 26 lb-ft
S3 - 60 degrees
where you do 1-4 first and then 5-8.

Last edited:
Installed the new dip stick tube:
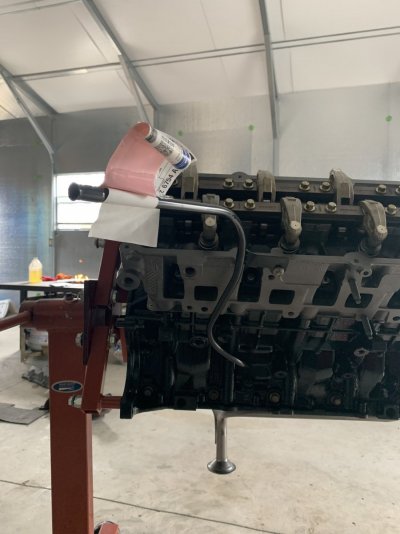
Need the actual dip stick as well. Ordered P/N AL3Z-6750-A.
OIL PAN
New gasket and drain plug.
Schmoo on the seams at the front and rear covers
S1 - 18 lb-in
S2 - 89 lb-in
S3 - 45 degrees
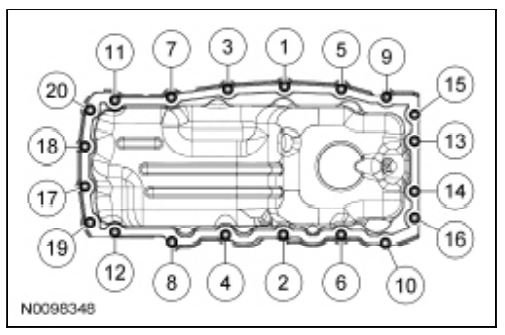
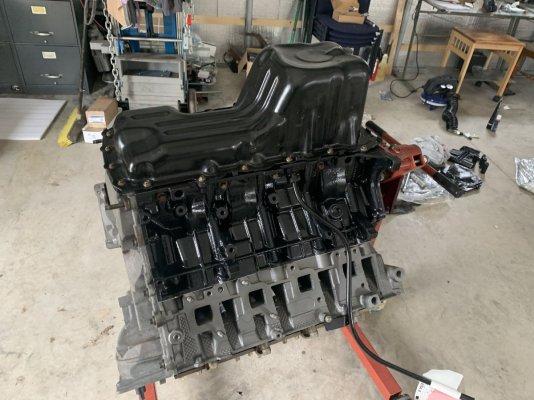
Was missing the 4 bolts up front and one to hold the crank sensor at the back. All the same P/N W503276-S439.

Need the actual dip stick as well. Ordered P/N AL3Z-6750-A.
OIL PAN
New gasket and drain plug.
Schmoo on the seams at the front and rear covers
S1 - 18 lb-in
S2 - 89 lb-in
S3 - 45 degrees


Was missing the 4 bolts up front and one to hold the crank sensor at the back. All the same P/N W503276-S439.
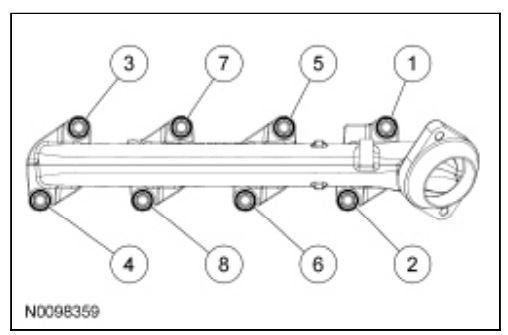
One exhaust manifold was putting up a fight. Tried pretty much everything to extract the studs. Vice grips, vice, penetrating oil, heat, and even welding a bolt to them, and then welding a bigger bolt. First one just bent, then the stud broke off flush with the flange on the larger bolt. Going to try and drill them out next go, but I'm sure they are super hard now from the heat that was poured into them. One side is okay, I just have to chase the thread.
Just putting this information for when I do get to install them, so I don't have to dig it up.
18 lb-ft
VALVE COVERS
Not installed yet. The one side has been on order for a couple of weeks. Was supposed to make it on time (last Thursday), but they sent it USPS, so it got lost in the ether. It should show up one day. Ordered a new PCV valve and cleaned up the other side:
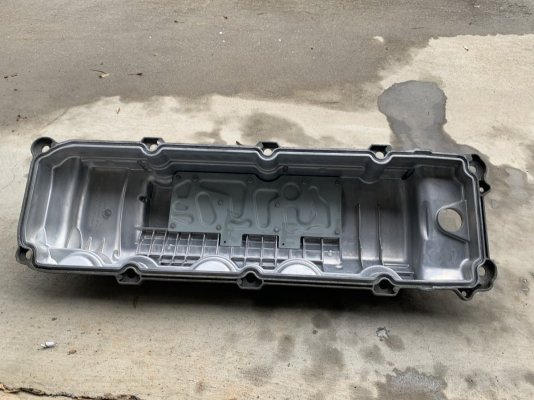
Probably going to take the opportunity to bling these up a bit.
Install will be, after replacing the gaskets, VVT solenoid seals, grommets and bolts, etc. Dab schmoo at the timing cover seams.
89 lb-in
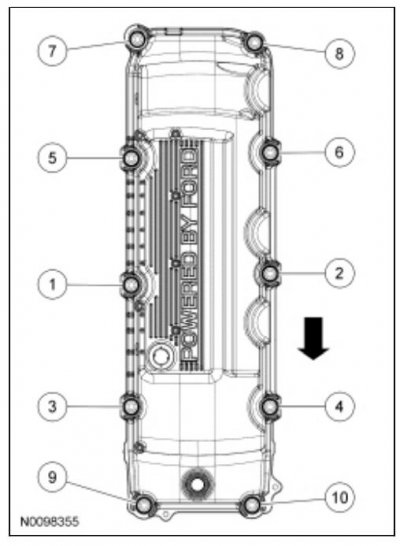
Then I guess at that point she'll be ready to roll.
Just putting this information for when I do get to install them, so I don't have to dig it up.
18 lb-ft

VALVE COVERS
Not installed yet. The one side has been on order for a couple of weeks. Was supposed to make it on time (last Thursday), but they sent it USPS, so it got lost in the ether. It should show up one day. Ordered a new PCV valve and cleaned up the other side:

Probably going to take the opportunity to bling these up a bit.
Install will be, after replacing the gaskets, VVT solenoid seals, grommets and bolts, etc. Dab schmoo at the timing cover seams.
89 lb-in

Then I guess at that point she'll be ready to roll.
Lotsa progress in a day, nice! Hope USPS comes through, I haven't had anything lost lately by them but they do take their sweet time. Ugh exhaust studs are a serious pain, good luck!!
Similar threads
- Replies
- 55
- Views
- 5K
- Replies
- 8
- Views
- 716
- Replies
- 2
- Views
- 564
- Replies
- 17
- Views
- 2K
Staff online
-
GriffinAdministrator
Members online
- Waledonald12
- weimer
- stevenstommyboy1
- BigBlue20
- SilverBolt
- pat247
- Sozzy12
- Five-O Donut Hole
- yotesmc
- Trail_Rider
- GLT
- Dee
- The Car Stereo Company
- Booth9999
- Anas
- jaytperry
- Tbogo
- Gumby
- EricM
- optimal
- sj-CHI
- Nulldetailing
- tabvette
- MurderedOutSVT
- ismael8000
- Taeko-4
- Badgertits
- taquitos
- Wisco
- OBS_RAPTOR7362
- NickyF25
- ToadSmasher2K1
- Chzhead
- snt505
- Irregular F150
- quattrojim
- dinocrisis
- ActionJaxon
- ThePoolGuy
- borgelpe
- JohnyPython
- sclark900
- tm965
- Griffin
- smurfslayer
- killswitch engage
- KingKoopa17
- full-race geoff
- RoNiN Raptor
- TnRaptorVol
Total: 2,458 (members: 105, guests: 2,353)

