Odds and Ends - Sunday with Raptor in the Garage
Today was a great catch up day. Made room in the garage for the Raptor and in she came, she is too big to spend the night but today it was mostly all hers. It was a great day, drinking cold beer, listening and watching football and getting caught up on some Raptor chores.
TPMS
I moved the TPMS display to a position I an easily see while driving. I just did not care for it where I first placed it.

View thru the windshield to back of bracket
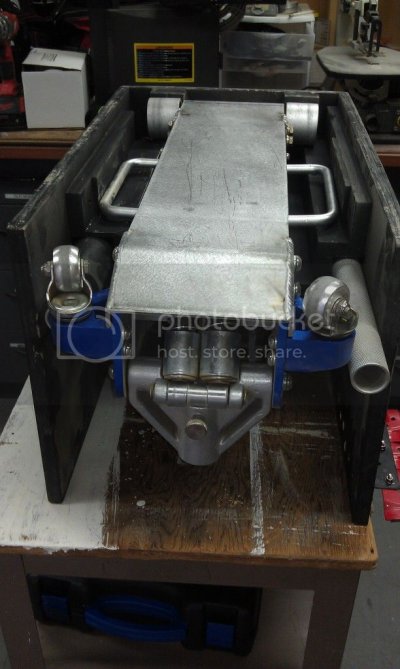
 Jack and Cooler box
The belly pan was slightly bigger than the original jack and slightly rubbed on the tail gate, solution was to route a channel in the rear wall.


I removed the side handles and front wheels. The side handles came off easily without the need to take the entire jack apart

Without the handles, I needed to add some different blocks to keep the jack from moving left to right.

The Fire Extinguisher bracket had come loose from vibration on the wood screws, I replaced with countersunk lock-tited bolts.


By removing the wheels, it is now possible to position the jack directly under the rear shock mount.


Some finished pictures

 Lighting
Here is pic of just the low beams – Dash Z 55W HID projectors. All of these were taken with phone, as you can see is greatly understates how bright my normal headlights are. They are significantly brighter than stock

Here is with the 20” Vison X in the bumper

And with the camera phone on full zoom, it is lighting up the trees 250 yards away

Normal reverse lights seen thru Nav screen

Now with the vision X 10W individual lights in the rear bumper
 Navigation
AS you may recall the last time I messed with the wiring for the TPMS, I attempted to make the Nav wiring Hot all the time so that It would stay on and functioning while the engine and ignition is off. Well it turns out there are two Hot connections and I had only changed one. So simple reroute of the second wire and bingo, she’s live when the Beast aint.


To reveal all the wiring, I had to remove a lot of the interior trim, and while it was off, it was the perfect time to do the Weatherstripping / door molding mod I have been looking forward to doing.
Reinforced Door Molding

Just to be clear this was not my original idea, like many things I have learned from others, yet did things in my own way. Our first attempts failed, this is one where Abby is holding the reel.

I had trouble get the fish tape thru and learned that more lube was needed, along with straightening the fish tape and molding itself. We also had a complete failure when the continuous piece from the reel turned out not be, it had been spliced.

So, first thing you should do if you do this mod is inspect the reel and look for some red tape. Unfortunately for me this first 5 feet became useless and was the reason I was unable to complete this job for the fourth door.
I tried several different ways to do this and this is what worked best:
First step was to lubricate the inside of the molding by squirting in some Dry Film Teflon Lubricant, thru both ends and in the air holes on the sides. You can also you a spray lubricant, if doing it that way it is suggested you spray as you pull the hose into the molding in addition to spraying in the small holes along the sides.


Push your “Fish Tape” all the way thru and insert the end into the rubber hose about 3 inches. Securely wrap electrical tape around the hose going over the transition area many times. I compressed the hose slightly as I wrapped.

Since I did not always have an assistant to help (Abby was doing Homework) I was able to do a lot by myself, by securing the Tape Reel to a hook in the garage, I tried a spring clamp that exploded when it failed, luckily no one or any vehicle was hit by the debris, so I used some heavy Stainless steel wire I had.

I marked how much tubing I expected to go into the molding by wrapping some blue tape.
By myself I was able to pull the molding down the length of the fish tape while guiding the rubber tubing inside, slightly stretching the tubing makes it smaller and easier to pass. The challenge is to get it to un-compress inside the molding. To do this you need a partner to help stretch the molding while letting the tubing slide.
For those of you with Super-cabs, this mod is a little more difficult as your molding does not have a continuous channel and you have to stop it near the top. But it can still be done
Here is a link to a more detailed write up and video of this mod:
http://www.fordraptorforum.com/f10/door-seal-fix-surgical-tubing-11515/


