Interested In A Group Buy?

Disclaimer: Links on this page pointing to Amazon, eBay and other sites may include affiliate code. If you click them and make a purchase, we may earn a small commission.

RSiWORKS

Supporting Vendor
Supporting Vendor
Joined
Feb 4, 2013
Posts
516
Reaction score
325
Location
S.C.S. Michigan
It does look a bit big. What are your thoughts on the fit.
It goes right over the rubber seal, does the door hit?
 

DesaRaptor

FRF Supporting Member
Supporting Member
Joined
Aug 19, 2012
Posts
1,122
Reaction score
718
Location
Houston, TX
The fit is good, door isn't touched. It really is only like 1/4 thicker than the oem plastic ones. The only issue was removing the retaining clips from the plastic sill covers.
 

DesaRaptor

FRF Supporting Member
Supporting Member
Joined
Aug 19, 2012
Posts
1,122
Reaction score
718
Location
Houston, TX
Here are the install instructions I got "after" the install. It was missing from the box, but DefenderWorx emailed them to me. I was too excited to wait and did it on my own though.
 

Attachments

  • Raptor_F-150 Door Sill 901101_02_901159_901115.pdf
    471.7 KB · Views: 37

DesaRaptor

FRF Supporting Member
Supporting Member
Joined
Aug 19, 2012
Posts
1,122
Reaction score
718
Location
Houston, TX
In regards to the instructions saying "simply lift them off" I beg to differ. I forced them off to a point that I bent a couple of them.
 

Mike Hammer

Full Access Member
Joined
Aug 1, 2012
Posts
791
Reaction score
246
Location
Florida
So if you had to do it over again, what would you do different. Wider screw driver, placement of the screw driver when prying them off? Give directions for dummys.
 

DesaRaptor

FRF Supporting Member
Supporting Member
Joined
Aug 19, 2012
Posts
1,122
Reaction score
718
Location
Houston, TX
So if you had to do it over again, what would you do different. Wider screw driver, placement of the screw driver when prying them off? Give directions for dummys.

Honestly, if I had to do it over again, I would have ordered 16 of the yellow clips and not removed them from the OEM. I haven't found the part number yet, but I guess they will cost $1.50 each so another $20.00 to save an hour of my life would be worth it.

Removing the OEM sill covers took less than 5 minutes for all 4 sills.
Installing the new Billet Sill Covers took less than 5 minutes for all 4.
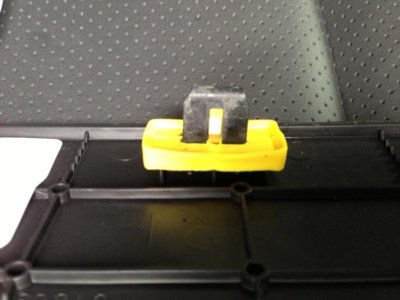
Removing the yellow retainer clips from the plastic OEM took an hour and many of them were bent or torn. The clips are strange. It consists of a plastic clip (black) a brass retaining clip, and a yellow rubber cover.

They issue is that the brass clip has teeth that dig into the plastic OEM sill over when it installed at the factory. To remove them forced me to tear them off of the sill cover basically. I was not able to figure out a way to decompress them for removal. Of course, their might be a easy way of doing it, but I bulled through it.
 

Attachments

  • photo.jpg
    photo.jpg
    46.6 KB · Views: 39

Mike Hammer

Full Access Member
Joined
Aug 1, 2012
Posts
791
Reaction score
246
Location
Florida
Defenderworx, I have a question.

Look at my pictures. The 1st one is the way the part came. The 2nd picture is the way I think the part needs to be. I turned two of L brackets so they hit the 2 clips that do not have the yellow taps on them. I did not install the yellow tabs on the others to make sure everything lines up first.

Also the third picture with the loctite, just in case the screw backs out.

I am in the 2% class that strange things happen to only me and I am used to it by now. So I have to live by "expect the best and prepare for the worst". LOL

Am I correct on the turning on two of them and your thoughts on the loctite?

The way the part came.jpgThe way the part needs to be.jpgLoctite.jpg
 
Last edited:

Forum statistics

Threads
95,027
Posts
1,997,152
Members
58,435
Latest member
thatguyfromford
Top