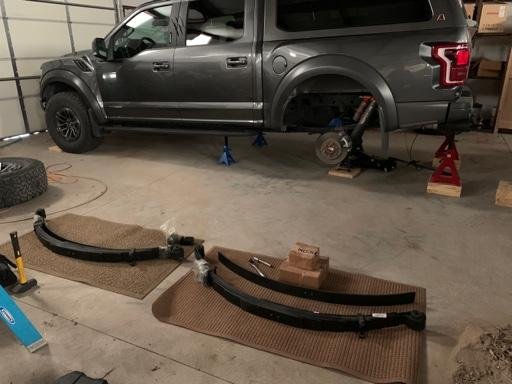
Icon Multi-Rate Rear Leaf Spring Kit

Disclaimer: Links on this page pointing to Amazon, eBay and other sites may include affiliate code. If you click them and make a purchase, we may earn a small commission.

CoronaRaptor

FRF Addict
Joined
Dec 17, 2012
Posts
28,961
Reaction score
31,191
Location
CANADA
Our 2017 shop truck with full Icon suspension. Icon coilovers up front, shocks and bump kit out back with Icon rear leaf springs set at option 3. These are 35" Toyo RT's for what's that worth. It definitely lifts the truck up a good bit more than the Deavers at option 3.


We've still got a plenty of Icon springs in stock if anyone is looking for a set.


Nice looking shop truck
 

James Dougan

Member
Joined
Dec 3, 2019
Posts
6
Reaction score
8
Location
San Antonio, TX
How much weight did you have in the bed at the time of those measurements?

I’m currently on icons option 1 and going to switch out to option 2 since I get a little squatty once I load my offroad gear. I really like the stance unloaded but I’m not so fond of the squat/nose high look once I get weight in the bed.


Sent from my iPhone using Tapatalk

you installed the icon leaf pack solo?

Absolutely would do it again solo. This is my second set solo. Deavers on my gen 1 and then the icons on the gen 2.

The biggest hurdle is wrestling them into place just due to their weight and awkward shape.

I’d budget about 4 hours for the install now but if it’s your first time you may want to double that.

Also, have a few sawzall blades handy for getting through the OE front leaf bolt on the drivers side. No sense in trying to fight a dull blade


Sent from my iPhone using Tapatalk

Sorry for the delay, but yeah solo across the board.

And like DrewFish11 noted, good medium or thick metal sawzall blades are a must. I spent an hour on the first bolt (probably melting it off) just cause I didn't want to trek to HD to get new blades in the middle of install. Bought a couple medium and one thick blade. The medium cut through in a couple minutes.

Couple install helper notes:
1. It's not required really to remove the shocks (I did fully on passenger and just bottom on driver) but at least disconnect both bottoms as it gives much more horizontal (side to side) play in the rear to help pin alignment to the spring perch.
2. Have two jacks ... floor jack and a scissor jack if you don't have another floor jack. Reason being once you drop the rear down enough to get the front and rear shackle bolts in and hand tightened, the pin alignment for the spring perch can be considerably off front to back, especially as the axle leans slightly forward, or I should say the spring perch does. I put the scissor jack under the leaf just in front of the axle and compress the leaf, which gets the spring perch holes aligned with the bottom pins, and then raised the rear with the floor jack to push in place.

Then just u-bolt it up to take up slack and you are golden.

The first one took me some time as I did things out of order (thinking it would work better) but the second took ... 4 hours but that included finishing everything, both shocks back in, drop the truck, torque all bolts both side ...and garage cleanup. So maybe 3 hours for a novice like me.

Would I do it again ... not today or tomorrow ... but probably in a couple weeks :)
 

James Dougan

Member
Joined
Dec 3, 2019
Posts
6
Reaction score
8
Location
San Antonio, TX
Excellent. I'll be over in a couple weeks. :)

Colorado isn't too far from South Texas ... although the garage only has a box fan so make sure you are ready for the heat, August in San Antone can be ... warm? :favorites13:

Oh, and @DrewFish11, I have two full size spares and a chase rack, metal tonneau in the back but no gear. So about 180lbs in wheel / tires and 60lbs for chase. Still up 3". Definitely looks Baja now :)
 

Johnfaeglasgow

Full Access Member
Joined
Jun 8, 2019
Posts
245
Reaction score
214
Location
Kansas
I did it solo in about five hours first time. Dewalt 60t bi-metal blades went through the bolts easy (just make sure you use WD-40 to cool and lubricate as you go).
Make sure you have all the tools you need before you start. Get a torque wrench with a long-ass handle, because torquing the u-bolts under there takes a bit of effort. Also put an electric fan under there because you’re gonna sweat.
If I was doing it again I would have installed strike plates for hydraulic bumps just in case for future upgrades.


Sent from my iPhone using Tapatalk Pro1a3a3efd1dd65e1cfed8c8027e4c27c4.jpg
 

Droid

kglesq's Brother
Joined
Sep 25, 2010
Posts
1,486
Reaction score
757
Anyone running just the Icon leaves in Option 1 without changing the front springs?

Have a 2019, totally stock. I'm currently at 40" front and 41.5" rear.

I assume these take me up to 42.5" in the rear unless I get a 2" drop shackle like the Camburg item?

Will I see more payload capacity on option #1? I just moved across country and wound up having to leave my motorcycle for another trip because the truck was scary low in the back with 1/2 ton in the bed. Maybe I was overcautious, but I didn't like the idea of a 1200 mile drive with my lights blinding everyone and no suspension with a (half) ton of expensive crap in the bed.

My stock Gen1 worked much better with a heavier load. We once put two Yamaha FZ1s, and 200lb of gear in the bed (~1200lb) and it sat down a bit but nothing like the Gen2.

Anyone have pictures of this setup? (Option 1, no front mods, with or without shackles).

(I did skim *entire* thread and also search, but may well have missed stuff.)
 

ZackZ

Full Access Member
Joined
Feb 6, 2019
Posts
144
Reaction score
53
Location
Michigan
Does anybody have these leaf springs with a bedcage/bypass setup? Do they cycle as well with their vulcanized bushings compared to the poly free moving bushings the deavers have?
 

Milo12

Member
Joined
Jun 5, 2020
Posts
46
Reaction score
17
Location
CA
How are the Icon springs delivered? Are they on a pallet? Do I need a forklift?
 
Top