ICON Ford Raptor Rear Hydraulic Air Bumpstop System

Available for sale through multiple FRF vendors: SDHQ, Raptor Addict, Outlaw Raptor, TMX, Freedom Motorsports, Krazy House Customs, and others.
Difficulty:
1 2 3 4 5 6 7 8 9 10
Time:
2-6 hours
I received and installed the ICON Hydraulic Bumpstop system late last week. I decided around the time of TRR '13 that I wanted a bumpstop kit after experiencing really for the first time how quickly things can go badly, especially when SPRSNK Rick marks the course.
I had the chance to ride along with Dylan from ICON during his initial testing of this kit, and I also spent time in the RPG truck, further experiencing the benefits of a bumpstop kit from the rear end control and added peace of mind.
This ICON kit is extremely impressive from the standpoint of initial overall quality and the obvious time that went in to the smallest details. The powder coat finish on the frame brackets, the welds, and the fitment really blew me away, and I mean that. The billet aluminum polished/clear anodized cross beam is a really nice piece too and as a whole this kit appears that it will withstand many New England winters from a corrosion standpoint.
I don't have a ton to add as far as the method of installation. I jabbed at ICON's instructions during my front 3.0 Coilover/ UCA install but in this case I can give credit where credit is due. The instructions ICON includes with this kit are extremely detailed and I am relieved that I don't have to do my own installation instructions .
.
If you're considering this kit, the instructions can be found here for you to browse: http://www.iconvehicledynamics.com/wp-content/uploads/2013/06/95120_instructions.pdf
Here are my thoughts and impressions of the install its self.
1. I DID NOT remove the bed, as others have suggested. Honestly I can't see why anyone would remove the bed for this install. There are 2 bolts that are a bit difficult to get at, but with a selection of socket extensions, a pivoting socket head and a little patience it's not a big deal. Also, ICON provides a flange head nut for those two bolts which makes holding them in place with a socket much easier. Again, little details make this kit.
I started by jacking up the rear of truck until the tires were off the ground, removed the rear wheels, and secured the truck with jack stands and wheel chocks.
During the entire install, I just sat under the truck "Indian style" and was able to work comfortably.
This was basically my view. I should also note that since I have the MBRP turn down exhaust, I didn't have to contend with removing the exhaust. The MBRP turn down does not interfere at all with this kit, it's like a foot away from being in the way.
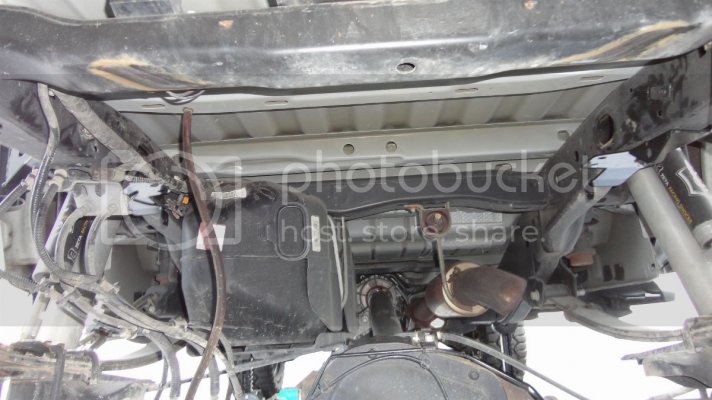
2. I have to admit that when I opened the box, I was little overwhelmed by all of the different sizes of nuts, bolts and washers to keep track of. Luckily, ICON clearly marks the parts bags #1, #2 and #3. Each hardware bag defines 3 phases of the installation according to the instructions. The installation actually goes very quickly once the main brackets are installed. And in reality, most of the bolts are either 1/2" x 1.25 or 1/2" x 1.50 so just make sure you know which is which and you'll move right along.
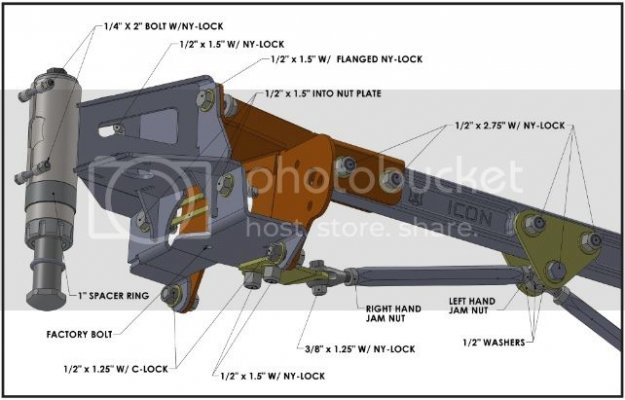
3. It's important not to tighten any of the bolts down on the main frame brackets until all of the bolts are in place. There is a tightening procedure outlined in the supplied instructions and I can reaffirm that you should follow that process. The brackets fit so snugly to the frame rails that you won't have much room to line up other holes if you have already tightened any of the bolts down. If you find that you need to maneuver the brackets to line up, you can use the handle of channel locks or something similar to stick through the bolt holes where the inner and outer frame brackets meet to pry slightly and line the holes up.
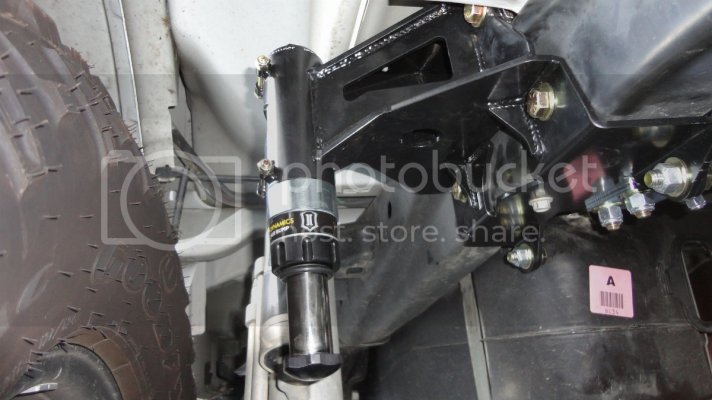
4. As I mentioned earlier, the fit and finish of this kit is exceptional. When you install the drivers side inner bracket, you need to pop the wiring harness and brake line retainers out of small holes in the frame. I was especially impressed with how the small 1/4" holes on the ICON kit lined up perfectly, allowing perfect alignment and re-installation of the factory retainers. With various factory variances and lots of room for error, it's clear that this kit is built with precision to fit so well.
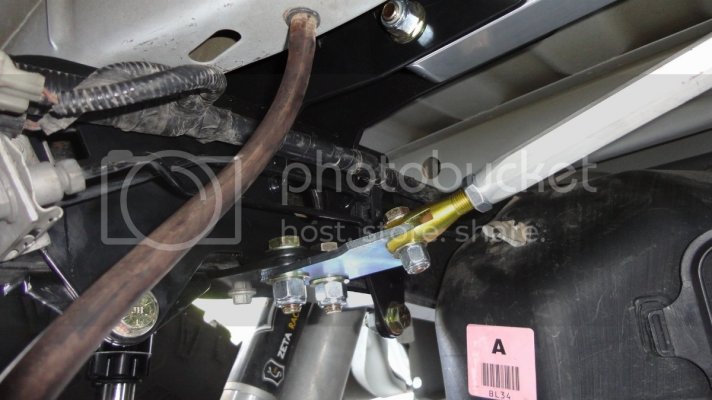
5. When installing the cross beam and throughout this installation I referenced the diagram above to make note of which way the bolt heads are facing. I'm not sure if it's of any significance, but I found myself using the diagram more than the written instructions once I had a grasp on how the installation came together.
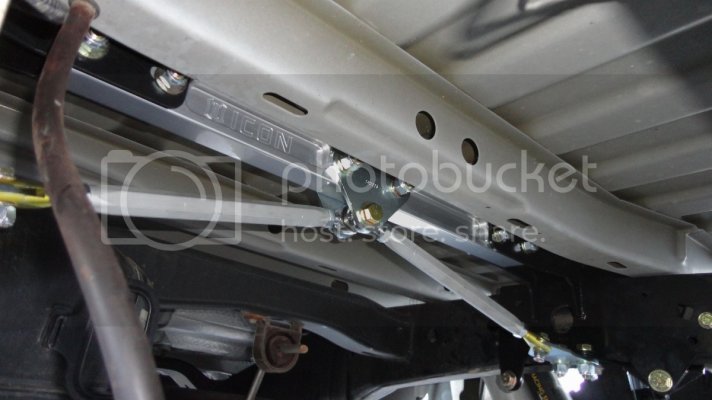
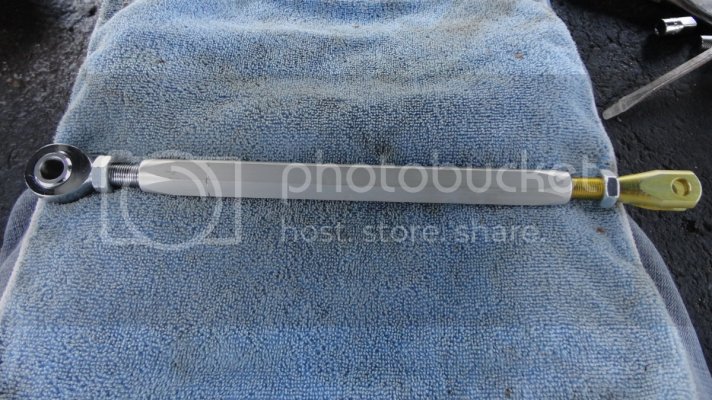
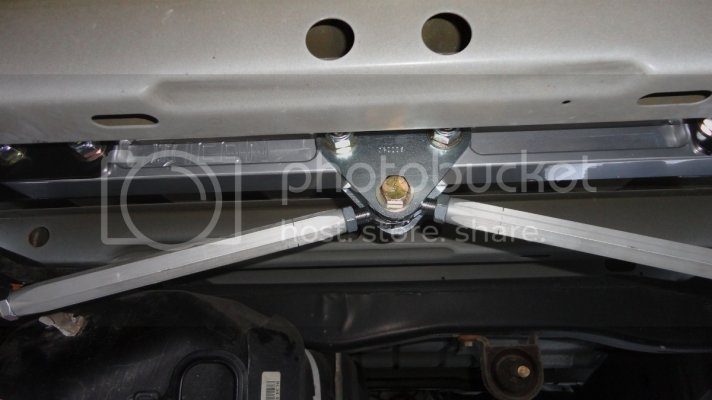
6. When assembling the tension rods, you will need to make note of the small notches on one side of the bar and 2 of the jam nuts. These identify the heim end side of the rod as being left hand threads. Your assembled rod should look like this (I used a little anti-seize on the threads):
I was a bit skeptical as to what these tension rods actually do, but it was apparent during the tensioning process that the bottom of the frame support clearly pulls in when you tighten the rods. Pretty cool how it really doesn't take much at all. A half turn either way on the tension bar and you can watch the frame twist in and out.
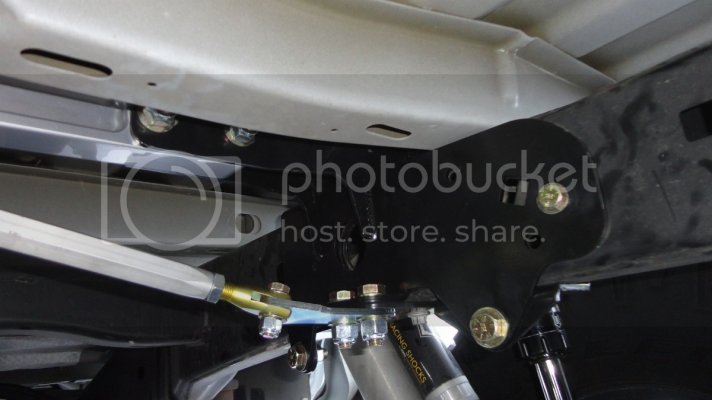
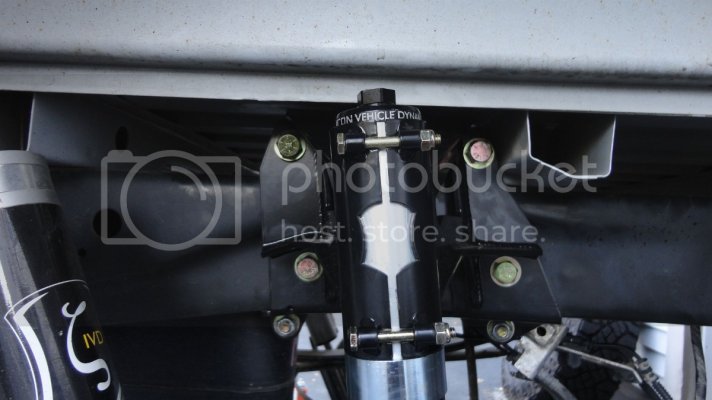
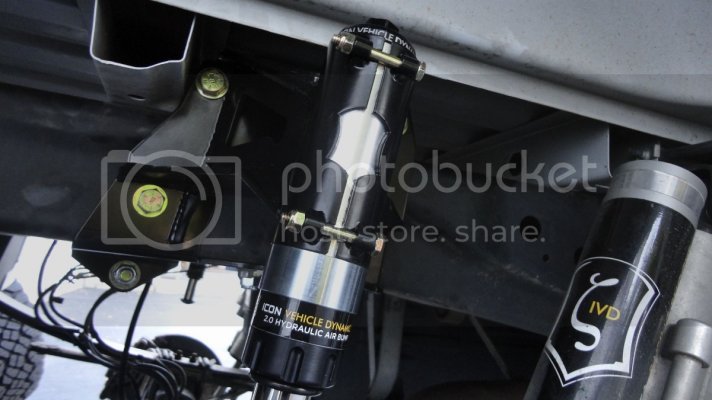
7. This is mentioned in the instructions, but it's important not to over-tighten the bolts which secure the bumpstops in to their sleeves or else it could effect how the bumpstop retracts. A tip for installing the bumps is to take a large flat head screw driver to spread the collar a bit and lube up the bump a little so it will slide in easier. Then just snug them down until you can't move the bumpstop by hand. I didn't pinch the collar together, I left a little space.
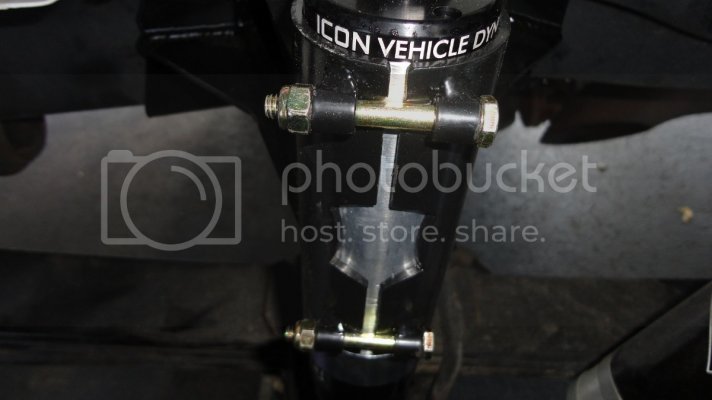
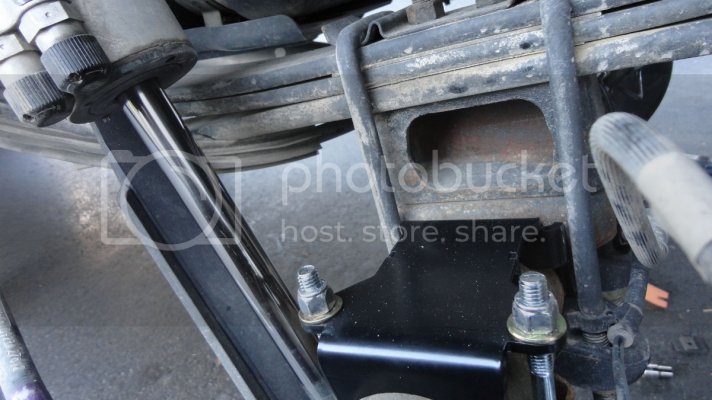
8. Here is ICON's solution for the striker plate. It's simple to install and effective. I believe it also works with aftermarket springs but I have the factory rear leafs. The strike pad hooks under the axle pad (where the factory block sits) and then bolts to the axle securely with a U bolt.
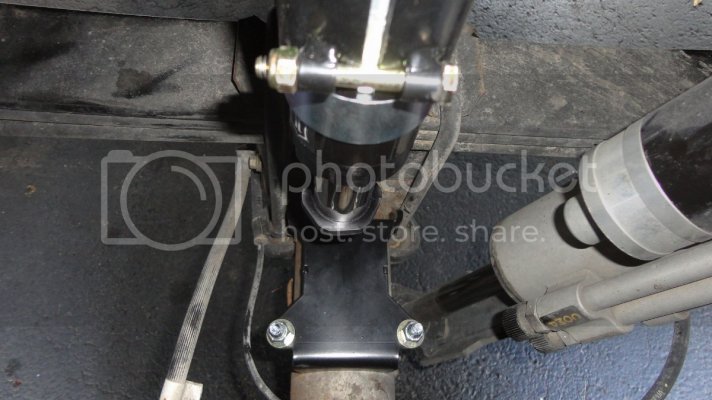
Overall, the installation took me about 4 hours. I'd say that's about average with hand tools. If you're a little less nimble, it might take longer and if you have air tools you could probably pull this off in 2-3 hours. The kit isn't difficult to install or understand, there's just a lot of bolts that need tightening!
I haven't had the chance to really test this kit out yet, but I plan on giving it a workout at Havoc in the Hills
I engaged in some fire road shenanigans, speed bumps, berm and couldn't get the pad to make contact while on the road. I remember there was some talk of whether or not the bumpstops would hit on the street and from what I can tell they won't. Even if they do it would take a pretty gnarly hit and still I can't see that it would be possible on the road or of any consequence.
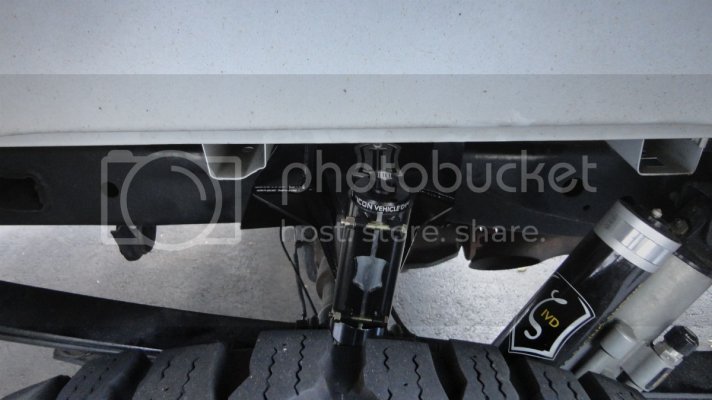
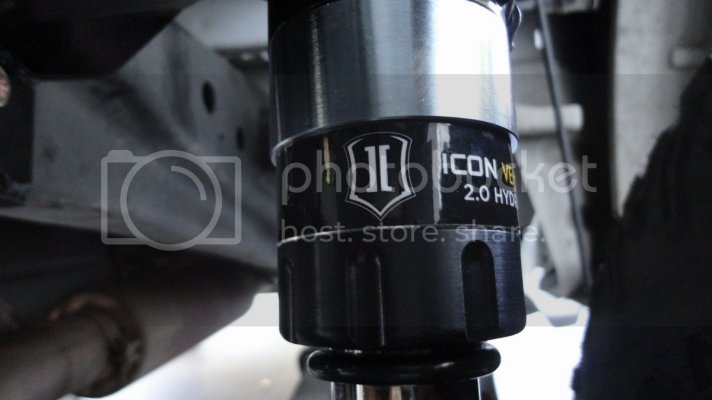
Beauty shots:
Available for sale through multiple FRF vendors: SDHQ, Raptor Addict, Outlaw Raptor, TMX, Freedom Motorsports, Krazy House Customs, and others.
Difficulty:
1 2 3 4 5 6 7 8 9 10
Time:
2-6 hours
I received and installed the ICON Hydraulic Bumpstop system late last week. I decided around the time of TRR '13 that I wanted a bumpstop kit after experiencing really for the first time how quickly things can go badly, especially when SPRSNK Rick marks the course.

I had the chance to ride along with Dylan from ICON during his initial testing of this kit, and I also spent time in the RPG truck, further experiencing the benefits of a bumpstop kit from the rear end control and added peace of mind.
This ICON kit is extremely impressive from the standpoint of initial overall quality and the obvious time that went in to the smallest details. The powder coat finish on the frame brackets, the welds, and the fitment really blew me away, and I mean that. The billet aluminum polished/clear anodized cross beam is a really nice piece too and as a whole this kit appears that it will withstand many New England winters from a corrosion standpoint.
I don't have a ton to add as far as the method of installation. I jabbed at ICON's instructions during my front 3.0 Coilover/ UCA install but in this case I can give credit where credit is due. The instructions ICON includes with this kit are extremely detailed and I am relieved that I don't have to do my own installation instructions
If you're considering this kit, the instructions can be found here for you to browse: http://www.iconvehicledynamics.com/wp-content/uploads/2013/06/95120_instructions.pdf
Here are my thoughts and impressions of the install its self.
1. I DID NOT remove the bed, as others have suggested. Honestly I can't see why anyone would remove the bed for this install. There are 2 bolts that are a bit difficult to get at, but with a selection of socket extensions, a pivoting socket head and a little patience it's not a big deal. Also, ICON provides a flange head nut for those two bolts which makes holding them in place with a socket much easier. Again, little details make this kit.
I started by jacking up the rear of truck until the tires were off the ground, removed the rear wheels, and secured the truck with jack stands and wheel chocks.
During the entire install, I just sat under the truck "Indian style" and was able to work comfortably.
This was basically my view. I should also note that since I have the MBRP turn down exhaust, I didn't have to contend with removing the exhaust. The MBRP turn down does not interfere at all with this kit, it's like a foot away from being in the way.

2. I have to admit that when I opened the box, I was little overwhelmed by all of the different sizes of nuts, bolts and washers to keep track of. Luckily, ICON clearly marks the parts bags #1, #2 and #3. Each hardware bag defines 3 phases of the installation according to the instructions. The installation actually goes very quickly once the main brackets are installed. And in reality, most of the bolts are either 1/2" x 1.25 or 1/2" x 1.50 so just make sure you know which is which and you'll move right along.

3. It's important not to tighten any of the bolts down on the main frame brackets until all of the bolts are in place. There is a tightening procedure outlined in the supplied instructions and I can reaffirm that you should follow that process. The brackets fit so snugly to the frame rails that you won't have much room to line up other holes if you have already tightened any of the bolts down. If you find that you need to maneuver the brackets to line up, you can use the handle of channel locks or something similar to stick through the bolt holes where the inner and outer frame brackets meet to pry slightly and line the holes up.

4. As I mentioned earlier, the fit and finish of this kit is exceptional. When you install the drivers side inner bracket, you need to pop the wiring harness and brake line retainers out of small holes in the frame. I was especially impressed with how the small 1/4" holes on the ICON kit lined up perfectly, allowing perfect alignment and re-installation of the factory retainers. With various factory variances and lots of room for error, it's clear that this kit is built with precision to fit so well.

5. When installing the cross beam and throughout this installation I referenced the diagram above to make note of which way the bolt heads are facing. I'm not sure if it's of any significance, but I found myself using the diagram more than the written instructions once I had a grasp on how the installation came together.

6. When assembling the tension rods, you will need to make note of the small notches on one side of the bar and 2 of the jam nuts. These identify the heim end side of the rod as being left hand threads. Your assembled rod should look like this (I used a little anti-seize on the threads):

I was a bit skeptical as to what these tension rods actually do, but it was apparent during the tensioning process that the bottom of the frame support clearly pulls in when you tighten the rods. Pretty cool how it really doesn't take much at all. A half turn either way on the tension bar and you can watch the frame twist in and out.

7. This is mentioned in the instructions, but it's important not to over-tighten the bolts which secure the bumpstops in to their sleeves or else it could effect how the bumpstop retracts. A tip for installing the bumps is to take a large flat head screw driver to spread the collar a bit and lube up the bump a little so it will slide in easier. Then just snug them down until you can't move the bumpstop by hand. I didn't pinch the collar together, I left a little space.

8. Here is ICON's solution for the striker plate. It's simple to install and effective. I believe it also works with aftermarket springs but I have the factory rear leafs. The strike pad hooks under the axle pad (where the factory block sits) and then bolts to the axle securely with a U bolt.


Overall, the installation took me about 4 hours. I'd say that's about average with hand tools. If you're a little less nimble, it might take longer and if you have air tools you could probably pull this off in 2-3 hours. The kit isn't difficult to install or understand, there's just a lot of bolts that need tightening!
I haven't had the chance to really test this kit out yet, but I plan on giving it a workout at Havoc in the Hills

I engaged in some fire road shenanigans, speed bumps, berm and couldn't get the pad to make contact while on the road. I remember there was some talk of whether or not the bumpstops would hit on the street and from what I can tell they won't. Even if they do it would take a pretty gnarly hit and still I can't see that it would be possible on the road or of any consequence.
Beauty shots:


