DIY - Stock Raptor 2.5 Shock Rebuild.

Disclaimer: Links on this page pointing to Amazon, eBay and other sites may include affiliate code. If you click them and make a purchase, we may earn a small commission.

Jefftopgun

Member
Joined
Feb 8, 2018
Posts
6
Reaction score
4
Ok I'm sorry I'm having issues, I've read all 28 pages so here goes.
Picked up a used set to rebuild, ordered all my parts, have tanked nitrogen and regulator I can being home from work. Threw the used rears on just to test em out. I installed them by hand which should have been my first indication, but didn't have my needles or anything yet, so I wanted to see how bad they were. Wellllll.....
They've got some bounce to them, rear end doesn't just pop back to center, its like it hunts ever so slightly.
Alright lets pull em off and adjust the precharge. I noticed if I put shaft on ground and lean onto the body, it compresses through about half of its travel pretty easily. Then I feel like I'm getting into the precharge and it has some pretty stout resistance. But if I push it all the way in, it gets a little stiffer and then stays in. They're is minimal pressure to push shaft back out, I kind of have to help slide it back out. And it only goes half way or so. I can pull it the rest of the way with some force, but there's almost a bubbling gurgling sound coming from the shock.
My take on this is im low on oil? Shocks turned out to have schraders on them so someone's been inside them. Again assuming they botched the rebuild. Building my spanner and t handles tomorrow so we'll see.

So aside from that.
Trying to make sure I've got the floating piston setup right.
So you have shock mounted in vice, everything removed 2 holes facing up. Fill the piggyback up (which will fill about half of shock tube up). Install floating piston (this to ensure no air gets in under the piston). Push this piston all the way down (which will nearly fill main body). Retract 1/4 inch or so from bottomed out (this being 1/4 inch from bottomed out on the crossover housing linking piggyback resivoir to shock body). Pour in the remainder of your shock oil. Should be nearly full on the shock body side. Install shaft and cap. Ensure bleed screws are open, add nitrogen, and close when any air is removed.
Making sure I have this so at full droop/extension, there should be between 1/4 and 1/8 inch of travel the floating piston has before bottoming out. At full compression the fluid is forced into the resivoir/piggyback section, which compresses the floating piston against the precharge, which is why it pops back out so quickly, and why its a bugger to install.
 

BenBB

FRF Supporting Member
Supporting Member
Joined
Apr 21, 2016
Posts
1,825
Reaction score
2,499
Location
Lots of different places
Ok I'm sorry I'm having issues, I've read all 28 pages so here goes.
Picked up a used set to rebuild, ordered all my parts, have tanked nitrogen and regulator I can being home from work. Threw the used rears on just to test em out. I installed them by hand which should have been my first indication, but didn't have my needles or anything yet, so I wanted to see how bad they were. Wellllll.....
They've got some bounce to them, rear end doesn't just pop back to center, its like it hunts ever so slightly.
Alright lets pull em off and adjust the precharge. I noticed if I put shaft on ground and lean onto the body, it compresses through about half of its travel pretty easily. Then I feel like I'm getting into the precharge and it has some pretty stout resistance. But if I push it all the way in, it gets a little stiffer and then stays in. They're is minimal pressure to push shaft back out, I kind of have to help slide it back out. And it only goes half way or so. I can pull it the rest of the way with some force, but there's almost a bubbling gurgling sound coming from the shock.
My take on this is im low on oil? Shocks turned out to have schraders on them so someone's been inside them. Again assuming they botched the rebuild. Building my spanner and t handles tomorrow so we'll see.

So aside from that.
Trying to make sure I've got the floating piston setup right.
So you have shock mounted in vice, everything removed 2 holes facing up. Fill the piggyback up (which will fill about half of shock tube up). Install floating piston (this to ensure no air gets in under the piston). Push this piston all the way down (which will nearly fill main body). Retract 1/4 inch or so from bottomed out (this being 1/4 inch from bottomed out on the crossover housing linking piggyback resivoir to shock body). Pour in the remainder of your shock oil. Should be nearly full on the shock body side. Install shaft and cap. Ensure bleed screws are open, add nitrogen, and close when any air is removed.
Making sure I have this so at full droop/extension, there should be between 1/4 and 1/8 inch of travel the floating piston has before bottoming out. At full compression the fluid is forced into the resivoir/piggyback section, which compresses the floating piston against the precharge, which is why it pops back out so quickly, and why its a bugger to install.

Sounds right to me, I'll find out for sure in a week or two when I do mine but planning the same exact procedure on the rears. Might shoot for more distance on the IFP from bottoming but on my first time around I'd rather have a little too much oil than not enough...
 

Kostiuk

Member
Joined
Jan 30, 2017
Posts
12
Reaction score
5
Location
Loveland,Co
So I rebuilt my rear shocks this weekend and I do have some info to add to the process. I thought it was pretty easy except for reinstalling the top cap on the shaft. The center seal did not want to go on and when it did it folded over. Apparently I am not the only one having this problem because I had these rebuilt through the exchange program and this is what one of them looked like.

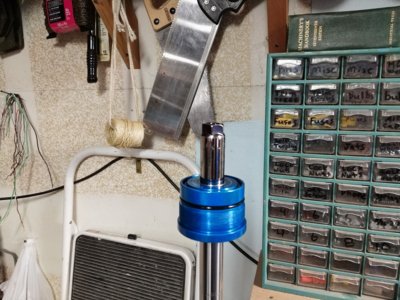
I came up with the idea to put something inside the top cap and then be able to push it straight on the shaft. I ended up finding a socket that measured .870 (the shaft is .875) Hard to explain but check out the pics. I also put a light amount of grease on the seals, the oil did not offer quite enough lubrication. If you just try and work it on you will have failures and there is no way to tell until you pull it off and see the seal folded over. I put the cap on and off several times and did not see any failures using the method I came up with. I should also mention I pushed the socket through the cap from the smaller tapered end of the socket.

Kevin K.
 

Attachments

  • IMG_20180317_134013 (3).jpg
    IMG_20180317_134013 (3).jpg
    94.5 KB · Views: 72
  • 2.jpg
    2.jpg
    196.6 KB · Views: 70
  • 3.jpg
    3.jpg
    189.8 KB · Views: 67
  • 4.jpg
    4.jpg
    228.3 KB · Views: 79
  • 6.jpg
    6.jpg
    226.4 KB · Views: 80
Last edited:

BenBB

FRF Supporting Member
Supporting Member
Joined
Apr 21, 2016
Posts
1,825
Reaction score
2,499
Location
Lots of different places
So I rebuilt my rear shocks this weekend and I do have some info to add to the process. I thought it was pretty easy except for reinstalling the top cap on the shaft. The center seal did not want to go on and when it did it folded over. Apparently I am not the only one having this problem because I had these rebuilt through the exchange program and this is what one of them looked like.

I came up with the idea to put something inside the top cap and then be able to push it straight on the shaft. I ended up finding a socket that measured .870 (the shaft is .875) Hard to explain but check out the pics. I also put a light amount of grease on the seals, the oil did not offer quite enough lubrication. If you just try and work it on you will have failures and there is no way to tell until you pull it off and see the seal folded over. I put the cap on and off several times and did not see any failures using the method I came up with. I should also mention I pushed the socket through the cap from the smaller tapered end of the socket.

Kevin K.

That's freaking genius. Glad I invested in a Shaft Bullet from Kartek when I was shopping around for all the parts and tools for this job. I'll find out Friday how it works:

how-to-rebuild-a-fox-shock.jpg
 
OP
OP
m3dragon

m3dragon

FRF Addict
Joined
Nov 28, 2012
Posts
1,308
Reaction score
1,372
Location
Orangevale
The other way is apply oil to the lip, then SLOWLY rotate the cap around the shaft. You are essentially rocking it around to the the seal over the lip.
 

Kostiuk

Member
Joined
Jan 30, 2017
Posts
12
Reaction score
5
Location
Loveland,Co
The other way is apply oil to the lip, then SLOWLY rotate the cap around the shaft. You are essentially rocking it around to the the seal over the lip.

That would be great if it actually worked all the time but clearly it does not based on the picture of the one I took apart that was rebuilt a year ago and has the center seal folded over.
That bullet looks like the ticket, wish I'd have known about that before and I can't believe everyone hasn't had this problem. I'll be interested to see if I have any of this on the front shocks.

Kevin K.
 
OP
OP
m3dragon

m3dragon

FRF Addict
Joined
Nov 28, 2012
Posts
1,308
Reaction score
1,372
Location
Orangevale
It does if you don't rush lol. Or do a whole lot, not saying I have.

A extreme way was file the lip slightly. Helped a guy in Germany who did that.
 

BenBB

FRF Supporting Member
Supporting Member
Joined
Apr 21, 2016
Posts
1,825
Reaction score
2,499
Location
Lots of different places
Ok got my front shocks done on Friday, thanks again @m3dragon for the thread, video, and help via text! Just a few tips for anyone else:

1. Print out those pdf's on the first page, they are invaluable. I had a panic moment after the shock was apart and I'm like "how the **** am I getting the floating piston and wear band down there in the eyelet" since the body diameter is larger than the bore that the FP lives in...technically you could remove the shock body from the bottom eyelet and shove it in, or you could go by the pdf and just use the bypass since it's the exact same diameter, brilliant!!

2. Make sure you have all the tools ahead of time. Probably redundant to most people but I was fortunate to do mine in a fully equipped shop with experienced mechanics that don't mind answering stupid questions or loaning me tools. I thought I had everything covered but wound up borrowing some vice soft jaws, a 30mm socket (the stock lower shock mounting nut is 30mm not 29mm like I thought it was), a 27mm wrench, and a 30mm wrench, aside from the 400 ft-lb. wrench I had already asked to borrow in advance. Most important is the wooden stick, I used the shit out of that thing. Doesn't matter if it's a dowel, broom handle, toilet plunger handle, whatever. I had a buddy at work weld a 1/2" bolt to a flat plate for a piston holder after I cut off the threads and beveled the edge. Also built a long pick out of some wire that was laying around. Needle came from Forged, little valve found in the shop. Amazon had the Ampro gland wrench I used on the shock cap, that worked great too. They also had the 2mm hex wrenches I used, in case I needed to whack one with a hammer to break loose.
JYOGiKz5ore7i6tvnhRme9mJSWs71NZ-Vo_rf3GqJ6M_C-JVvh2JW9x204VqP3S9eKjAB95jEoLys0Jf1209vf6n5I9LOnPkvl9J4n3KmDkzOD-OIKd6xeuhSh5cnM31To6fq7KI6UMwNP5zhZNktZ3EDSUvDcrwNFsD545geffAK5tFH5lOLMCrVKPUlZc2BswFP2PdvYEdh7yRXyS6BxwyA-ZHuGAZlaSEiLj3HxQNCJdqpmdeuK0BaxrelSpR6PNmI3XOtyg4pmMRfib7Z6GTV5eIqAsvsG99K63d1-f3VT-Eayd3k9T3eSarWAjVCXY4wapvzRuIS7KH_gVHJ3wriWgAat-EeXr36UEasdfpy6CkMgHXosNGRX0dfu2Ju8GtfQMG2YUzUDyBGtA7w-Qsjd6X2JAQSPl-U5JoEdrC50E7B9DK0X07xTZbH50_y5frepoCmb9zwD7YCKNL7mH7dYB53Cm33QT8zkP_ueR2JT7y4ojuJz_qNh6OzeE--yr9-wo-NJvZoPrqqiY8lwaF3DL07BSL_lpQEV6fcpdlQL2g2AqCjOpqxyt_hVNlPkk2k_2dJhcZkFAWwH5DTNnFjfYCrdD42ibWtts=w1472-h828-no


3. I'm sure it's been mentioned in this thread already, but my left front shock had pressurized the fluid side; I bled all the nitrogen and removed the hex plug and rubber pellet (since I was going back with schraders), cracked the bleeders open and both started bubbling like crazy. Nitrogen in the shock oil. Had I not opened he bleeders I would have taken a shower in shock oil...and it's no exaggeration that shit stinks. Imagine how gear oil has a kinda skunky smell? Shock oil is like a skunk drowning in a vat of rotting fish. I was able to just wait a while for the bleeders to vent the Nitrogen and all went good.
fpo5ZaNClQrJFYJUh3C-jf_7LIH9t9rgiheHze6TRrMGvlKqqOuxnBtAmHX0Y6RXzfN6abZlGxAy7NmQyvpq9IAnnOG58Kh3tCh4enUVoScYWHVgPqmL4NirAjKm0ed_OfPGgsGfnWyz7pKmwEJ9nCC9m_swCA5N2vALL1iGF-o2UqMElJnDbGdFu5isaqOAMcclJmiDfDZphSjb1weOnrw-hcNn3QmEwNbjKam9zMiWJpsrbyaJajsoZfmiQFPXdmhnTVSeXsigl-Wpr_x-2BVVd0X2APVJoCUzB9C6hgap4Bk2egp9iq_mQiKBP5kOmocOZfQO9Od6sVcdN6c6a3I0v0VfFJa-xBQ9tQZGOnAY_VlN8PZREHg3Z7MgdF7qusOiD-fQs_AoN_YuONQXI2TAOA-7w2HklZEpp1ClGCCSO64lrh0hfwamXYOEZbmDqZMf2v24E8qGwSkzkGFxAJFb-uZaXcrX7gtjGQV2KpGNuj6kid3NLwQIB_n1_RiZfH8JX7FqcnhJuvDStfgr0AAjQR3QTFAqFvwefWPeTIYjY_N5xZzLAQzk71AN19KlkS6x1_9993StR0a_XlVl-EGC_sjZ4YoWtrdn3fc=w1472-h828-no


4. The Shaft Bullet works GREAT. Like @Kostiuk, I lightly greased the seals inside the shock cap along with the shaft bullet and it slid right on; pulled it off and all the seals look perfect.
ZiiEM4Ol8xtit4i6X8cY_w4CmjgIEVdD8NV4LcoifBgFJ88o3e0rKd_0NBZu5ck7KwD50xH2E9CsQjT2BliPHruLBb2hxAi58kcpWD5ePHhVl4Sbo8TYztV4II9m8kRO-vdS89iLqLycjiERF2Tv62qky5prC9L0Syrurh8e5GT59VzODC-PYzQOBiF-axhSIpssNGWJAhDegA8dUPbOtFbsVx13HMhQ-UPBlV_fAMjQShY8mS5GbF9z9Z2A-biO971pblayOUJEgdWPLEKheY7rTx-hspirmzcXvjAmldIcfv10aVUGbiu_P3R3JYbLvPKAij3UR5Kk8r9G8hbWh8XeGlayANENiru62htS9UkDlvama9293LyzoHMqL7rNJq-35ZiRxtH3HlV4CAstASSFgVmv90Imzzp2CZ4O-6jH_6m6cnjzWQoQnAToTa8hX08q84wecHjQXdJgdHnxAIwPjJnn88XIgJ4SQiXhBjWxe6FR1672t1pXYZxQa55a6E3V1XN4NTaQfpjGXW5vnmmH_zro15dO9n-OwTLqJOurVTO3y7aXsmY6-X6pv4aQL_AhBhYwduV8GlShe2N4-n82l2sH73pntzBYnUM=w1472-h828-no


5. I don't have a Branick spring compressor, or $1500 or whatever they cost to buy one, I did call around locally and they wanted $40 per shock to remove the spring. Probably charge me the same to put it back on. For $126 I found one on ebay that works PERFECT. Thank you JiXing Zhe Jiang, the bigger lobster claws fit my coils just right.
4xrkJgiW7sX9EAL6ywV_eWZEhpKkhT84bmwM989-v_FLao3MTqR8Hj_8ih3tEMi-dzK9YK9H-ABd0YJff11VQNpL23ZiTfTVLiU_N0jAtn7w1EdlwWc8dz5GwU69kUxp1toDmb-WbnNd-9H9ld5y7NRSbxY9YuZ7NzWOuj48KtYjsXKvCG_n1nDdsrMdh1Z-t_p7zgHAruY0kW3fKyKRaCBZ34PSP1pMhKjoHgyHQtuCvS3e1d5_0jgQytYSgDSJ8hQn2-Ac1AhtFCJVvyoxu6D8EDFA0-du5ktZW6GpXrYvzhTC6aS9KlCfLV6vTNl7QQz2YsCYzrEZySmkXEuJHNUvfg2eOt1sO6lZtnr5QnogLfIRrJrrfd_-enOp_UyXH8OmorsFdCwR_ng6KQI6GAaBEoLu6glcKPLXBYk7AuDFn6DkcJKr134gLy6qqzrNWtS5CQuuJx23N1r_lpH8fhj7j6S_8_pLD6OFq9q7GAz-DlZ4cSk-x8hWP5-HZ4-sWV75MhPJt-FMBbkvQV8VP5UetOyC3d6pawQsgkRlufk-vySVvGbZ17LS7mbYZVoyqVn-ZMaXHcjci2JIcndl4BuPY3wlk2HiL4ZZSEo=w1472-h828-no


6. One thing I was worried about was getting that floating piston snap ring out of the groove it lives in. Following the instruction pdf worked perfect, and I'm not 100% sure but think the bottom of the snap ring groove might be beveled, like the attached pic. It may just be a shallow groove, I don't know for sure. Regardless, if you push down on the snap ring 180° from the open ends of the ring, it will flip down and you can easily retreive it with a loooong 90° pick, or some other wire or tool that's long enough to reach. Here's my MS paint attempt at illustration, go ahead and laugh I'm not an artist lol:
 

Attachments

  • FrontShock.jpg
    FrontShock.jpg
    36.3 KB · Views: 119

Cole2534

Member
Joined
Mar 9, 2018
Posts
11
Reaction score
8
Well, I lost the little ball bearing on the bleeder.

Anyone know the diameter?

Sent from my SM-G930R4 using Tapatalk
 
Top