What did you do to your Gen 3 today?

Disclaimer: Links on this page pointing to Amazon, eBay and other sites may include affiliate code. If you click them and make a purchase, we may earn a small commission.

Bozz

Royal Smart A$$
Supporting Member
Joined
Aug 24, 2020
Posts
7,632
Reaction score
32,644
Location
Nashville, TN
Installed an E&G console vault I picked up from @Nick@Apollo-Optics ‘s store.

I realized I was only using less than half the space for a flashlight and a few Magpul DAKA organizers full of charging cords and small items so when I saw this half console safe on another post it just made sense. Install is quick and pretty easy.

View attachment 430328
No. Just....no. Much too clean. You're doing it wrong.
 

BIGW0RM

Highest Access Member
Joined
Jan 22, 2018
Posts
307
Reaction score
268
Location
Pirate
Installed SPV BAJA DESIGNS S2 reverse lights with long harness. Reverse and or manually activated by uplifter switch.

The spv harness is far superior. Not a single splice or cut to anything. Perfect length harness too. I ran mine down inside my frame. Install wise, that part took the 2nd longest. Otherwise this would have been a 1hr job.

IMG_0575.jpegIMG_0570.jpegIMG_0571.jpegIMG_0572.jpegIMG_0576.jpeg
 
Last edited:

BIGW0RM

Highest Access Member
Joined
Jan 22, 2018
Posts
307
Reaction score
268
Location
Pirate
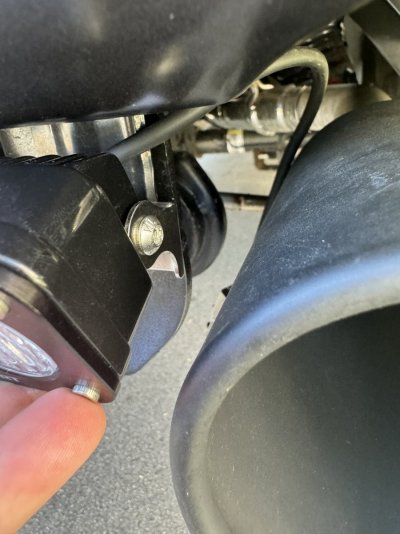
I will say that BD did not create a nice bracket. Reason being are the Allen head bolts. They should have used normal flat head hex nuts. That an open wrench could easily get too. They use allen head bolts. Which as you can see, you can’t tighten down easily. The big bolt that holds the bracket you can’t tighten down with the lights on the bracket. And the Allen’s head bolts cause the Allen head tool to hit the exhaust. This is a dumb design. To make matter worse. Baja designs put WAY too much loctight on the Allen bolts. So just trying to tighten them feels like you’re going to strip them out.

So my harness was top notch. The lights look nice. But the BD brackets and bolts are not well thought out at all. Complete cluster just trying to install three simple bolts. Just installing the lights to the mount took the longest by far.

Why on earth would they supply allen head bolts where you have NO room for an allen head tool? It was such a pain in the ass to get on. It’s doable. But I had to do the exhaust side bolts first, then the other side. The excessive loctight made it very difficult to get started. A normal bolt with a flat hex head would have been so much easier to tighten down. Not so much room with an Allen head and tool.


IMG_0551.jpeg
 

Attachments

  • IMG_0550.jpeg
    IMG_0550.jpeg
    157 KB · Views: 33
Last edited:

Wildcat1865

Member
Joined
Sep 9, 2023
Posts
21
Reaction score
54
Location
North Carolina
Installed Rigid 360 6” (Spot Pattern) lights on SPV heavy duty A-Pillar mounts today. I struggled HARD with the driver side bracket but once that got into place everything else was pretty easy with the SPV harness and their AUX 1 / Fog Light relocation harness so I could make use of Switch 1.

I’m starting to think the 4” antenna looks a bit strange next to the light so might be swapping for a 12” next I think. Probably overthinking it.

IMG_0050.jpeg
 

Baja Designs

Supporting Vendor
Supporting Vendor
Joined
Apr 12, 2012
Posts
1,775
Reaction score
1,250
I will say that BD did not create a nice bracket. Reason being are the Allen head bolts. They should have used normal flat head hex nuts. That an open wrench could easily get too. They use allen head bolts. Which as you can see, you can’t tighten down easily. The big bolt that holds the bracket you can’t tighten down with the lights on the bracket. And the Allen’s head bolts cause the Allen head tool to hit the exhaust. This is a dumb design. To make matter worse. Baja designs put WAY too much loctight on the Allen bolts. So just trying to tighten them feels like you’re going to strip them out.

So my harness was top notch. The lights look nice. But the BD brackets and bolts are not well thought out at all. Complete cluster just trying to install three simple bolts. Just installing the lights to the mount took the longest by far.

Why on earth would they supply allen head bolts where you have NO room for an allen head tool? It was such a pain in the ass to get on. It’s doable. But I had to do the exhaust side bolts first, then the other side. The excessive loctight made it very difficult to get started. A normal bolt with a flat hex head would have been so much easier to tighten down. Not so much room with an Allen head and tool.


View attachment 430603
Was a pair of Universal S2 purchased ? or did you purchase our Ford Raptor kit? Our Ford Raptor kit comes with 6x16 Reduced Flange head bolts to avoid these issues. As seen in the Install video these bolts are used to make the installation as easy as possible. These are also visible in our Installation instructions Baja Designs on steps 2 and 3. If you are missing the head bolts please reach out to me via PM or [email protected] and I'll get some sent immediately.
Best,
 

BIGW0RM

Highest Access Member
Joined
Jan 22, 2018
Posts
307
Reaction score
268
Location
Pirate
Was a pair of Universal S2 purchased ? or did you purchase our Ford Raptor kit? Our Ford Raptor kit comes with 6x16 Reduced Flange head bolts to avoid these issues. As seen in the Install video these bolts are used to make the installation as easy as possible. These are also visible in our Installation instructions Baja Designs on steps 2 and 3. If you are missing the head bolts please reach out to me via PM or [email protected] and I'll get some sent immediately.
Best,
Just saw this. OH! I see. Well it appears I do in fact have the universal kit that was mated with a custom harness. I did not know you have a universal kit. I just assumed what I had was specific for a raptor. Thank you for explaining that to me. My bad for assuming this was the raptor specific kit.

Out of curiosity. Why use two different types of bolts? Why not just use the flange nut for all kits?
 
Last edited:
Top