You are using an out of date browser. It may not display this or other websites correctly.
You should upgrade or use an alternative browser.
You should upgrade or use an alternative browser.
What did u do to your raptor today?
- Thread starter CAbimmer
- Start date
Disclaimer: Links on this page pointing to Amazon, eBay and other sites may include affiliate code. If you click them and make a purchase, we may earn a small commission.
TomDirt
FRF Addict
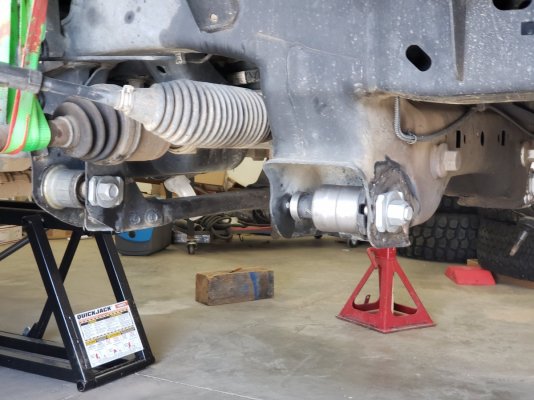
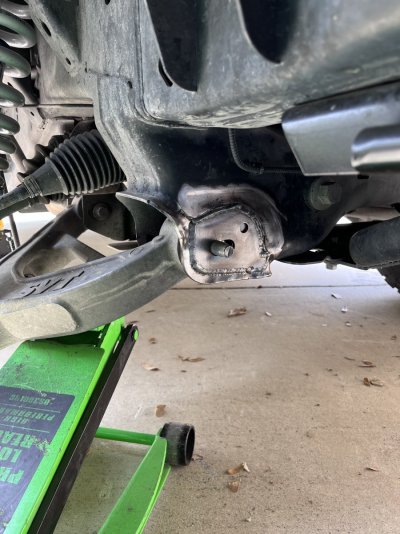
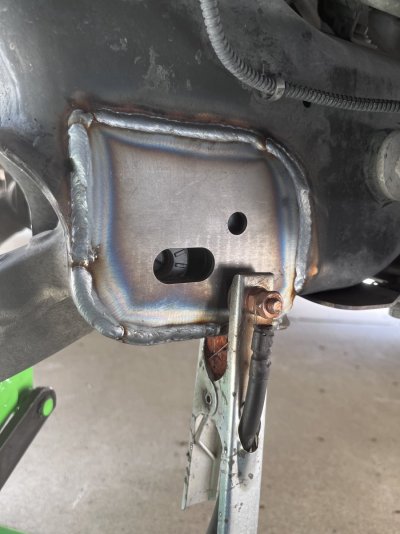
I had several people tell me to weld the cam tabs on also, apparently a few people have snapped the little alignment pin.Finished welding on new RPG alignment gussets and test-fit the new SPC Performance alignment cam sets. Dropping the diff housing next. There's a new Torsen front diff going in next.
The RPG Tripler kit is pretty impressive for the cost compared to the other options out there. Having 3x the steel thickness gives me more confidence to send it deep!
Attachments
Last edited:
TomDirt
FRF Addict
Whats the verdict on the Lee power steering install? I've heard there's some issues where having a tiny set of hands available makes it easier. And how much noise does it make compared to the oem steering system? Thx.surprisingly not that bad to install
View attachment 349994View attachment 349995View attachment 349996View attachment 349998
TomDirt
FRF Addict
I went with just the inner plate instead of both of the 1/8" plates; it looks like the thread length on those SPC bolts doesn't allow for much. I'm guessing 3 threads will be showing once it's aligned & properly torqued down. Add another 1/8" with the 2nd plate and maybe just a single thread beyond the nut sounds sketch. But I agree about welding those tabs on. The coating will come off quick & once its secured there's 1less thing to break.I had several people tell me to weld the cam tabs on also, apparently a few people have snapped the little alignment pin.
The RPG kit is pretty impressive for the cost compared to the other options out there.
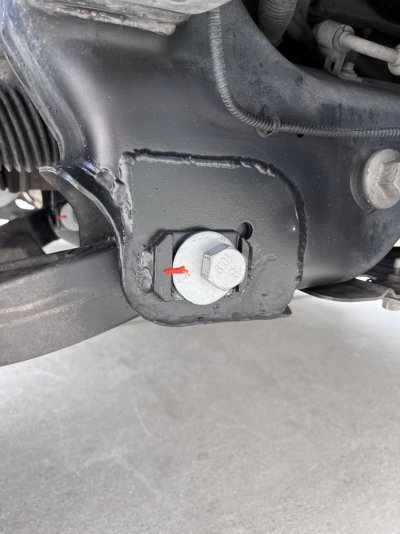
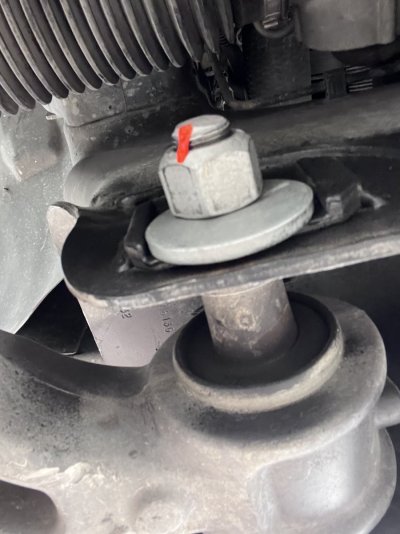
Here’s mine after being torqued to spec. In my mullings, any extra threads sticking out past this isn’t really any safer if it’s already that loose.I went with just the inner plate instead of both of the 1/8" plates; it looks like the thread length on those SPC bolts doesn't allow for much. I'm guessing 3 threads will be showing once it's aligned & properly torqued down. Add another 1/8" with the 2nd plate and maybe just a single thread beyond the nut sounds sketch. But I agree about welding those tabs on. The coating will come off quick & once its secured there's 1less thing to break.
I certainly wanted the extra strength all the way to the edge since I figured if it caught dirt, just the inner plate wasn’t going to do much better than stock.
Attachments
LED headlights, cleaned out my throttle body with b12 chemtool, cleaned the MAF sensor, then Seamfoamed the induction. Wanted to install my new Ford Racing exhaust tips but my back is out so it'll have to wait. Got them from another member on this forum.
Irregular F150
its terrain good sir!
LED headlights, cleaned out my throttle body with b12 chemtool, cleaned the MAF sensor, then Seamfoamed the induction. Wanted to install my new Ford Racing exhaust tips but my back is out so it'll have to wait. Got them from another member on this forum.
Howd you clean the tb, It just sprayed in or you take it out and do it?
Does the seafoam work good, ive heard of it but never tried it?
Ok done with the Qs lol
Yeah i saw the tips, those looked great. If they were black i would of jumped on them lol.
This time I just sprayed the tb in place... Stuck a long screwdriver or something down to open up the blade and sprayed the bejeezus out of it.Howd you clean the tb, It just sprayed in or you take it out and do it?
Does the seafoam work good, ive heard of it but never tried it?
Ok done with the Qs lol
Yeah i saw the tips, those looked great. If they were black i would of jumped on them lol.
I try to use the seafoam about once a year. Unhooked a vacuum line on the power booster and sucked it into the motor. About 1/3 can. Let it sit in the motor for a few minutes then restarted and revved the motor until all the white smoke stops blowing from the tailpipes. It did trigger a couple CEL codes, but deleted them with my programmer. IME, the Seafoam cleans out the carbon pretty well. I've used it on several vehicles for years.
I scraped my stock tips in Moab last year so the new tips should be a great fix.
Hilbilly Jack
Full Access Member
Seafoam has been out forever but definitely works! Used it in my 02 Harley truck. Suck it in through the brake booster line while running, let sit for 30 minutes, then fire it up, stomp on it and do a John Force burnout!!! LOLThis time I just sprayed the tb in place... Stuck a long screwdriver or something down to open up the blade and sprayed the bejeezus out of it.
I try to use the seafoam about once a year. Unhooked a vacuum line on the power booster and sucked it into the motor. About 1/3 can. Let it sit in the motor for a few minutes then restarted and revved the motor until all the white smoke stops blowing from the tailpipes. It did trigger a couple CEL codes, but deleted them with my programmer. IME, the Seafoam cleans out the carbon pretty well. I've used it on several vehicles for years.
I scraped my stock tips in Moab last year so the new tips should be a great fix.
Similar threads
- Replies
- 0
- Views
- 2K
- Replies
- 21
- Views
- 2K
- Replies
- 12
- Views
- 3K
- Replies
- 13
- Views
- 3K
Staff online
-
GriffinAdministrator
Members online
- pat247
- aparkins30
- noleraptor
- KOBRA2848
- 1BAD454SSv2
- ToadSmasher2K1
- Sage
- NachoRaptor37
- MNMRAPTOR
- B Scott
- carydean
- MurderedOutSVT
- cde21
- MSM
- chupicocconut
- Ken Felt
- SpiderBat2099
- tcm glx
- Kenny008
- Canuck714
- s4chico
- abrown
- scroper
- visionxp
- rfranklin1
- hyperspeed
- dvm
- DaveInMn
- US HWY 666
- flajax
- GLT
- Griffin
- jorukfundan
- W0n70n
- NEOGARAGE
- Bubbasuwannee
- NeoLeo
- SIN-7
- OldEngr
- dinocrisis
- Skyfrog
- OffroadAlliance.com
- Helopilot
- NickyF25
- TomDirt
- Swacer_2
- JeepSRT8
- Dain
- smurfslayer
- Pyro3601
Total: 4,256 (members: 115, guests: 4,141)


