bigrig
Full Access Member
RPG Stage 3 Rear Suspension
HD Deaver Leaf Springs, RPG Frame Support, Fox 2.5 Air Bumps and HD RPG Shackles
I should first note that following the directions RPG provides on YouTube is a good way to attack this project. There are a few things I felt were missing in their videos however, so I wanted to include them here.
The RPG videos are available in two parts:
https://www.youtube.com/watch?v=MFLQ639SP6I
https://www.youtube.com/watch?v=-22itQAmRK0
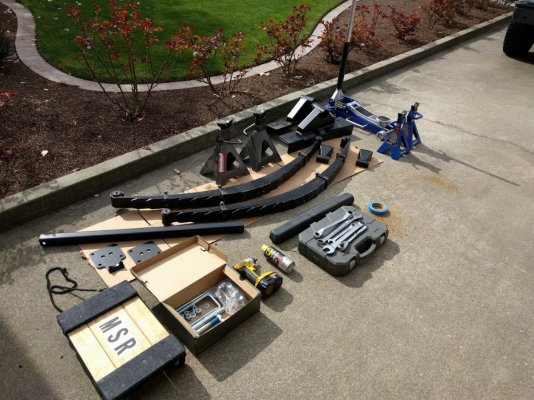
Tools I used:
Torque Specs
About My Experience with RPG:
The people at RPG are very helpful and thoughtful when it comes to discussing your truck. They take the time to figure out what you want your truck to do, and offer up options on how to proceed. I spoke with Corey, Andrew and Darick all of whom knew what they were talking about. I think I enjoyed speaking with Corey best since he seemed most enthusiastic about my plans. I also met Shane (I think that is his name) at the shop and he showed me around so I could check out the projects he was working on. If you get a chance, I would highly recommend visiting, they have some amazing work going on there.
Delivery of the new rear suspension was less than exceptional. It arrived in boxes that looked like they went through the ape baggage handler treatment. Luckily, all the parts are heavy duty, so nothing was really damaged, just scraped up in places.
First off, I noticed that the strike plates and the Fox bump stops were not included in my delivery. After speaking to the guys at RPG I found that the strike plates were forgotten, so they sent those out right away and I got them in a couple days. The bump stops however were on backorder because of a QA issue Fox was having in production. I had to follow up with RPG several times to get updates, I wish they were a little more proactive when it came to communicating the status of the situation. I eventually was able to pick them up at the shop about 3 weeks later. That was when I met Shane, he was nice enough to double check my install and confirm that I did it right. He also offered to install the bump stops since he had the 1 5/16” box end wrench there (I was going to use a huge crescent wrench).
Removal of the old suspension:
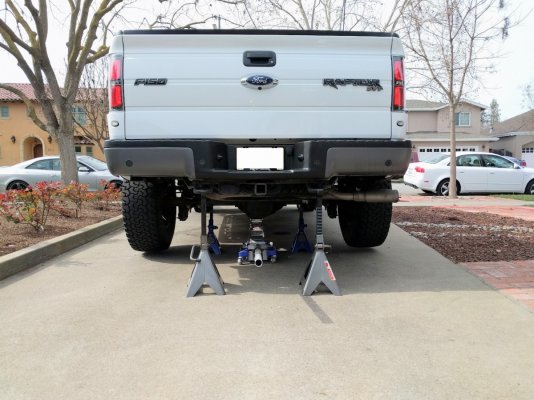
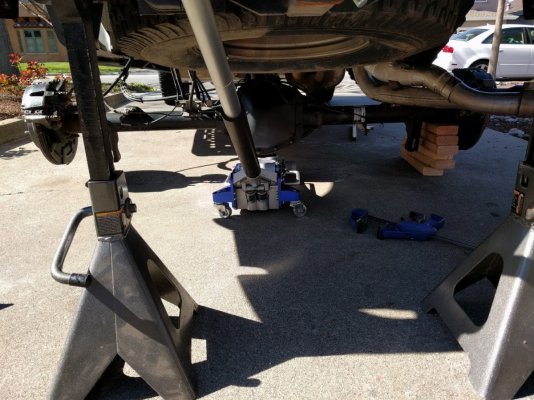
Jack the rear of the truck up as high as your floor jack will take it. I lifted it under the rear differential. I know some people say this is not a good way to lift your truck but I never have had trouble doing this so this is what I did, you can choose your own way of lifting the back of the truck, just know it should get it up high enough so you can extend your large jack stands all the way and put them under the rear hitch mounted tow hooks. Then put your small jackstands on their lowest level and put them under the rear axles.
Below is a picture of what not to do. You will see here that my jack stands under the axles are too high. This caused me trouble as I was trying to remove and install the leafs. You want those jack stands as low as they will go. You may, depending on how high you have the truck supported from the rear, need to go lower than what the jack stands will allow for proper clearance. Try to match the height of the jackstands in the RPG video.
Take off both wheels.
Remove the top shock nut (but not the bolt). This will require a 15mm socket and 18mm box end wrench.
Remove the bottom shock nut and bolt. This will also require a 15mm socket and 18mm box end wrench.
Remove the top shock bolt and the shock.
Remove the OEM bump stop, but keep the bolt for use later. This will require a 13mm deep drive socket.
Remove lower bolt on rear shackle but keep the bolt for use later. This will require a 18mm box end wrench and a 21mm deep drive socket. I had to use a breaker bar to get started. I also used a ball joint separator to get leverage to pull the bolt out.
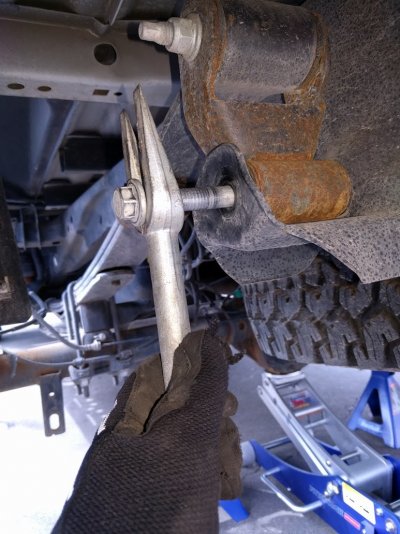
Remove nut but not bolt where the front of the leafs mount to the frame. This will require a 27mm box end wrench and a 24mm socket. I had to use a breaker bar to get started.
Remove U-bolts for leaf springs. This will require a 21mm socket.
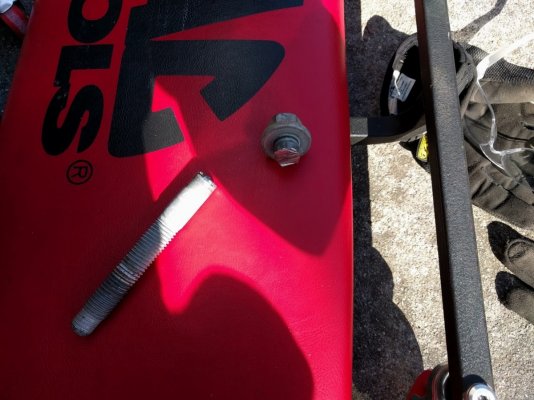
Remove the bolt where the front of the leaf springs mount to the frame. This is easy on the passenger side but the drivers side requires one of two approaches since it is impossible because the gas tank location relative to the bolt impedes its removal. You can either drop the gas tank or cut the bolt. I chose to cut the bolt. It took me 3 sawzall blades and about an hour to cut it.
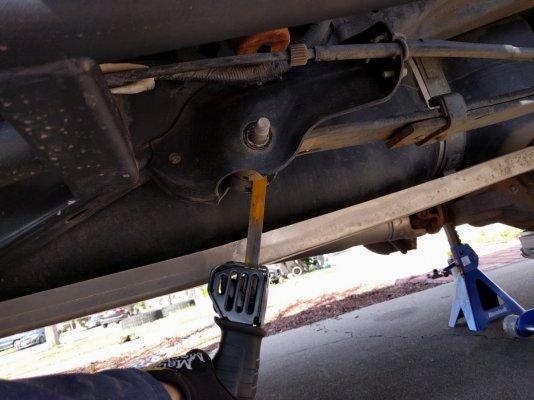
Detach the last three exhaust mounts. The RPG video says to only remove the last one but I think it made the leaf spring installation easier by removing the other two as well.
Remove the leaf springs by rocking/prying them out of the frame mounts. I had to lower the rear end even further than my jackstands would allow to ease the removal of the springs. I used a few pieces of wood to support the rear housing while doing this. This part wasn’t exactly precision automotive work, in hindsight I should have had larger jackstands on the far back tow hooks to get the truck up higher.
Installation of the new suspension:
As I noted before, the RPG online instructions are very good so this write up is supplemental to their video. I would recommend reading all the text overlays in the video however, it has helpful instructions that aren’t always called out in the audio of the video itself.
I have to note here how heavy the Deaver HD spring pack is. They are really tough to move around and required me to get help from another person to help get them in place.
Install the frame support per the RPG video instructions. I don’t have much to add to their instructions here but to reiterate that when you tape the bolt to your 28mm box end wrench, make sure it sticks really well. If the bolt falls off the wrench while you are tightening it, you will have to use a magnet to get the bolt back out of the frame (like I did). I should also note the fit and finish of the frame support was exceptional.
Install the top of the RPG HD shackles to the rear of the Deaver leaf spring pack. I had to hit the bushing sleeve with a rubber mallet to get it seated deep enough so the shackle would fit (on one shackle I had to file about a millimeter off the sleeve so it would fit).
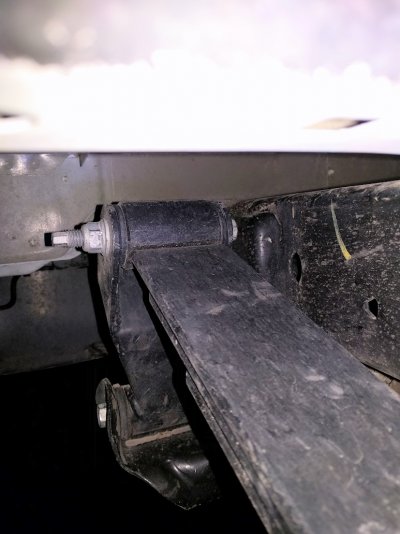
IMPORTANT: You must install the bolt so that the head of it will be closest to the frame when you install the leaf. Otherwise the bolt will bind on the frame after installation. Note the orientation of the bolts in the following picture of the passenger side:
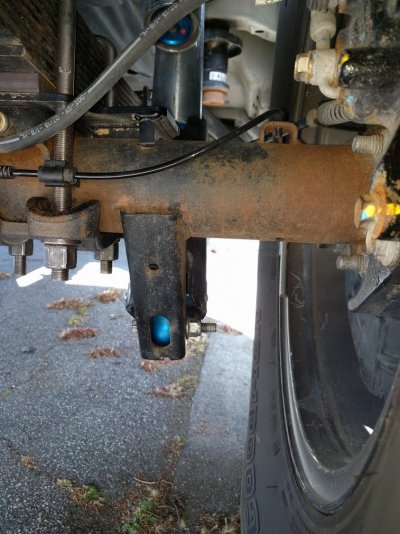
You will also want to install the lower shock bolt so the head is facing towards the differential. This will allow you to more easily torque down the leaf spring u-bolts as well as the shock bolt itself. Note the orientation of the bolt in the following picture:
The RPG video instructions says to first install the front of the leaf pack to the frame mount, but I had better luck with installing the rear first and then working my way forward. The forward bolts should now be inserted with the head of the bolt facing outwards (opposite to that of their original orientation). The big bolts on the frame support will require 27mm box end wrench (using the open end) on the inside and a 24mm socket on the outside bolt head.
When installing the front of the leaf pack to the frame on the driver’s side you may wish to grind down the end of the bolt to provide better clearance for the gas tank. I didn’t do this but in hindsight wish I did. It would have made it easier to get a wrench around the nut and would have made sure the bolt would never come in contact with the gas tank.
During the install I cleaned up everything with Chemical Guys Nonsense Invisible Cleaner and Chemical Guys Bare Bones. After everything was installed it looked like this:
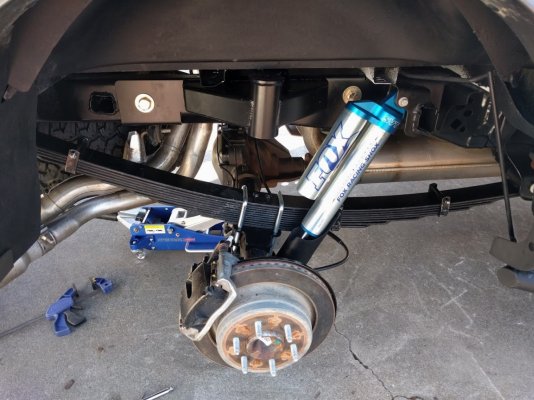
Final Thoughts
I immediately noticed an improvement in the driveability and feel of the truck on my first drive with the new springs. The truck also picked up a low vibration at slow speeds though (5mph - 15mpg). I figured it would work itself out as the springs settled in. After a trip to the desert where I put it through its paces, and a road trip to get there and back (over 500 miles), the vibration still didn’t go away. I called RPG and reported the issue, they set me up with some shims and new u-bolts. The shims change the angle of the differential when placed between the springs and the axle (theoretically fixing the vibration issue… which it did!). The unfortunate part about the shims is that they didn’t fit over the bolts holding the Deaver springs together. I had to cut new holes in them to accommodate the bolts. You can see the difference between the size of what came with the shim (right) to what I had to cut it to (left):
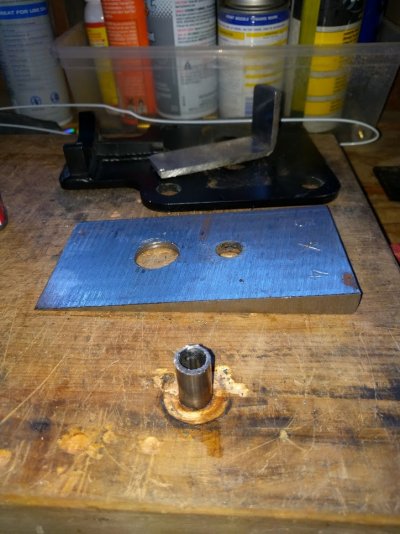
Here you can see the shim installed under the leaf springs.
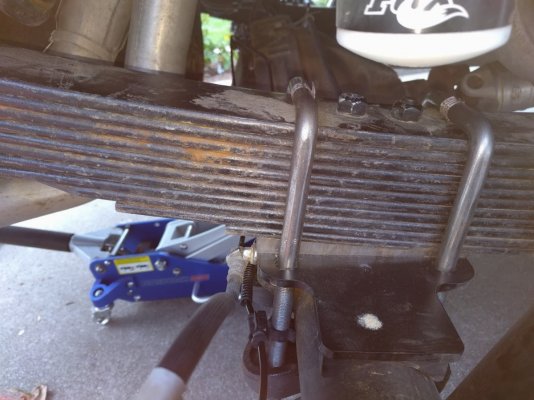
The rear end now sits a bit higher than it used to. I am not super excited about the new stance but I plan to install a couple of the Geiser Brothers Progressive Springs on the mid perch to even things out. But that post will come another day.
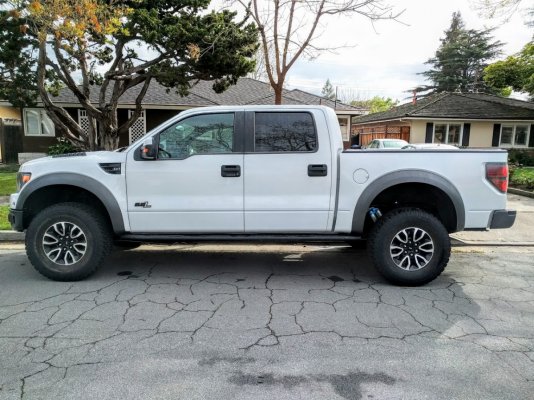
Measure twice, cut once, have fun, enjoy the process!
~bigrig
HD Deaver Leaf Springs, RPG Frame Support, Fox 2.5 Air Bumps and HD RPG Shackles
I should first note that following the directions RPG provides on YouTube is a good way to attack this project. There are a few things I felt were missing in their videos however, so I wanted to include them here.
The RPG videos are available in two parts:
https://www.youtube.com/watch?v=MFLQ639SP6I
https://www.youtube.com/watch?v=-22itQAmRK0

Tools I used:
- 28mm box end wrench
- 18mm box end wrench
- 22mm box end wrench
- 1 5/16” box end wrench
- 28mm deep impact socket
- 22mm deep impact socket
- 19mm deep impact socket
- 13mm deep impact socket
- Impact wrench (optional)
- Ball joint separator (optional)
- Magnet (optional)
- Taper line-up punch
- Sawzall/Metal cutting blades
- Hand file
- Jack
- 4 jackstands (two big, two small)
- Painters tape (more sticky the better)
- Torque wrench
- Torque spec sheet
Torque Specs
- Frame to rear shackle: 136 ft/lbs
- Rear shackle to leaf spring: 136 ft/lbs
- Leaf spring to front frame: 258 ft/lbs
- Fox bump stop bolt: 150 ft/lbs
- Jounce bumper bolt: 26 ft/lbs
- Leaf spring U-bolts. In a cross pattern progressing upwards: 25 ft/lbs, 50 ft/lbs, 75 ft/lbs, 110 ft/lbs.
About My Experience with RPG:
The people at RPG are very helpful and thoughtful when it comes to discussing your truck. They take the time to figure out what you want your truck to do, and offer up options on how to proceed. I spoke with Corey, Andrew and Darick all of whom knew what they were talking about. I think I enjoyed speaking with Corey best since he seemed most enthusiastic about my plans. I also met Shane (I think that is his name) at the shop and he showed me around so I could check out the projects he was working on. If you get a chance, I would highly recommend visiting, they have some amazing work going on there.
Delivery of the new rear suspension was less than exceptional. It arrived in boxes that looked like they went through the ape baggage handler treatment. Luckily, all the parts are heavy duty, so nothing was really damaged, just scraped up in places.
First off, I noticed that the strike plates and the Fox bump stops were not included in my delivery. After speaking to the guys at RPG I found that the strike plates were forgotten, so they sent those out right away and I got them in a couple days. The bump stops however were on backorder because of a QA issue Fox was having in production. I had to follow up with RPG several times to get updates, I wish they were a little more proactive when it came to communicating the status of the situation. I eventually was able to pick them up at the shop about 3 weeks later. That was when I met Shane, he was nice enough to double check my install and confirm that I did it right. He also offered to install the bump stops since he had the 1 5/16” box end wrench there (I was going to use a huge crescent wrench).
Removal of the old suspension:
Jack the rear of the truck up as high as your floor jack will take it. I lifted it under the rear differential. I know some people say this is not a good way to lift your truck but I never have had trouble doing this so this is what I did, you can choose your own way of lifting the back of the truck, just know it should get it up high enough so you can extend your large jack stands all the way and put them under the rear hitch mounted tow hooks. Then put your small jackstands on their lowest level and put them under the rear axles.
Below is a picture of what not to do. You will see here that my jack stands under the axles are too high. This caused me trouble as I was trying to remove and install the leafs. You want those jack stands as low as they will go. You may, depending on how high you have the truck supported from the rear, need to go lower than what the jack stands will allow for proper clearance. Try to match the height of the jackstands in the RPG video.

Take off both wheels.
Remove the top shock nut (but not the bolt). This will require a 15mm socket and 18mm box end wrench.
Remove the bottom shock nut and bolt. This will also require a 15mm socket and 18mm box end wrench.
Remove the top shock bolt and the shock.
Remove the OEM bump stop, but keep the bolt for use later. This will require a 13mm deep drive socket.
Remove lower bolt on rear shackle but keep the bolt for use later. This will require a 18mm box end wrench and a 21mm deep drive socket. I had to use a breaker bar to get started. I also used a ball joint separator to get leverage to pull the bolt out.

Remove nut but not bolt where the front of the leafs mount to the frame. This will require a 27mm box end wrench and a 24mm socket. I had to use a breaker bar to get started.
Remove U-bolts for leaf springs. This will require a 21mm socket.
Remove the bolt where the front of the leaf springs mount to the frame. This is easy on the passenger side but the drivers side requires one of two approaches since it is impossible because the gas tank location relative to the bolt impedes its removal. You can either drop the gas tank or cut the bolt. I chose to cut the bolt. It took me 3 sawzall blades and about an hour to cut it.


Detach the last three exhaust mounts. The RPG video says to only remove the last one but I think it made the leaf spring installation easier by removing the other two as well.
Remove the leaf springs by rocking/prying them out of the frame mounts. I had to lower the rear end even further than my jackstands would allow to ease the removal of the springs. I used a few pieces of wood to support the rear housing while doing this. This part wasn’t exactly precision automotive work, in hindsight I should have had larger jackstands on the far back tow hooks to get the truck up higher.

Installation of the new suspension:
As I noted before, the RPG online instructions are very good so this write up is supplemental to their video. I would recommend reading all the text overlays in the video however, it has helpful instructions that aren’t always called out in the audio of the video itself.
I have to note here how heavy the Deaver HD spring pack is. They are really tough to move around and required me to get help from another person to help get them in place.
Install the frame support per the RPG video instructions. I don’t have much to add to their instructions here but to reiterate that when you tape the bolt to your 28mm box end wrench, make sure it sticks really well. If the bolt falls off the wrench while you are tightening it, you will have to use a magnet to get the bolt back out of the frame (like I did). I should also note the fit and finish of the frame support was exceptional.
Install the top of the RPG HD shackles to the rear of the Deaver leaf spring pack. I had to hit the bushing sleeve with a rubber mallet to get it seated deep enough so the shackle would fit (on one shackle I had to file about a millimeter off the sleeve so it would fit).
IMPORTANT: You must install the bolt so that the head of it will be closest to the frame when you install the leaf. Otherwise the bolt will bind on the frame after installation. Note the orientation of the bolts in the following picture of the passenger side:

You will also want to install the lower shock bolt so the head is facing towards the differential. This will allow you to more easily torque down the leaf spring u-bolts as well as the shock bolt itself. Note the orientation of the bolt in the following picture:

The RPG video instructions says to first install the front of the leaf pack to the frame mount, but I had better luck with installing the rear first and then working my way forward. The forward bolts should now be inserted with the head of the bolt facing outwards (opposite to that of their original orientation). The big bolts on the frame support will require 27mm box end wrench (using the open end) on the inside and a 24mm socket on the outside bolt head.
When installing the front of the leaf pack to the frame on the driver’s side you may wish to grind down the end of the bolt to provide better clearance for the gas tank. I didn’t do this but in hindsight wish I did. It would have made it easier to get a wrench around the nut and would have made sure the bolt would never come in contact with the gas tank.
During the install I cleaned up everything with Chemical Guys Nonsense Invisible Cleaner and Chemical Guys Bare Bones. After everything was installed it looked like this:

Final Thoughts
I immediately noticed an improvement in the driveability and feel of the truck on my first drive with the new springs. The truck also picked up a low vibration at slow speeds though (5mph - 15mpg). I figured it would work itself out as the springs settled in. After a trip to the desert where I put it through its paces, and a road trip to get there and back (over 500 miles), the vibration still didn’t go away. I called RPG and reported the issue, they set me up with some shims and new u-bolts. The shims change the angle of the differential when placed between the springs and the axle (theoretically fixing the vibration issue… which it did!). The unfortunate part about the shims is that they didn’t fit over the bolts holding the Deaver springs together. I had to cut new holes in them to accommodate the bolts. You can see the difference between the size of what came with the shim (right) to what I had to cut it to (left):

Here you can see the shim installed under the leaf springs.

The rear end now sits a bit higher than it used to. I am not super excited about the new stance but I plan to install a couple of the Geiser Brothers Progressive Springs on the mid perch to even things out. But that post will come another day.

Measure twice, cut once, have fun, enjoy the process!
~bigrig


