Rigid 20" Lightbar & Duallys - Installation Instructions

Disclaimer: Links on this page pointing to Amazon, eBay and other sites may include affiliate code. If you click them and make a purchase, we may earn a small commission.

Pynenut

Full Access Member
Joined
Jul 5, 2012
Posts
702
Reaction score
148
Location
Las Vegas, NV
I should have my 20" LED bar here any day now and I have a quick question. What type of drill bit should I use to drill the 1/2 inch hole to mount the bracket? Will any bit that goes through metal do the job or is there a special piece I should use?
 

iSurvive

FRF Addict
Joined
Feb 26, 2012
Posts
1,272
Reaction score
780
Location
Highlands Ranch, CO
I should have my 20" LED bar here any day now and I have a quick question. What type of drill bit should I use to drill the 1/2 inch hole to mount the bracket? Will any bit that goes through metal do the job or is there a special piece I should use?

I used a drill bit made for metal, but it's not very thick metal. Measure 10 times and drill once!!

If you found the tips on NOT removing the bumperettes, you can use the same drill bit to drill holes on the inside of each bumperette. I used this method and it was easy and looks fantastic.
 

justvettn

FRF Addict
Joined
Feb 9, 2012
Posts
4,316
Reaction score
890
Location
GTA
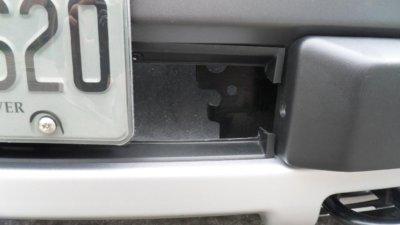
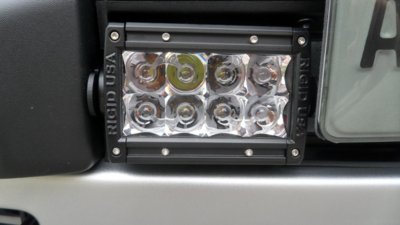
When I ordered my lights, I didn't think that I would want to relocate my license plate for some reason, So I ordered the two 4" Raptor kit that has a light on ether side of the license plate. So far not that happy how every thing is fitting together. When the licence plate is in place it hides part of the lights, so I think i should cut the license bracket down to size. Also it would have been nice if the bracket was just a little bit wider to keep the lights as close as possible to the bumperets , hopefully I can bend the frame to fit better? Has anyone else installed this kit?
 

iSurvive

FRF Addict
Joined
Feb 26, 2012
Posts
1,272
Reaction score
780
Location
Highlands Ranch, CO
I was in the same boat when I thought about the license plate, but after seeing others relocate theirs - I moved mine and bought the 20" Rigid. Two 4" a 20" do not make. :)

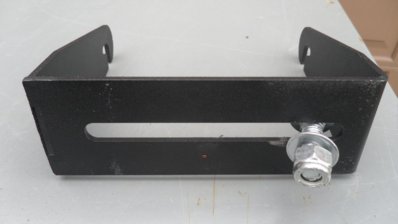
My first design was to install the hidden winch mount and winch, with 4" Rigids on each side. Then there is a license plate mount that clips onto the winch rollers. This is still my ultimate choice and may do this in the future.

OK, so here's my advise: Cut the bracket in half, or even remove the whole section between the two 4" brackets. Mount the 4" brackets with one bolt each. I think if you mount them tight enough they will stay in place.

You could also drill a second hole an inch away from the first hole - then use two bolts for each 4" section. Since the bracket has a long slot for mounting, I think there is room for two bolts side by side.

before: |__|_________|__| after: |__| |__|
 

justvettn

FRF Addict
Joined
Feb 9, 2012
Posts
4,316
Reaction score
890
Location
GTA
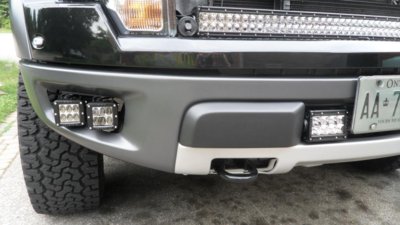
Good thinking! Thanks that should work, I drilled my holes big enough in the bumperets so that the whole nut and bolt fits inside and disappears. This may turn out well after-all. I also love the idea of having a winch with the lights on doth sides.
 

iSurvive

FRF Addict
Joined
Feb 26, 2012
Posts
1,272
Reaction score
780
Location
Highlands Ranch, CO
Here's a mock-up of what I tried to explain with words:

3732-cut-bracket.jpg


If you drilled 1/2" holes in the bumperettes, the whole nut and bolt fit in perfectly.


Here's the winch mount:

3748-mount-only.jpg


Here's the winch mount installed:

3745-winch.jpg


Here's the Warn winch with "rollers":

3746-warn-winch.jpg


Here's the license plate mount for the winch:

3747-winch-plate-mount.jpg


I don't know if Rigid 4" lights would fit, or if it would require Rigid Dually lights (about 3" wide).

OK, now you owe me a trip to "For Your Eyes Only" or "The Brass Rail". I fell in love with a Romanian girl at the first club!! Fond memories!
 

justvettn

FRF Addict
Joined
Feb 9, 2012
Posts
4,316
Reaction score
890
Location
GTA
Thanks ISurvive you are a great contributor to this forum!
This is how it looks so far.
 

Attachments

  • SAM_6955.jpg
    SAM_6955.jpg
    89 KB · Views: 202
  • SAM_6956.jpg
    SAM_6956.jpg
    94.8 KB · Views: 192
  • SAM_6958.jpg
    SAM_6958.jpg
    95.2 KB · Views: 189
  • SAM_6960.jpg
    SAM_6960.jpg
    98 KB · Views: 430

iSurvive

FRF Addict
Joined
Feb 26, 2012
Posts
1,272
Reaction score
780
Location
Highlands Ranch, CO
Thanks ISurvive you are a great contributor to this forum!
This is how it looks so far.

:happy107:

Damn, you frick'n knocked it out of the park!! Really nice work!

Glad I could help. I hate when something doesn't work the way I want it to, so I always find ways to have it work MY WAY. I also don't care for rig'n something up unless it still looks perfect. The devil's in the details!

Cheers!
 
Top