Rigid 20" Lightbar & Duallys - Installation Instructions

Disclaimer: Links on this page pointing to Amazon, eBay and other sites may include affiliate code. If you click them and make a purchase, we may earn a small commission.

corradobomb

Member
Joined
Feb 4, 2013
Posts
1
Reaction score
0
I installed my 20" Rigid this past weekend. I will only cover the things that I did a little bit differently.

I purchased the generic Rigid that comes with the generic, non-Raptor specific wiring harness. Rather than hack up the included harness, I made my own. I bought the wire (14 gauge with nice, thick insulation), 1/4" split loom and Deutsch connector from Jegs. I bought ring terminals from a local electronics store. I measured everything out, cut the wires and built the male side of the connector. Next I installed the ring connector (for the ground) with solder and heatshring, installed split loom and then zip tied it every 6"-8". Then I installed the harness and zip tied it to the other harnesses under the hood on the passenger side.

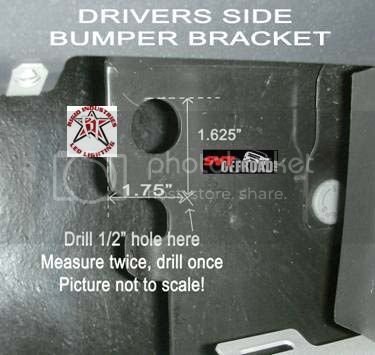
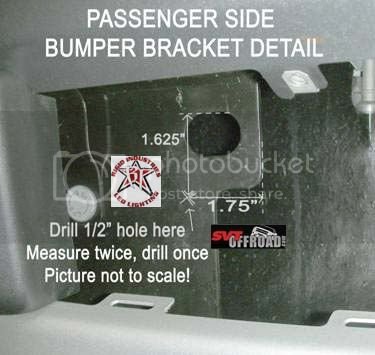
I mocked up the mount and compared it to the pics Dan posted.
10-DriversSideBumperBracketcopy.jpg

09-PassengerSideBumperBracketDet-1.jpg

I noticed that there was more room to move the holes further away from the edge. Instead of using the 1.75" lateral dimensions shown above, I used 2". In addition, I ditched the included carriage bolts and used grade 8 3/8" bolt and washers. This also allowed me to drill a 3/8" hole instead of a 1/2" hole. I did use the include nyloc nuts. I like this setup much better.

The last thing I did differently, I think some others have mentioned as well. I temp installed the bracket and then marked the location for my clearance holes on the bump pads. Instead of slotting as recommended, I drilled a 1/2" hole with a unibit. I assembled the light with the light to mount nuts loose. Next, I inserted the driver's side light bolt into the clearance hole, pushed it all of the way in and the inserted the passenger side. I did not tighten these until I adjusted the light.

Do you have any pictures of this last process? Some installs look cleaner than others, I think with the half inch drilled out of the bumperettes, this might be the case
 

GeorgiaRaptor

Full Access Member
Joined
Jan 2, 2012
Posts
65
Reaction score
0
Location
Athens GA
I know nothing about wiring......

Ok, I searched this whole thread and maybe the reason my question is not addressed is because it is so obvious.......but I just got my 20" light bar and 2 sets of D-2's.
My question is this.....can I use the Raptor switches as a "master" on/off for the bar and fogs (one for each one) but then have them wired into the high (bar) and low (fogs) beam factory wiring? The intent of this would be to disable the rigid auxiliary lights when driving on road in traffic and use the up fitter Raptor switches to turn them on when off road or on lonely dirt roads. The advantage I see to this is that when I turn them off- they are off. But when they are switched on the 20" light bar would act as an auxiliary high beam light and the fogs would work like factory fogs.....I.e. they would be on when low beams are on and would go off on high beam when the 20" bar came on.....
I apologize if this is a stupid question?!!
Thanks
 

iSurvive

FRF Addict
Joined
Feb 26, 2012
Posts
1,272
Reaction score
780
Location
Highlands Ranch, CO
Sounds like a complicated install. I understand your concept, but I would just leave all of the lights on when off road. Why turn off the fogs? If you want some distinction with the lights, have one set amber (great for snow and dust).

Someone with more electrical knowledge will have to answer your hi-low beam question.
 

bosssho

Full Access Member
Joined
Dec 1, 2013
Posts
287
Reaction score
46
Location
Boston, MA
What do you guys think of the lights POST install? I assume the first thing you all did was try them out on a dark stretch of road or off road? Curious to here if your expectations have been met or not....
 

iSurvive

FRF Addict
Joined
Feb 26, 2012
Posts
1,272
Reaction score
780
Location
Highlands Ranch, CO
What do you guys think of the lights POST install? I assume the first thing you all did was try them out on a dark stretch of road or off road? Curious to here if your expectations have been met or not....

The Rigid 20" puts out an amazing amount of light, specially for a somewhat small package. The 4 Dually's are bright, but they don't have the concentration or throw of the 20".

My 40" takes it up a notch, and I could probably run at night with just the 40". Although best for straight trails where spread isn't as important. The more sharp turns, the harder to see them ahead of time at high speed.

My 50" is really all I need on night runs. It goes so far forward that you get spread at medium distance for catching those corners and any possible near-trail obstacles. The biggest thing missing is lighting for close up things to the left and right of the truck. I added cornering lights just in front of the front wheel wells. These cover a 45 degree pattern from the front door to the headlight.

I think the new Rigid Radius light bars will solve a lot of the light spread issues (at least if you like driving in the pitch black in the desert).
 

bosssho

Full Access Member
Joined
Dec 1, 2013
Posts
287
Reaction score
46
Location
Boston, MA
I have the 10" SR 91061 and 2 Dually D2s on my Titan's brush bar and they are pretty Amazing. I got the Raptor kit and I have to say I am NOT blown away w/the light output at all. I am Happy with it, but let down compared to what the Titan's set up is putting out...distance and intensity wise....

All I can think of is that on the Raptor the lights are like 1.5' to 2' lower in the bottom grill vs. on the Titan where they are top mounted on the brush bar's tubes....

Thoughts???

Also, I did not go with the behind the grill 40'' bar yet on the Raptor b/c I wanted to see how this set up as is would do...
 
Last edited:

HarkinBanks

Member
Joined
Mar 10, 2013
Posts
30
Reaction score
7
Location
Wydaho
Any input/reply on this?

This is exactly what I want to do. Why? Such that I can run the lights at night, in the Fall & Winter on the backroads in MT, ID & WY to light up the road. As an example, 2 days ago coming home from skiing at Teton Village, WY, 6 moose & 2 whitetail ran across the road in front of me. I want to be able to light up the road such that I can see the road way out in front of me along with the barrow pits, but I want to be able to hit my low beams and have all the lights turn off. And FYI, I have a 2013 Screw w/ HID's.

Any help would be greatly appreciated.

I'm wondering if I just go a local aftermarket shop and tell them what how I want the lights to work and then just let them figure it out.

Thanks in advance.

HB

Ok, I searched this whole thread and maybe the reason my question is not addressed is because it is so obvious.......but I just got my 20" light bar and 2 sets of D-2's.
My question is this.....can I use the Raptor switches as a "master" on/off for the bar and fogs (one for each one) but then have them wired into the high (bar) and low (fogs) beam factory wiring? The intent of this would be to disable the rigid auxiliary lights when driving on road in traffic and use the up fitter Raptor switches to turn them on when off road or on lonely dirt roads. The advantage I see to this is that when I turn them off- they are off. But when they are switched on the 20" light bar would act as an auxiliary high beam light and the fogs would work like factory fogs.....I.e. they would be on when low beams are on and would go off on high beam when the 20" bar came on.....
I apologize if this is a stupid question?!!
Thanks
 
Top