Quality Bolts

Disclaimer: Links on this page pointing to Amazon, eBay and other sites may include affiliate code. If you click them and make a purchase, we may earn a small commission.

SurfRaptor

FRF Addict
Joined
Dec 28, 2019
Posts
1,173
Reaction score
744
Location
Newport Beach CA
Its the lower bolt bear the bottom of the center console near the seat track. Did you mod yours to put a sandwich plate in requiring prying and lifting the bottom up a bit from the floor? The 15-20 model does that, I wasn’t happy with the self tapping.
I just noticed I never replied to this message. Sorry, I didn't see it. I didn't put anything in, just the self-tapping screws. Talk to me more about this plate. I love extra added security.
 

mmayo

Full Access Member
Joined
Mar 24, 2018
Posts
143
Reaction score
68
Location
Texas
Same - it’s too easy to rip out with the self tapping screws. I went with 1/4 longer screws but would like to have a plate on the bottom side with bolts facing up or an expanding screw.
 

SurfRaptor

FRF Addict
Joined
Dec 28, 2019
Posts
1,173
Reaction score
744
Location
Newport Beach CA
Same - it’s too easy to rip out with the self tapping screws. I went with 1/4 longer screws but would like to have a plate on the bottom side with bolts facing up or an expanding screw.
Would you then have to take apart the entire center console to get underneath? That could be a pain.
 
OP
OP
scottybs

scottybs

Active Member
Joined
Feb 3, 2023
Posts
89
Reaction score
128
Location
WA
Was my understanding the OP lifted the back and slid the plate under?
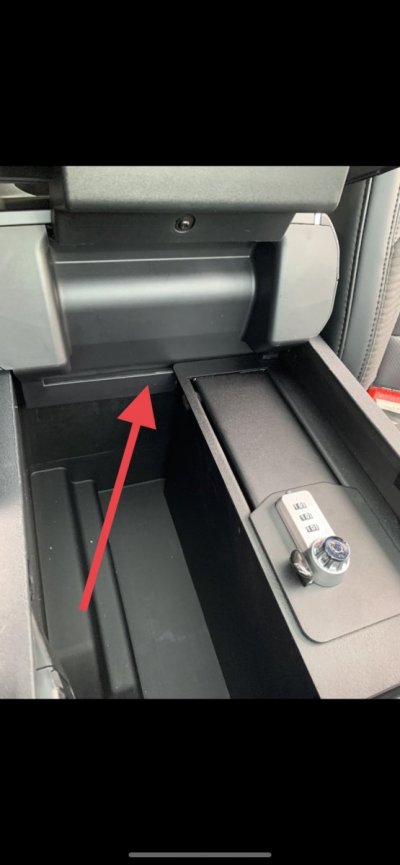
So yes. Get some stainless steel or powder coated aluminum and you’re going to want to take the bottom of the safe and make a template almost the size, There is a taper at the front of the box (my 16 F150 does not have this sorcery) which is hard to explain that I did discover until I began the install so you will have to do a trial and error process. Now backing up you will want to tac weld bolts on said plate as well. The install will involve removing the console lid and taking down the back. You will need 2 people for install. First you will need to lift gently with a pry bar and then block it to shim. Then fine cutting of the plate to fit. Then 2 people to guide and fish the bolts/thread into place. It is a real thunder____ compared to the Gen 2 installation. Also remember to install the back trim plate that the safe rests on in the back of the console. I forgot and it would have required unbolting, so I opted to trim and it is clean looking. Good luck.2265066D-CA75-4687-B051-00906251B4D1.jpeg
 

SurfRaptor

FRF Addict
Joined
Dec 28, 2019
Posts
1,173
Reaction score
744
Location
Newport Beach CA
Damn, that's a pretty good idea. Now you have me thinking how easy it is to just take a pry bar and yank out the safe. Then again, I was only using the safe for petty theft issues, but I guess a pry bar wouldn't be uncommon to have on hand during theft.
 
OP
OP
scottybs

scottybs

Active Member
Joined
Feb 3, 2023
Posts
89
Reaction score
128
Location
WA
Damn, that's a pretty good idea. Now you have me thinking how easy it is to just take a pry bar and yank out the safe. Then again, I was only using the safe for petty theft issues, but I guess a pry bar wouldn't be uncommon to have on hand during theft.
Yeah creating a sandwich of plate-console bottom-safe is the only way to make it effective. The self tapping screws wouldn’t withstand a large flathead.
 

mmayo

Full Access Member
Joined
Mar 24, 2018
Posts
143
Reaction score
68
Location
Texas
anyone got a pic of what it looks like underneath there? Wondering if rivet nuts on a plate/metal strap is an option
 
Top