Installation of SDHQ Rear Frame Reinforcement Kit

Disclaimer: Links on this page pointing to Amazon, eBay and other sites may include affiliate code. If you click them and make a purchase, we may earn a small commission.

Sierra13

Full Access Member
Joined
Apr 13, 2012
Posts
85
Reaction score
12
Location
Medicine Hat, AB
Just did this tonight and found an easier way. On my '13 the rear is reinforced so there is more steel to get around (not much but enough to make me swear ALOT! And yes I got the newer one for the '13). I tried to leave only 1 thread on but still wasn't quite enough and lost the piece a quite a few times. Anyways take the parallelogram apart from the oval. Grab a zip tie and loop it together so it fits very loosely around the parallelogram. Insert the parallelogram into the hole and have the zip tie around it. Now use the looped zip tie to pull the parallelogram towards the inside of the frame, then screw in ur other piece cut the tie and tighten. Hopefully this makes sense took me 5 min a side doing it this way, wish I would have grabbed some pics.
 

Big Blue

Administrator
Staff member
Admin
Supporting Member
Joined
Aug 1, 2011
Posts
4,273
Reaction score
7,601
Location
USA
Just installed my SDHQ frame support last night.

Super easy job (30 minutes total), thanks mostly to this awesome thread. I think it would have taken considerably longer had I not read this first. The "insert from front to back" was key. Not a single roadblock. :rockit:

Now...Offically ready for TRR!!
 

Scott13

Full Access Member
Joined
Dec 27, 2012
Posts
218
Reaction score
40
Location
Goodyear, AZ
Picked mine up today and installed today in about an hr (had my 3yo helping out).. the thread is full of helpful hints.. I got mine in by going nuts down / horizontal, and from the front. The plugs were the easiest part.. left one thread on and all together, wiggled it in there and then tightened down.

One question though, is there a way to check and see if the plug back went in to place properly? I'm sure it did, I could feel it spin into place I think but without seeing it I am not 100%.
 

DesaRaptor

FRF Supporting Member
Supporting Member
Joined
Aug 19, 2012
Posts
1,122
Reaction score
718
Location
Houston, TX
I recall a few choice words and phrases used while installing mine. It was when I dropped the silly brace inside the frame rail. Took 15 minutes to fish it up. BTW, do the install on level ground :)
 

Scott13

Full Access Member
Joined
Dec 27, 2012
Posts
218
Reaction score
40
Location
Goodyear, AZ
Yeah I did the same thing... just glad I have long fingers.. my biggest pain was when I tapped in the driver side with a hammer (got a little stuck) and it FLEW all the way to the end of the frame rail. That took FOREVER to fish back out. My truck was on level ground though.
 

debordj

Full Access Member
Joined
Jun 13, 2012
Posts
487
Reaction score
154
Location
San Diego, CA
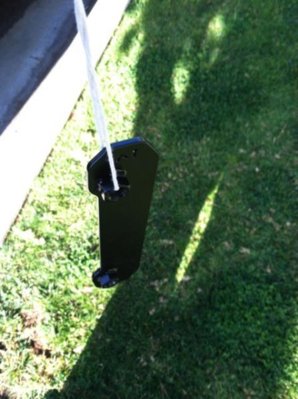
Folks - thanks to this great thread this install was a breeze. For the larger gusset plate I did add one little thing that worked like a champ. I tied some yarn through the front bolt hole nearest the arrow. Make a big loop so u can just cut at the end and pull it out later. Then I slid it in bolts down front to back. I could then use the yarn to help maneuver the plate. I then put the back bolt on finger tight and cut the yarn and pulled it out.

ImageUploadedByTapatalk1361725748.935445.jpg

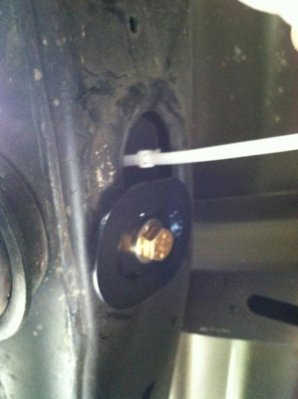
For the smaller hole plate I did what someone else came up with. Zip tie loosely around the top. Make the zip tie head lay against the flat part of the plate or it is harder to get the plate to lay flat in the frame while u get the bolt started. Was a piece of cake on passenger side but driver side was harder with the brake lines in there. But it is doable. Then just take a knife and cut the zip tie off. Did everything in about 30 mins.

ImageUploadedByTapatalk1361725911.753873.jpg
 

Sierra13

Full Access Member
Joined
Apr 13, 2012
Posts
85
Reaction score
12
Location
Medicine Hat, AB
Folks - thanks to this great thread this install was a breeze. For the larger gusset plate I did add one little thing that worked like a champ. I tied some yarn through the front bolt hole nearest the arrow. Make a big loop so u can just cut at the end and pull it out later. Then I slid it in bolts down front to back. I could then use the yarn to help maneuver the plate. I then put the back bolt on finger tight and cut the yarn and pulled it out.

View attachment 17427

For the smaller hole plate I did what someone else came up with. Zip tie loosely around the top. Make the zip tie head lay against the flat part of the plate or it is harder to get the plate to lay flat in the frame while u get the bolt started. Was a piece of cake on passenger side but driver side was harder with the brake lines in there. But it is doable. Then just take a knife and cut the zip tie off. Did everything in about 30 mins.

View attachment 17428

Your welcome! hah I had enough and gave up for the night once i couldn't get it. You need 3 hands in a space barely big enough for 1. I went to bed and at about 3am i woke up and had it figured. Went out to the garage right then, put the zip tie around it and had it in and back to bed in 10min. Slept like a baby after that haha. Glad you got it man
 
Top