Gen 2 SCAB makeover…totally not ripping off Geoff’s 2.5 build!

Disclaimer: Links on this page pointing to Amazon, eBay and other sites may include affiliate code. If you click them and make a purchase, we may earn a small commission.

OP
OP
91Eunos

91Eunos

Full Access Member
Joined
Oct 18, 2018
Posts
944
Reaction score
1,980
Location
Hill country, Tejas
Couple pics from before the cab removal. One thing that slowed me down is that I couldn’t find my transmission line disconnect tool, and the ones I have for fuel lines are all too small…and far too thick to slide into that narrow gap between the quick connect and the housing.

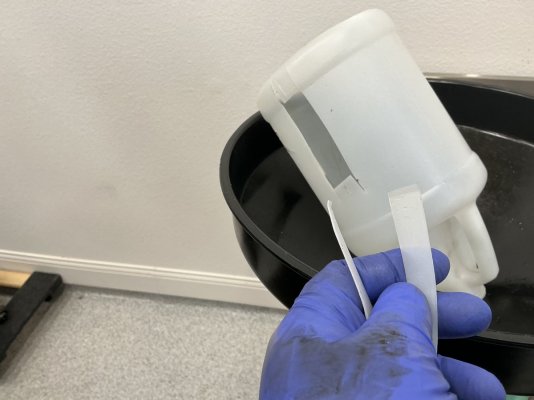
So I tried the old “cut some shims from a plastic jug” trick:
IMG_0339.jpeg

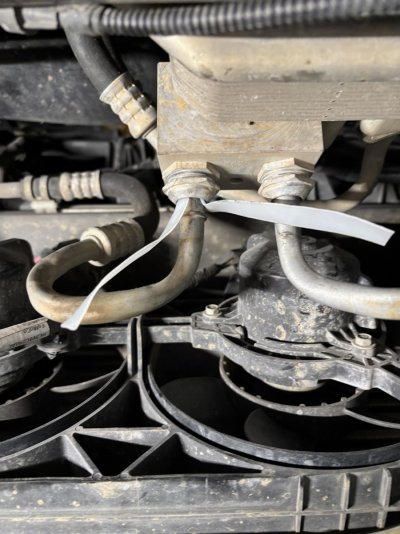
And they sort of fit down inside the junction, but no matter how much I pushed and pulled, and tried to feed them in with needle-nose pliers I couldn’t get them to slide into the gap far enough to release the locking tabs:
i-XD2fLs8-X4.jpg

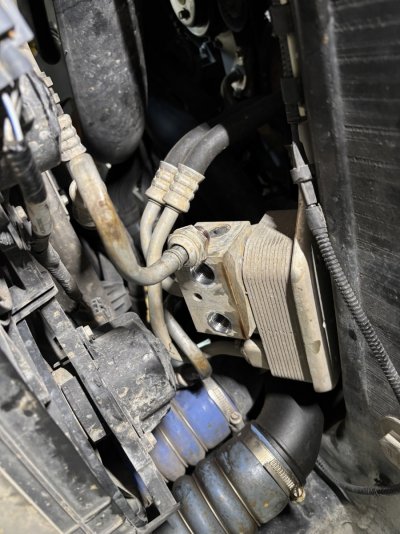
…so I just unbolted the entire connector assembly from the heat sink/junction block…whatever that thing is called that sits right above the steering rack:
i-MrTZKvF-X4.jpg
 
OP
OP
91Eunos

91Eunos

Full Access Member
Joined
Oct 18, 2018
Posts
944
Reaction score
1,980
Location
Hill country, Tejas
Next issue was that I had the RH rear support pad on the arm instead of using the round puck at the end of the lift. I thought this would provide a more stable support to that pinch weld seam when lifting the cab.

What I didn’t account for was the end piece getting caught under the suspension/body mount pad when raising the cab up off the frame:

i-Ph8RWNX-X4.jpg

I actually lifted it a couple times before figuring out what was happening. And when I stopped lifting when I saw the damn right wheel was lifting up, and then lowered the arms because I thought I’d forgotten to disconnect something, the arm end was off that pad, so of course I couldn’t see any obstructions.

It wasn’t until the second time that I just stopped lifting, and then looked under there and saw the problem.

Regardless, worked like a champ once I relocated the rear lift arms and just used the little pucks.

i-vnZ5S4z-X4.jpg

i-gpT6x2X-X4.jpg
 
OP
OP
91Eunos

91Eunos

Full Access Member
Joined
Oct 18, 2018
Posts
944
Reaction score
1,980
Location
Hill country, Tejas
Got a start on undressing the motor… holy crap are there a lot of electrical connections on this motor!

IMG_0344.jpeg

IMG_0345.jpeg

IMG_0346.jpeg

IMG_0348.jpeg

Have most of the wiring connections disconnected here, but the loom is still attached:

IMG_0349.jpeg

If the weather’s nice, I’ll roll the chassis out to the driveway to clean up the garage and degrease as much of motor and chassis as possible. Regardless of the weather, will try to get the wiring and all the air pipes plus the OEM intercooler off, and maybe get the fuel system depressurized and unhooked mañana.

Will plan to start on the exhaust manifolds, etc. next weekend.

Definitely have an oil leak on the LH top of the motor too…likely the valve cover.
 
Last edited:
OP
OP
91Eunos

91Eunos

Full Access Member
Joined
Oct 18, 2018
Posts
944
Reaction score
1,980
Location
Hill country, Tejas
Well, I didn’t get as far as I’d hoped this weekend, but got farther than expected considering I forgot we had a Valentine’s Day concert to attend, and I was instructing novice drivers for an Autocross all day yesterday; only worked on the truck last night for a couple hours, and a few more hours today.

First order of business was rolling out the chassis so I could get the floor cleaned up…never ending task with all the coolant that kept draining out every time I removed a hose or fitting it seemed.

i-KzS7cx6-X4.jpg

i-Zm2McxQ-X4.jpg

Cleaned up some stuff on the frame too, including treating some of the surface rust. Then rolled it back in to dig into getting all the turbo/intercooler/intake plumbing and wiring harness removed.

i-qPZWHWq-X4.jpg

I’d like to nut punch the assembly line worker, or Ford tech who rotated the hose clamp for the passenger-side turbo to where it was under, and between the turbo and the head:

i-R9T4qwj-X4.jpg

Regardless, got all the air and water plumbing removed, and then removed the intake and fuel systems:

i-RPJ3VdC-X4.jpg

Definite oil leak on the left hand valve cover:

i-xtQXMP7-X4.jpg

Where I stopped for tonight:

i-thks2Bx-X4.jpg

i-Z3d4GHj-X4.jpg

And nobody better give me shit for suspending the brake master cylinder from the lift arm with gorilla tape. LoL. It was the only thing I had available at the time…field expedient repairs are approved when working solo!

Will obviously rig up something better, or more likely, just take the damn thing off. I’ll then need to cap off the lines and then bleed the system when I put it back onto the truck of course.

Will try to get to the exhaust manifolds and turbos mañana, and maybe the valve covers. The front timing chain cover, water pump, etc. and all that entails with the accessories and belts, etc. will have to wait until next weekend.
 
Last edited:
OP
OP
91Eunos

91Eunos

Full Access Member
Joined
Oct 18, 2018
Posts
944
Reaction score
1,980
Location
Hill country, Tejas
@full-race geoff Any utility to going to a larger intake throttle body?

I know the stock turbo inlets/necked-down piping are pretty much the limiting factor for a stock setup, but with the new manifolds, larger turbos, and down pipes, I’d think there’s some room for more volume on the intake side as well.

I have the new intake, but I think that stock throttle body has got to be close to max capacity, and may even limit capacity when I install the larger injectors and higher flow fuel pump.
 

julien194b

offroad addict
Supporting Member
Joined
May 26, 2018
Posts
1,216
Reaction score
1,980
Location
Europe FR.
what an amazaing job, congrats. It's good to know all steps are done seriously and in the best conditions , very methodical and clean job :waytogo:
 

full-race geoff

Full Access Member
Joined
Jun 21, 2012
Posts
150
Reaction score
383
Location
AZ / NJ
@full-race geoff Any utility to going to a larger intake throttle body?

I know the stock turbo inlets/necked-down piping are pretty much the limiting factor for a stock setup, but with the new manifolds, larger turbos, and down pipes, I’d think there’s some room for more volume on the intake side as well.

I have the new intake, but I think that stock throttle body has got to be close to max capacity, and may even limit capacity when I install the larger injectors and higher flow fuel pump.


It’s counter intuitive, yet Increasing diameter on charge-air side generally yields negligible increase in power. And for reliability and simplicity reasons I prefer oem throttle bodies. (Forgot to mention in my thread I installed a new oem on my motor).

1739827162409.png
Ford’s continued the use of the same HL3Z intake manifold and TB since 2017 gives me confidence. They even back-updated the same HL3Z throttle body to the gen1 Ecoboost in the transit. Fact is the 3.5L charge air side is well executed (i was told roush did the charge piping design work for g1, g2 and g3)
1739827107597.png
If I thought there would be free-lunch gains like with the intakes, I’d be running oversized tb on my own trucks tonite. A larger set of camshafts may change this, I hope to find out. Reliability in a truck remains paramount in my opinion
 

Zeusmotorworks

Semi-retired, now just a happy grumpy old man!
Supporting Member
Joined
Jan 17, 2017
Posts
2,478
Reaction score
4,393
Location
Northwest shore of Lake Travis
Geoff,

What would you say is the limiting factor on the bottom end? If one where to get an OE 3rd gen short block, stuff it with good pistons, rods, and maybe some of the later Total Seal gas ported rings, ATI or other (yet to be disclosed) harmonic balancer, would one be leaving anything on the table?
 

full-race geoff

Full Access Member
Joined
Jun 21, 2012
Posts
150
Reaction score
383
Location
AZ / NJ
Weak point on an gen 3 block after valvetrain and oil pump are addressed is the rod/ piston.

JE pistons and boostline rods is the high end solve. No need for total seal rings imo.

The next step beyond that is using ductile iron sleeves. This is big work and tricky machining to avoid head gasket issues, so it must be done by someone with experience
 
Top