Gen 2 SCAB makeover…totally not ripping off Geoff’s 2.5 build!

Disclaimer: Links on this page pointing to Amazon, eBay and other sites may include affiliate code. If you click them and make a purchase, we may earn a small commission.

mashtastic

Full Access Member
Joined
Dec 11, 2019
Posts
192
Reaction score
217
Location
las vegas nv
It’s a an Asian knockoff of the SPD with the same issues I pointed out above - and slightly worse fitment. Sorry if this comes off harsh, their r&d process consists of Rob & Duplicate so i don’t hold back
so port the SPD's to match the Garrett's is the perfect option? Have you tested the ported vs no ported on the dyno? personally, I am not looking for high hp numbers, just reliability with quality parts. with everything we've talked about within the two threads, I am estimating north of 600 hp with a lukewarm tune...which is fine going to dunkin'.......the lonnnng way

Sorry Eunos, you can have your thread back
 
OP
OP
91Eunos

91Eunos

Full Access Member
Joined
Oct 18, 2018
Posts
933
Reaction score
1,904
Location
Hill country, Tejas
Baby steps… got the RH side motor mount nuts removed, and have the radiator draining:

i-tNXfxLD-X4.jpg

i-QXGPVQR-X4.jpg

As soon as that’s finished, I’ll lower the truck and remove the battery. May as well get the radiator grill, radiator, oil cooler, etc. removed today too.
 
OP
OP
91Eunos

91Eunos

Full Access Member
Joined
Oct 18, 2018
Posts
933
Reaction score
1,904
Location
Hill country, Tejas
Battery, air filter assembly, etc. out and almost all connections disconnected…

IMG_0303.jpeg

IMG_0305.jpeg

But having a hell of a time getting the heater lines going into the firewall disconnected for some reason, so gonna call it a night before I get frustrated.

These little bastards:

IMG_0306.jpeg


Edit: Think I figured it out, but will need to get someone over to help. The manual shows to push in on the tab, and then pull the hose out from the firewall:

IMG_0307.jpeg

…but there are two tabs that need to be pushed in simultaneously, and they’re located 180* out from each other. I think I can have the truck lifted a few feet off the ground so someone can get underneath with a really long screwdriver (I have one) to push the bottom tab, and I’ll stand on a ladder to reach into the engine bay and push the top one.

There’s probably a special tool for this, kinda like the transmission connector, and fuel line tools, but not sure I need to buy a special tool for what I hope is a one time use.
 
Last edited:

full-race geoff

Full Access Member
Joined
Jun 21, 2012
Posts
146
Reaction score
366
Location
AZ / NJ
You have to physically push the fitting towards the firewall to unlock the tab. Spray silicone lubricant and wear a glove to forcefully move it around. If it has never been replaced it’s possible the oring is cooked into place and a good idea to replace the entire hose
 
OP
OP
91Eunos

91Eunos

Full Access Member
Joined
Oct 18, 2018
Posts
933
Reaction score
1,904
Location
Hill country, Tejas
You have to physically push the fitting towards the firewall to unlock the tab. Spray silicone lubricant and wear a glove to forcefully move it around. If it has never been replaced it’s possible the oring is cooked into place and a good idea to replace the entire hose
That’s exactly what I eventually figured out! Thanks again @full-race geoff

i-M7Wh7bN-X4.jpg

And these tools helped too:

i-bvfp7Cq-X4.jpg
 
Last edited:
OP
OP
91Eunos

91Eunos

Full Access Member
Joined
Oct 18, 2018
Posts
933
Reaction score
1,904
Location
Hill country, Tejas
Regardless, after cutting approximately 472,971 zip ties and going up and down with the lift half a dozen times, I believe I have all the wiring connections separated between what will go up with the cab, and what will remain with the chassis:

i-P5FC7bK-X4.jpg

Complicating the endeavor was that large bundle of wires on top of the bracket where the RH headlight usually sits; that’s the wiring for my front bumper fog lights. Thank God Baja Design makes a well-integrated loom that just required me to unclip them from the lights, and route the loom back up into the engine bay.

Also took the running boards off to get easier access to the cab body seam pinch welds later:

i-msVSGtp-X4.jpg

Truck looks weird without them!

i-xM2D2bD-X4.jpg
 
Last edited:
OP
OP
91Eunos

91Eunos

Full Access Member
Joined
Oct 18, 2018
Posts
933
Reaction score
1,904
Location
Hill country, Tejas
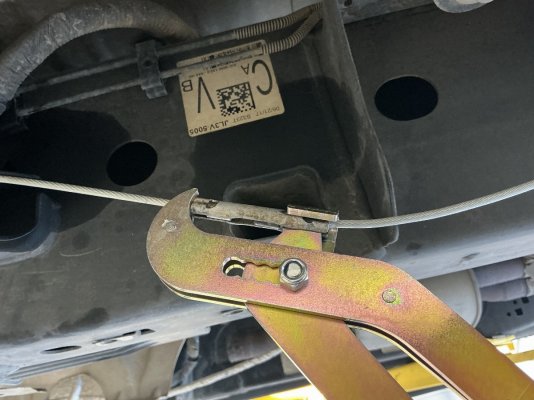
A bit out of sequence, but I also got this special tool to release the emergency brake; my truck’s an early 2018 MY, so it still has the mechanical brake:

i-2nwQRZt-X4.jpg

Once I figured out how to use it, disconnecting took less than 30 seconds…key step is to pull as much slack as possible, and clamp the line off with some locking pliers first:

i-q3jmDQs-X4.jpg

…easy peasy:

i-XTHS5gK-X4.jpg
 

Attachments

  • i-XTHS5gK-X4.jpg
    i-XTHS5gK-X4.jpg
    773.2 KB · Views: 7
OP
OP
91Eunos

91Eunos

Full Access Member
Joined
Oct 18, 2018
Posts
933
Reaction score
1,904
Location
Hill country, Tejas
And if I’d thought more than one step ahead, I could have avoided removing the RH headlight to get to that a/c line behind the grill that has to be disconnected:

i-QTC2N9G-X4.jpg

Since I’m swapping out the trans cooler and radiator, I went ahead and pulled the front grill:

i-Dsf4ph6-X4.jpg

Keen-eyed observers will note the body’s already raised a couple inches off the frame!

i-xP72zXx-X4.jpg

I stopped for the night though so I can crawl under there one last time in the morning to confirm everything is disconnected and routed properly to clear the cab as it goes up.

More to follow…
 
Last edited:
Top