smurfslayer
Be vewwy, vewwy quiet. We’re hunting sasquatch77
- Joined
- Dec 16, 2016
- Posts
- 17,449
- Reaction score
- 26,770
Similar to the rear door speaker replacement how to - http://www.fordraptorforum.com/f266/rear-door-speaker-replacement-55388/
(FWIW, Lucille is an 802A with Sony sound system model).
this is a first person experience of replacing the front door speakers. It’s not too bad. If you check the rear door thread, and have some non-marring trim tools, you’re pretty much set.
<PRO TIP> Make sure you check that your speakers all work, before undertaking any changes! do it across several songs to verify you have a signal coming into the speaker.
Assuming you do, and you have the parts, such as the ones described in Guy’s excellent http://www.fordraptorforum.com/f266/diy-stereo-upgrade-under-$500-00-a-53213/ then you are ready to go. If you are doing this without dynamat, budget an hour per door, give or take depending on your skill and relative clumsiness. If you’re doing dynamat at the same time, double the time per door.
You need a 9/32” socket for the bolts, and you should have an extension for one piece of trim. Let’s get to it.
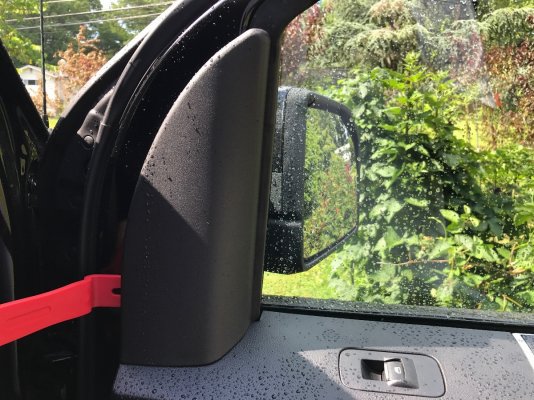
Start disassembly at the top of the door; front piece of trim.

you’ll want to pry from the front side of this trim. Note the location of the clips

Unlike the rear doors, there is an extra screw in this top piece of trim.
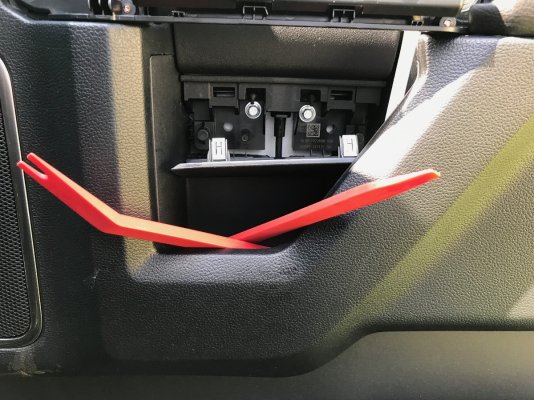
now, just like the rear doors, you have 2 trim pieces to remove, one on the door handle and another just underneath. Just like with the rear doors, the order is not important, but both must come off.

As on the rear doors, the trim under the door handle has to be popped off from the TOP, NOT the bottom. The tabs are on the bottom, the clips on the top. pry the top clips loose. These are a bit tight, if you have a thin metal blade to get in the top of one side or another, so as to facilitate using the thicker no-mar trim removal pieces, just be cautious to not scratch up your 50-70 thousand dollar plastic.
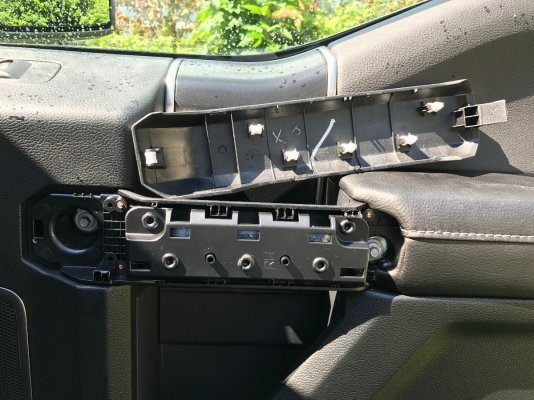
Now the door handle cover.

In the above picture you’ll see a “screwdriver slot” intended for a small flat blade. You can use a knife or similar, but don’t skimp here - use the slot to insert a screwdriver, knife / etc and pry up slightly, then insert the plastic trim removal tools to do the job properly. Note the orientation of the rear tab and the remaining clips.

on the REAR of each door handle cover is a tab, so pry from the front / bottom and pop the clips loose. There’s an appropriate amount of force to use here that successfully pops the trim off. Too much and you’ll need a replacement. too little, and you will be at it a while longer.

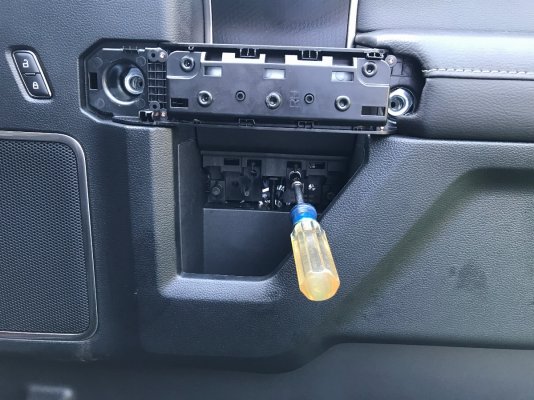
Now you have access to all the screws. They are all removed withe the same sized socket. You have 2 on the bottom of the door. Next, the one on the top underneath the front trim, 2 more under the door handle trim, and then 2 more in that trim under the door handle.
Remove all of these screws and the trim can be popped loose from the door. Again, use the trim removal tools and save your finish and plastic. Pry with the tools and pop the trim loose at each fastener. Once free, you can lift the trim off the door.
Now, your trim is held by 3 connectors and the door latch. The connectors are a little on the finicky side, so be patient.
here’s a video I used x2. The door latch removal and description is at 3:34 seconds in:
https://www.youtube.com/watch?v=J7-nyQ_UMtU
Now, remove the speaker harness, and speaker - same size socket. There are 4 screws and when you loose the last one, the speaker is free so keep that in mind. If you’ve gotten the Metro harness adapter and adapter plates, take note: The harness is a tight fit for a 6x9” speaker. The adapter plate has a slot cut for wires, but, it may be more beneficial to drill a hole that’s closer to the speaker connectors. As with the rear speakers, the Metro spacers do not contain usable hardware, so you may need screws to seat the speaker to the adapter.
If you’re going to add dynamat, this is an opportune time.
Add your speaker and plug it in. Smoke test and make sure you (still) have sound from that speaker. If so, you’re good to reassemble.
Putting the door latch back on, 3 wired connectors, and fit the trim piece. before buttoning everything up, confirm your locks and window(s) work. Once confirmed, start putting the screws back in. Pop the trim pieces for the door panel back into place. I started with the 2 bottom screws, as they’re a bit persnickety to get just right. Once they’re done, you have the door handle screws, screws under the door handle

get the screw under the front, triangular trim piece and snap that back on and you should be good.
There should be no more than 1 leftover screw per door, upon reassembly and it should not be door handle or under door handle screws ! if you have 2 or more leftover parts, admit defeat, and pull it back apart!
Else, test out the new speakers.
(FWIW, Lucille is an 802A with Sony sound system model).
this is a first person experience of replacing the front door speakers. It’s not too bad. If you check the rear door thread, and have some non-marring trim tools, you’re pretty much set.
<PRO TIP> Make sure you check that your speakers all work, before undertaking any changes! do it across several songs to verify you have a signal coming into the speaker.
Assuming you do, and you have the parts, such as the ones described in Guy’s excellent http://www.fordraptorforum.com/f266/diy-stereo-upgrade-under-$500-00-a-53213/ then you are ready to go. If you are doing this without dynamat, budget an hour per door, give or take depending on your skill and relative clumsiness. If you’re doing dynamat at the same time, double the time per door.
You need a 9/32” socket for the bolts, and you should have an extension for one piece of trim. Let’s get to it.
Start disassembly at the top of the door; front piece of trim.

you’ll want to pry from the front side of this trim. Note the location of the clips
Unlike the rear doors, there is an extra screw in this top piece of trim.
now, just like the rear doors, you have 2 trim pieces to remove, one on the door handle and another just underneath. Just like with the rear doors, the order is not important, but both must come off.

As on the rear doors, the trim under the door handle has to be popped off from the TOP, NOT the bottom. The tabs are on the bottom, the clips on the top. pry the top clips loose. These are a bit tight, if you have a thin metal blade to get in the top of one side or another, so as to facilitate using the thicker no-mar trim removal pieces, just be cautious to not scratch up your 50-70 thousand dollar plastic.
Now the door handle cover.
In the above picture you’ll see a “screwdriver slot” intended for a small flat blade. You can use a knife or similar, but don’t skimp here - use the slot to insert a screwdriver, knife / etc and pry up slightly, then insert the plastic trim removal tools to do the job properly. Note the orientation of the rear tab and the remaining clips.

on the REAR of each door handle cover is a tab, so pry from the front / bottom and pop the clips loose. There’s an appropriate amount of force to use here that successfully pops the trim off. Too much and you’ll need a replacement. too little, and you will be at it a while longer.
Now you have access to all the screws. They are all removed withe the same sized socket. You have 2 on the bottom of the door. Next, the one on the top underneath the front trim, 2 more under the door handle trim, and then 2 more in that trim under the door handle.
Remove all of these screws and the trim can be popped loose from the door. Again, use the trim removal tools and save your finish and plastic. Pry with the tools and pop the trim loose at each fastener. Once free, you can lift the trim off the door.
Now, your trim is held by 3 connectors and the door latch. The connectors are a little on the finicky side, so be patient.
here’s a video I used x2. The door latch removal and description is at 3:34 seconds in:
https://www.youtube.com/watch?v=J7-nyQ_UMtU
Now, remove the speaker harness, and speaker - same size socket. There are 4 screws and when you loose the last one, the speaker is free so keep that in mind. If you’ve gotten the Metro harness adapter and adapter plates, take note: The harness is a tight fit for a 6x9” speaker. The adapter plate has a slot cut for wires, but, it may be more beneficial to drill a hole that’s closer to the speaker connectors. As with the rear speakers, the Metro spacers do not contain usable hardware, so you may need screws to seat the speaker to the adapter.
If you’re going to add dynamat, this is an opportune time.
Add your speaker and plug it in. Smoke test and make sure you (still) have sound from that speaker. If so, you’re good to reassemble.
Putting the door latch back on, 3 wired connectors, and fit the trim piece. before buttoning everything up, confirm your locks and window(s) work. Once confirmed, start putting the screws back in. Pop the trim pieces for the door panel back into place. I started with the 2 bottom screws, as they’re a bit persnickety to get just right. Once they’re done, you have the door handle screws, screws under the door handle

get the screw under the front, triangular trim piece and snap that back on and you should be good.
There should be no more than 1 leftover screw per door, upon reassembly and it should not be door handle or under door handle screws ! if you have 2 or more leftover parts, admit defeat, and pull it back apart!
Else, test out the new speakers.

