DIY stereo upgrade for under $500.00

Disclaimer: Links on this page pointing to Amazon, eBay and other sites may include affiliate code. If you click them and make a purchase, we may earn a small commission.

OP
OP
G

Guy

FRF Supporting Member
Supporting Member
Joined
Feb 16, 2017
Posts
1,781
Reaction score
1,124
I mounted right where you did... and I used zip ties and cut a little hole in the the carpet and fastened it down. Thanks to dan for that tip.

For the most part you won't have any real sound clipping issues that you'll notice. The time and expense to use a DSP and then another amp I don't think is worth it. My advice, try it before you bother going further. I think you'll be shocked.

I can't take credit for the pioneer choice. I was researching speakers and I saw they were winning sound awards from reputable online testing labs... the folks at crutchfield were super high on them as well so I gave it a shot and boy am I pleased!

There are speakers that squeak them out for cleaner highs... and ones that will squeak them out for louder bass... but none will do it all quite as well as them in that price point with stock wattage. Best all around award...

Good luck guys

---------- Post added at 12:31 AM ---------- Previous post was at 12:09 AM ----------

Oh and not sure on the 2014. I only have a 17.
 

daaaaaan

Active Member
Joined
Oct 3, 2016
Posts
67
Reaction score
33
I did the system as Guy described, and it turned out very well!! Especially for the $$, can't be beat.

I took very few pics, but here's one of how I had to wire the factory sub output spliced into the RCA input for the new amp. Took me a few tries, but the signal finally worked with the below combo.

vW7IdbF.png

In the below pic, the screwdriver shows the piece that needs to be heated/pushed flat. You must use a heat gun (hair dryer, and map torch will not work). Invest in a 1100 degree min heat gun, after a few minutes it will turn to taffy and easily molded with a hammer.

GbsOTis.png

and here's the set up complete. I used screws all around the sub in every hole, as I had some air gaps. It's now nice a tight. I also used (per Guy) some polyfill in the far end of sub box.

DZMWLXu.png

---------- Post added at 10:00 PM ---------- Previous post was at 09:59 PM ----------

Ignore the blue wires in the above pic, I thought I could use the trigger as a on/off switch if needed, and it didnt work.
 

Marcsc1

Full Access Member
Joined
Feb 12, 2014
Posts
95
Reaction score
37
Location
Alden, NY
I did the system as Guy described, and it turned out very well!! Especially for the $$, can't be beat.

I took very few pics, but here's one of how I had to wire the factory sub output spliced into the RCA input for the new amp. Took me a few tries, but the signal finally worked with the below combo.

vW7IdbF.png

In the below pic, the screwdriver shows the piece that needs to be heated/pushed flat. You must use a heat gun (hair dryer, and map torch will not work). Invest in a 1100 degree min heat gun, after a few minutes it will turn to taffy and easily molded with a hammer.

GbsOTis.png

and here's the set up complete. I used screws all around the sub in every hole, as I had some air gaps. It's now nice a tight. I also used (per Guy) some polyfill in the far end of sub box.

DZMWLXu.png

---------- Post added at 10:00 PM ---------- Previous post was at 09:59 PM ----------

Ignore the blue wires in the above pic, I thought I could use the trigger as a on/off switch if needed, and it didnt work.

Is that the stock gen2 sub enclosure? If so, that's much different than 2014....whats the stock amp size on 802a?
 

pjones

Full Access Member
Joined
Jan 7, 2017
Posts
662
Reaction score
418
So the 8" Pioneer does sound better, but doesnt move enough air to hit the low notes hard enough, but for the money, its a good upgrade. The stock sub, cant even tell its there.

Cant wait to put in the other speakers.

What is the trick to get the handle cover off the door? I tried prying from the corners but doesnt seem to budge?
 
OP
OP
G

Guy

FRF Supporting Member
Supporting Member
Joined
Feb 16, 2017
Posts
1,781
Reaction score
1,124
Pjones.

It breaks in really well. I run a lot of gain too. I drive it as hard as you can drive it.

The piece under the door handle is SO annoying. Here is the trick. The cover is PAPER thin. Directly behind it is a plastic frame that is thick and strong. If you stick the tool in more than just a pinch you went too far. Start in the corner... and lift it like you're picking a scab.... VERY shallow... that's why you can't get it off. Once you get the tool behind the tiny thin membrane cover it pops right off.

Th door handle uses a tiny slow where you can fit a pry tool. Underneath towards the front of the door handle

---------- Post added at 08:57 PM ---------- Previous post was at 08:45 PM ----------

So the 8" Pioneer does sound better, but doesnt move enough air to hit the low notes hard enough, but for the money, its a good upgrade. The stock sub, cant even tell its there.

Cant wait to put in the other speakers.

What is the trick to get the handle cover off the door? I tried prying from the corners but doesnt seem to budge?
Don't forget...

It's 8 inch. It's in a plastic shallow enclosure. It's a sealed sub setup so it has a fairly linear bass response.

It's suited for fast moving drum lines, rock, pop... less jazz and hip hop.

The dynamat cover I put on it helps and some polyfill if you haven't. It's MUCH better than stock and when you get the door speakers in you'll pick up a fair amount of low midrange bass to fill it in.
 

pjones

Full Access Member
Joined
Jan 7, 2017
Posts
662
Reaction score
418
Thanks, yeah, I wasn't expected the 8" to pop my windshield or win any SPL events. ;)

Thanks also for the tip on the door trim removal. Will give it a shot next time I can work on the truck.
 

smurfslayer

Be vewwy, vewwy quiet. We’re hunting sasquatch77
Joined
Dec 16, 2016
Posts
17,515
Reaction score
26,939
Thanks Guy, where did you mount the kenwood amp? I have it mounted just above and to the left of the sony. Seems to fit but need to fab something to keep both sides held up.

that’s what I did as well and need to do, respectively.

Now that I’m basically done adding the first additional lights I can start picking up door speakers / hw.
 

adventure

Member
Joined
Feb 20, 2017
Posts
20
Reaction score
5
I got my sub and amp installed thanks to everyone's advice here - and it sounds good. I did the Kenwood amp and Pioneer sub, per Guy's list. I've got the gain on the amp all the way up and it's not rattling any windows at the stoplights or anything, but it definitely sounds (and feels) more correct now. Thank you again everyone for leading the way! Hope to pick away at the rest of the speakers soon.
 
OP
OP
G

Guy

FRF Supporting Member
Supporting Member
Joined
Feb 16, 2017
Posts
1,781
Reaction score
1,124
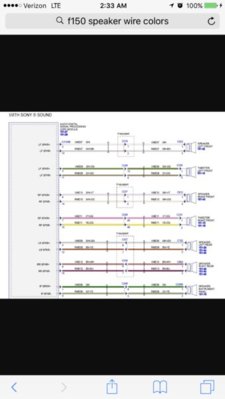
I thought I would throw this up to help those looking to do their speakers.

The front dash and a pillars do not have aftermarket harnesses and so you have to splice the wires yourself.

I'm attaching a diagram which shows you the positive and negative color coding on the stock wires so you won't have trouble making your connections to the new speaker terminals.

IMG_2497.jpg
 
Top