GEN 2 800A+ Offroad Build

Disclaimer: Links on this page pointing to Amazon, eBay and other sites may include affiliate code. If you click them and make a purchase, we may earn a small commission.

xxaarraa

Full Access Member
Joined
Mar 3, 2017
Posts
858
Reaction score
465
Location
Southlake, TX
Nice work Bark. Did you get the stock beedlock capable wheels as an add-on? Or did you order it with the 800A package?

Why no bed liner? You OK with the bed getting dinged up over time with use?

Any ideas for rock rails? For the rock crawling you seem to do, would be good to prevent body damage to rockers?

Keep it coming, great to see a Gen II get out on tight trails. Not everyone lives near a desert!
 
OP
OP
Bark beetle

Bark beetle

Full Access Member
Joined
Oct 29, 2016
Posts
135
Reaction score
151
Location
Northern NM
I have never had an issue in my climate with aluminum corrosion when bolted to steel. Some of those recommendations are nearly impossible to implement. A much better solution is to install a sacrificial anode, just like the boating world. An aluminum/zinc/indium alloy has a higher negative potential than aluminum and should protect a truck very well. Magnesium also has a higher potential and could be another option if the alloy Ford uses has a potential too close to the indium based alloy. Do you happen to know the specific alloy Ford is using?


Sent from my iPad using Tapatalk Pro
 

radio_man

Member
Joined
Jan 6, 2017
Posts
47
Reaction score
19
Bark Beetle, great job with the build. The Raptor will be my first offroad vehicle and I've learned a lot reading this thread.

Do you have any more pictures of the center console during your radio install? How much space is there inside the console and is it open in the back? I'm a ham operator and I cross-band my radio during public service events and it gets hot! I see the holes in the side of your mount. Is that for airflow or the speaker?
 
OP
OP
Bark beetle

Bark beetle

Full Access Member
Joined
Oct 29, 2016
Posts
135
Reaction score
151
Location
Northern NM
Bark Beetle, great job with the build. The Raptor will be my first offroad vehicle and I've learned a lot reading this thread.

Do you have any more pictures of the center console during your radio install? How much space is there inside the console and is it open in the back? I'm a ham operator and I cross-band my radio during public service events and it gets hot! I see the holes in the side of your mount. Is that for airflow or the speaker?


Thanks. Unfortunately I don't have any other pics of the console opening. The back is open to the entire dash, the holes in the side are primarily for the speaker. I really didn't want to run an external one and it worked. Volume is just fine. They also allow airflow but I don't think it is necessary. The volume is a bit shallow so I had to angle the transceiver. My initial plan was vertical with room for a second unit. The dual band Yaesu I have is pretty tall too because of the remote head option. I ran a 90 on the antenna to help with space. The diamond antenna cable is absolutely maxed out getting to the headache rack. I ran it out of the right side of the console, along the passenger seat, under the floormat of the back seat and store it on top of the jack. Sticks real nice to the steel top of the jack. The box I made for the radio could also be made out of high quality wood, coated and the result would look the same.


Sent from my iPad using Tapatalk Pro
 
OP
OP
Bark beetle

Bark beetle

Full Access Member
Joined
Oct 29, 2016
Posts
135
Reaction score
151
Location
Northern NM
We can thank the Tacoma guys for this Dodge part that fits tightly on the Raptor bed bolts. There may be better solutions but I already had them and they are heavy duty. Part numbers have changed since I ordered a bunch several years ago but I believe these are correct:

http://www.factorychryslerparts.com...R--RING-RING-RETAINER/4315215/05170492AA.html

They are for the Sprinter cargo vans. I have to use a tool, stick, leatherman, etc to pick them up for use. The good thing is there is zero rattle.

If Huck is paying attention and ordered them he can chime in on the fit because he asked about them a few weeks ago.


Sent from my iPad using Tapatalk Pro
 
OP
OP
Bark beetle

Bark beetle

Full Access Member
Joined
Oct 29, 2016
Posts
135
Reaction score
151
Location
Northern NM
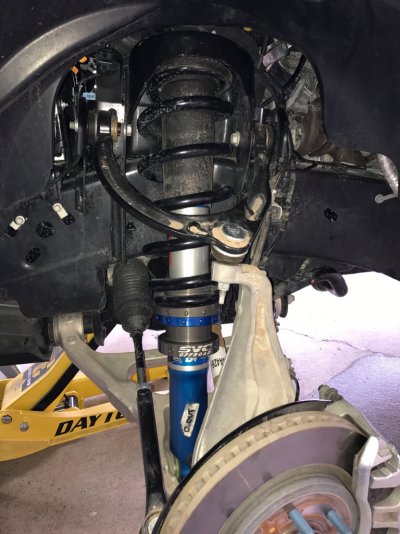
Got my SVC coilover preload adjusters on Friday and installed them in the snow today. It's always the best when your truck is too big to fit in your garage and you have the wheels off in the driveway when it is snowing! The install took 4 hours which isn't too bad. Getting these coilovers off is similar to a Taco or Tundra but the top bolts were a little harder to get to and the lower shock bolt is insanely tight. If you don't have the right sockets, forget it.

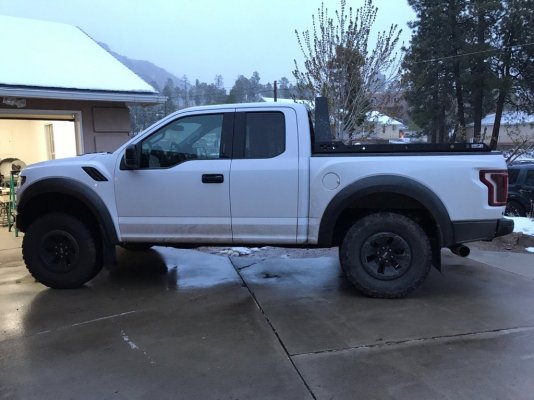
I set the height at 1" on the passenger and 1.125" on the driver which ended up as 1-3/8" lift on the passenger and 1-1/2" on the driver. This leveled the truck perfectly left/right with a full tank of gas and nobody inside. My truck still has a very small amount of rake but most important to me is the 1-1/2" additional ground clearance under the front differential. It needed that, as much as I would like the truck to stay low for CG reasons.
62d017ccd73e16fc4c31a050f7e556a6.jpg

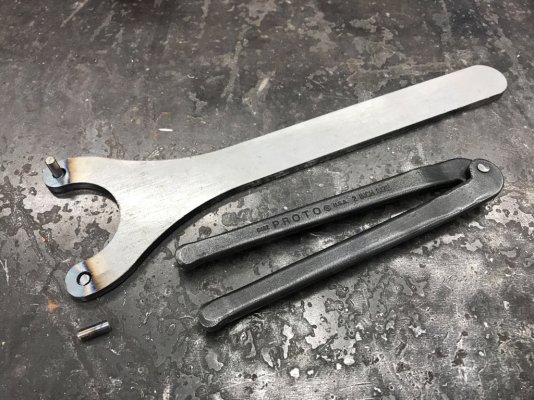
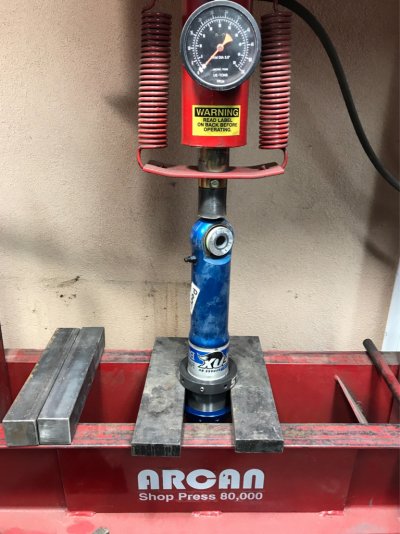
A couple notes from my install. The spanner wrench that comes with the kit looks nice but broke the second I tried to use it. The heat from the weld embrittled the pin. Good thing I had the Proto set. I didn't try very long with the hammer to set the new coil can before switching to the press. If you can get access to one it makes this part super easy. I have no idea if I would have ever gotten them pressed on with a dead blow. Could end up wrecking the threads too. I recommend getting some large spanner/coil wrenches to adjust these, I didn't have any big enough and had to use a strap wrench and the coil compressors to get it setup where I wanted.
012674da665380212547c8565c1ada34.jpg
711bc3a65d931e6cf3de1d971e2df98e.jpg
1ed94d9bbafa840c80d404c16c0f3368.jpg
Outside of the few minor issues with the install, a top quality product that gives a lot of adjustment options to cover winches, bumpers, skidplates, side to side imbalance, and lift height.

Some spanner diameters from SVC would be helpful, or including a set of those because they are just as specialized as the cap spanner.

Unrelated to the install but clearly visible in the side shot is the lack of mud on the side of my truck. I did a quick quick test run in some very sloppy conditions and the sides are almost completely clean. The mud flaps work infinitely better than the running boards at keeping the sides and door handles free of mud.


Sent from my iPad using Tapatalk Pro
 

CSJr

Full Access Member
Joined
Nov 3, 2016
Posts
299
Reaction score
199
Location
GA
Great build thread! It is threads like these that keep my elementary, off-the-shelf build from ever seeing the light of a post.

Yours is the example of what a true modification effort is supposed to be like!
 
Last edited:

gwpfan

Full Access Member
Joined
Mar 25, 2014
Posts
443
Reaction score
133
Worth noting, the front articulation sucks with the swaybar on, the driver front is off the ground in this pic. Really wish Ford had an electric disconnect unit like JK's, especially with Rock crawl mode. Without the swaybar I was eating up the tread on the fronts with the body roll, so it went back on. Obviously it feels much more solid in the corners with it on.

FWIW - the new Power Wagon's have the electronic swaybar disconnect. No idea how difficult it would be to modify/add....
 

Piranharaptor

Active Member
Joined
Aug 9, 2016
Posts
79
Reaction score
40
man I sure like the look of the headache rack and bedrails. I guess that's all custom. Anyone know of a similar set up on the bed rails. Ive searched and found nothing. Thanks

---------- Post added at 10:21 PM ---------- Previous post was at 10:12 PM ----------

nevermind I just found them
 
Top