First Detail - Adamized the Raptor

Disclaimer: Links on this page pointing to Amazon, eBay and other sites may include affiliate code. If you click them and make a purchase, we may earn a small commission.

Nick@Apollo-Optics

Supporting Vendor
Supporting Vendor
Joined
Apr 3, 2011
Posts
7,484
Reaction score
3,131
Location
Houston, TX
How the heck you are able to squeeze all in one day? Man i was arm wrestling like two 11-13 hour days and still not was able make tailgate. Do you do paint correction or just cleaning, claying, sealing and wax?
I have to say that i would have been little bit faster if i just used more cutting pad but i wanted to take easy with this truck for first time. Thanks

-Jan

Have add that this was my third time when i was doing 3 step polishing, so thats one reason why it **** so long. Im not an expert on this ;)

This was my process, in detail, in the past.

Wash
Quick dry (not getting everything, just avoiding water spots)
Move truck under cover
Clay
Get out Cyclo and polish first with Correcting, go all the way around
Second polish with Finishing
Liquid Paint Sealant with Cyclo
Glaze with Cyclo
Hand wax with Americana
Dress tires

Next day, clean glass, In N Out on the running boards, and check for any wax residue and get it out with Detail Spray and a double soft towel.
 

AdamsPolishes

Supporting Vendor
Supporting Vendor
Joined
Mar 15, 2013
Posts
3,210
Reaction score
2,342
This was my process, in detail, in the past.

Wash
Quick dry (not getting everything, just avoiding water spots)
Move truck under cover
Clay
Get out Cyclo and polish first with Correcting, go all the way around
Second polish with Finishing
Strip wash or Isopropyl alcohol wipe
Liquid Paint Sealant with Cyclo
Glaze with Cyclo
Hand wax with Americana
Dress tires

Next day, clean glass, In N Out on the running boards, and check for any wax residue and get it out with Detail Spray and a double soft towel.

Good process Nick, but if you remove the polishing oils with a strip wash or IPA wide-down, your sealant will bond better and last longer.

I love the deep, wet shine from that triple-play of Liquid Paint Sealant, Brilliant Glaze, and American Wax!

-Dan
 

no1

Full Access Member
Joined
Apr 2, 2015
Posts
520
Reaction score
709
Yes i know there is one-step polishing but i wanted to get it as shiny as possible even it is DD . It had punch of swirls and scratches from stones that have came from tires, washing and what not.
I have Rupes 21 with 125mm backing plate (5,5 pad) and mini , also was using their pads and polishes. Never had tried their pads and polishes but they seemed to work pretty well. My mistake was to do small areas like door in 4 areas, i think that i would have got same result by doing it in 2 areas. But like i mentioned i was doing it really carefully and in small peaces, cleaning the area each time after polishing it. This was first time for her so it had to be special moment ;)
It is now swirl free, clean inside and outside and have only two scratches. Those are too deep me to take off, you can feel those with finger nail. All in all I'm really pleased for result and want to see how it holds for winter.

I will ask from you since you seem to be Mr Shine here :) and thanks for sharing your story. It helped me to get next level of keeping her clean.

---------- Post added at 09:42 PM ---------- Previous post was at 09:30 PM ----------

This was my process, in detail, in the past.

Wash
Quick dry (not getting everything, just avoiding water spots)
Move truck under cover
Clay
Get out Cyclo and polish first with Correcting, go all the way around
Second polish with Finishing
Liquid Paint Sealant with Cyclo
Glaze with Cyclo
Hand wax with Americana
Dress tires

Next day, clean glass, In N Out on the running boards, and check for any wax residue and get it out with Detail Spray and a double soft towel.

So basically same as mine :) Mine is different in two ways. First - i did glaze and then sealant. I don't know which one is correct :) Second - glaze, sealant and wax by hand.
I also did whole interior detailing and that **** me like 3 hours. But man I'm still not able to do it in 8 hours ;) Maybe if i practice next two years.
 

Nick@Apollo-Optics

Supporting Vendor
Supporting Vendor
Joined
Apr 3, 2011
Posts
7,484
Reaction score
3,131
Location
Houston, TX
Good process Nick, but if you remove the polishing oils with a strip wash or IPA wide-down, your sealant will bond better and last longer.

I love the deep, wet shine from that triple-play of Liquid Paint Sealant, Brilliant Glaze, and American Wax!

-Dan

Thanks, Dan. That's why I put "in the past" since I'll know have to add the Isopropyl wipe down or another wash in there. To be honest, I used to add Revive and Finishing polish on the same pad and it helped remove the Finishing polish and I think that's why I never had a problem with the LSP sticking. It's been nearly 12 months with mud runs and all that since my last full detail. I've used H20 G&G once since then (awesome product) and I've also put on a coat of Americana in that time and my paint still beads like crazy even a year later.

Yes i know there is one-step polishing but i wanted to get it as shiny as possible even it is DD . It had punch of swirls and scratches from stones that have came from tires, washing and what not.
I have Rupes 21 with 125mm backing plate (5,5 pad) and mini , also was using their pads and polishes. Never had tried their pads and polishes but they seemed to work pretty well. My mistake was to do small areas like door in 4 areas, i think that i would have got same result by doing it in 2 areas. But like i mentioned i was doing it really carefully and in small peaces, cleaning the area each time after polishing it. This was first time for her so it had to be special moment ;)
It is now swirl free, clean inside and outside and have only two scratches. Those are too deep me to take off, you can feel those with finger nail. All in all I'm really pleased for result and want to see how it holds for winter.

I will ask from you since you seem to be Mr Shine here :) and thanks for sharing your story. It helped me to get next level of keeping her clean.

---------- Post added at 09:42 PM ---------- Previous post was at 09:30 PM ----------


So basically same as mine :) Mine is different in two ways. First - i did glaze and then sealant. I don't know which one is correct :) Second - glaze, sealant and wax by hand.
I also did whole interior detailing and that **** me like 3 hours. But man I'm still not able to do it in 8 hours ;) Maybe if i practice next two years.

Yep, depending on how long your polishing time is, that'll make or break your timing for your detail. But at the end of the day, if you get the results you desire, then it's time well spent.
 

no1

Full Access Member
Joined
Apr 2, 2015
Posts
520
Reaction score
709
Yep, depending on how long your polishing time is, that'll make or break your timing for your detail. But at the end of the day, if you get the results you desire, then it's time well spent.[/QUOTE]

Yes that is true.

I made few mistakes on my detailing process and had find solutions for those. I made mess in few places with wax really not big but annoying. This is what i found: ?wmode=opaque" frameborder="0" allowfullscreen>
 

AdamsPolishes

Supporting Vendor
Supporting Vendor
Joined
Mar 15, 2013
Posts
3,210
Reaction score
2,342
Yes i know there is one-step polishing but i wanted to get it as shiny as possible even it is DD .

I have Rupes 21 with 125mm backing plate (5,5 pad) and mini...

Yep, me too, shiny as possible!

I have read good reviews on the Rupes polishers, will have to get a few to try them out.


... First - i did glaze and then sealant. I don't know which one is correct :) Second - glaze, sealant and wax by hand.

Sealant should be applied before the glaze. Sealants get their longer life by bonding to the paint, and it will not bond very well to the glaze. Depending on the brand of sealant, it could take the protection from 6 months down to a few weeks or so.

The only time I will but a glaze down first is if there are minor swirls, since most glazes have fillers in them to help hide these. But in that case, I would typically use a wax over the glaze, rather than sealant.

-Dan
 

no1

Full Access Member
Joined
Apr 2, 2015
Posts
520
Reaction score
709
Yep, me too, shiny as possible!

I have read good reviews on the Rupes polishers, will have to get a few to try them out.


Sealant should be applied before the glaze. Sealants get their longer life by bonding to the paint, and it will not bond very well to the glaze. Depending on the brand of sealant, it could take the protection from 6 months down to a few weeks or so.

The only time I will but a glaze down first is if there are minor swirls, since most glazes have fillers in them to help hide these. But in that case, I would typically use a wax over the glaze, rather than sealant.

-Dan

Used before just sealant and wax so i don't know exactly the order but i did do some reading about products that I'm using. Applying order on those wore glaze, sealant and wax, that was the reason for my order of use. Can order be different in different brands. I did notes when i was applying Jetseal and wax on paint surface, applicator made really easily noise. So i think it had to be pretty clean from polishing oils. But please correct if I'm wrong. We have so crappy conditions in winter with lots of salt on roads, so i really want good protection for that.
 
OP
OP
TheWolf

TheWolf

Full Access Member
Joined
Nov 15, 2013
Posts
970
Reaction score
1,337
Location
Spokane, Washington
Used before just sealant and wax so i don't know exactly the order but i did do some reading about products that I'm using. Applying order on those wore glaze, sealant and wax, that was the reason for my order of use. Can order be different in different brands. I did notes when i was applying Jetseal and wax on paint surface, applicator made really easily noise. So i think it had to be pretty clean from polishing oils. But please correct if I'm wrong. We have so crappy conditions in winter with lots of salt on roads, so i really want good protection for that.

I suppose a different brand of products could have a glaze that could go under a sealant. However, when I read about the CG Jetseal, it says "Jet Seal bonds to the surface creating a strong shield against water spots, contamination, road grime, and solar rays. The ability to chemically bond to paintwork... " This would make me think that having any other product on the paint would affect the bonding of this sealant.

Not sure which of the seven different CG glazes you are using, but the info on Glossworkz Glaze say it "is formulated with special polymers to maintain even distribution of gloss enhancers, premium oils, and UV inhibitors...apply Glossworkz Glaze Follow up with your favorite Chemical Guys sealant or wax to lock in the premium look of Glossworkz Glaze". Given that the glaze has oils in it, I would think that this would prevent the sealant from fully bonding with the paint.

Since you have your truck polished, then there would be no swirls or minor scratches that would benefit from being filled or hidden by the glaze, so my unofficial recommendation would be to apply the sealant first.

Remember that most of the shine comes from having the paint polished. Glazes, sealants and waxes will certainly enhance to some degree, but the results are somewhat limited on paint that is in poor condition.

In the first post of this thread, the truck paint was new, not swirled, and I did not polish it. I applied Liquid Paint Sealant, Brilliant Glaze, then Americana Wax. It had really good shine. However, this spring I polished the paint with the two-step process, and then finished with just Liquid Paint Sealant. I will tell you without a doubt that the polished paint with just sealant had way more shine than the first process with the sealant/glaze/wax combo.

-Dan
 

no1

Full Access Member
Joined
Apr 2, 2015
Posts
520
Reaction score
709
Well it really does say that it has oils in it. You really have a point there, i have to look into it more. And you are right about polishing but you know when you get into this shine thing, you just want to get everything out of it :)
what you are saying about Jetseal i think your right there, it totally makes sense. The glaze that i used was Glossworkz. Now i have good reason to get some more detailing to do after winter since nothing is going to happen before next summer. Garage not big enough to get truck in it :(
Thank you for advice.
 
OP
OP
TheWolf

TheWolf

Full Access Member
Joined
Nov 15, 2013
Posts
970
Reaction score
1,337
Location
Spokane, Washington
H2O Guard & Gloss on a Raptor

For those of you that have not tried the H2O Guard & Gloss, it is a water-activated sealant that is applied when the vehicle is still wet, right after a thorough wash. This application method saves time not having to dry first, and the product can be applied and provides protection to all exterior surfaces: paint, glass, plastic trim, vinyl, and running boards.

After a few times applying the H2O Guard & Gloss using the wet method, I found that the truck is too big to apply and dry-wipe a panel at a time. I also found that I spent too much time going back and getting splatters off of panels and windows that were already done.

So, rather than the spray on, wet wipe, then dry wipe for each panel, I have been spraying the product on in about 3-4 larger areas and immediately wiping with the wet towel.

For example, I will spray the hood, windshield, and roof, then go right to spreading the product with the plush microfiber towel that is damp. Then, I will do one side, windows , fenders, door panels, tailgate, and wet wipe.

Next, spray the other side and front, then wet wipe.

As the damp towel gets saturated, wring it out between applications. Then, I use the damp towel that has product on it to wipe the bumpers and then finish with the running boards.

With the product applied and spread on basically every surface of the truck, you will see some streaking and splatters. For the final step, I get a new plush microfiber towel, get it damp to the level of wrung out, then spray some H2O Guard & Gloss directly onto both sides of the towel. I also grab a dry, plush microfiber towel for final buffing. Using both towels, I will go back over the whole truck a panel or window at a time, wet wiping to remove any streaks or splatters, then dry wipe any leftover residue. Working from top to bottom; doing the hood, windshield, and roof; then the windows; then the fenders and doors; and finishing on the bumpers and running boards.

This sounds like a lot of work, but it goes really fast. I can do an application in 20-30 minutes (after a thorough wash).

One advantage of this method over the process shown in the video, is that you don't need three hands (one to spray and one for each towel), and you don't have to worry about splatters from overspray. Another advantage is it is faster, so you can get the water wiped away before it dries and potentially causes water spots. This is why wringing the towel out as you go is needed, to get the water off the surface before it dries.

This product should also be applied in the shade, and on cool surfaces. You cannot work in the sun or on hot surfaces, or the water will dry too fast and spot. How fast you have to work to avoid spots depends on your water quality. If you have really hard water, and have to really rush to get dried after a basic wash to avoid spots, then the dry application method may be your best option. Watch the product video for a demo of this method.

The reason I switch to a fresh towel for the final wet wipe, is just in case the original application towel ends up with any dirt from the lower areas. This is also why I work top to bottom, and finish on the bumpers and running boards, which may have residual dirt hiding out in the nooks and crannies.

Any of the plush microfiber towels will work, but I prefer the Borderless Gray Towels. Since the product is light gray, it can stain white towels, but this does not show up on the Borderless Gray Towels.

One last tip, wear nitrile or latex gloves, or your hands will smell like grape soda for the rest of the day!

Here's a pic from a recent application.
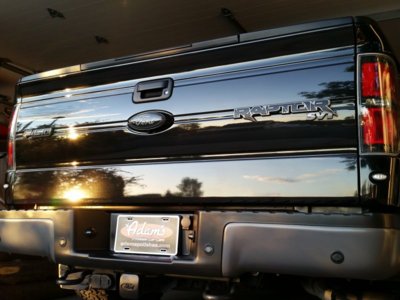
20150717_201310.jpg
 
Last edited:
Top