GEN 1 Whipple Kit Install :D

Disclaimer: Links on this page pointing to Amazon, eBay and other sites may include affiliate code. If you click them and make a purchase, we may earn a small commission.

MTF

FRF Addict
Joined
Nov 27, 2010
Posts
5,435
Reaction score
2,369
Location
Celebration, Florida
I run the HE fans off a uplifter switch in the console so I can turn them off in the winter so I had to cut and splice the power supply anyway on both.
I also suggest taping everything up on the back of the plug wires, I had salt water from the wintsr months get in there and corroded everything.
Not that you have winter months but you do have sea salt in the air.
And peel those white stickers off, LOL

The relays are positioned here roughly:
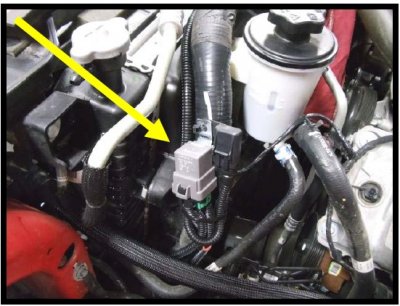
Relays.jpg
 
Last edited:

mindgame100

Member
Joined
Mar 3, 2017
Posts
45
Reaction score
25
Location
Honolulu, HI
FINALLY able to set a date for the SC install... Plan on installing on the long Turkey Day weekend..

I have a question for those of you that have already installed the Whipple SC..

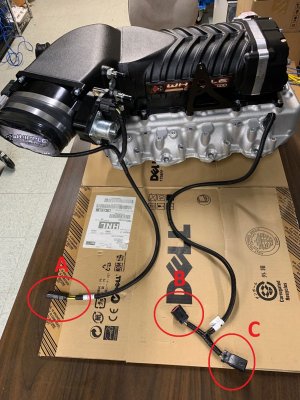
Where does these connectors connect to?

The main documentation really suxs..
>>121. Pre-route the inlet air temp sensor 2-way connector to the driver side and connect to air temp sensor. This must go along the firewall to clear SC assembly.
Okay... One end clicks into the air temp sensor.. What does the other end connect to?

Anyways...
Anyone able to figure this out?

I'm tempted to connect A to B and then connects to the TB sensor connector.. *guessing....
BTW, yes I have contacted support... Awaiting their reply..


IMG_1442.JPG
 

MTF

FRF Addict
Joined
Nov 27, 2010
Posts
5,435
Reaction score
2,369
Location
Celebration, Florida
Wish I could help you out on this one but since mine is a Gen 2 and 7 years old now, the temp sensor connection was different.
Plus I had it installed by SVT Tech at the dealer. I know he had to tap into one of the PCM plugs.
Like you said the .pdf install file leaves a lot to be desired.
 
Last edited:

mindgame100

Member
Joined
Mar 3, 2017
Posts
45
Reaction score
25
Location
Honolulu, HI
Wish I could help you out on this one but since mine is a Gen 2 and 7 years old now, the temp sensor connection was different.
Plus I had it installed by SVT Tech at the dealer. I know he had to tap into one of the PCM plugs.
Like you said the .pdf install file leaves a lot to be desired.

DUDE!!! Thanks!!!
Okays this is what I figured out...

The Throttle harness is straight forward, one end goes to TB sensor, other TB motor, and the last connector to the original TB connector in engine bay..

The 2 way extension (which is not mention in docs), is for the BEVIS connector which is relocated from the original mount point on manifold to its new location on the SC.

Finally... This is where your hint of tapping into the PCM...

No where in the new documentation mentions anything about tapping into the PCM.

However, I was able to search and locate the original 2011 SC installation manual(pdf). In this pdf, it describes where you need to tap into the PCM for the intake temp sensor (pins 36 and 56). At least now I have a fall back..

The 2019 version, the documentation only states that one end of harness connects to the intake temp sensor, but no mention of the other ends.

The ****** thing is... I now have to destroy a nice wiring harness, let alone, the wires are different colors from the 2011 doc so I can now connect to the intake temp sensor... I think I need to have whipple provide the older temp sensor harness with the PCM pin connected to it as stated in the 2011 version.

Looks like I can still proceed on turkey day weekend :) Hopefully, Whipple can validate my guess work..

Much Thanks MTF!!!

:)
 
Last edited:

MTF

FRF Addict
Joined
Nov 27, 2010
Posts
5,435
Reaction score
2,369
Location
Celebration, Florida
I don't think you'll have to destroy the wiring, I believe you can take the plugs apart and remove the wires with the pins intact from the back of the new plugs and use them to tie into the PCM connector.

That Bevis is also the canister purge valve, which I wound up having to replace mine a year later after the installation of the Whipple.
I had a vacuum issue that was throwing a code but couldn't track it down until I broke down and had a smoke test done at the dealer.
The tech found it right away when he touched the Bevis.

Not saying you'll have the same problem but some thing to keep in mind.
Just be careful when handling the canister purge valve.
 
Last edited:
Top