
Crow68
Member
Hey guys,
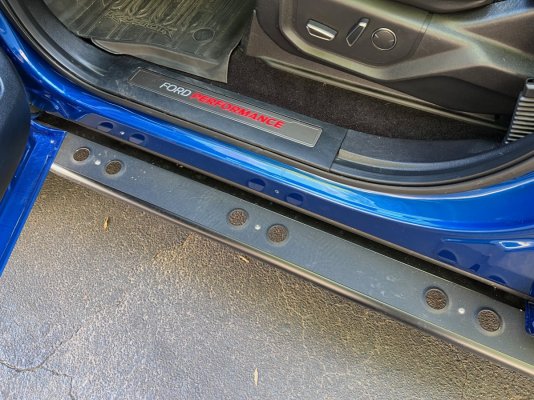
Just wanted to show you what I finished in case any of you guys have the same problems that I had with the finish on the OEM Ford raptor side steps that are starting to degrade/lose adhesion around the edges. I had a small spot below the drivers door on the very lower edge that was starting to lift and catch on things like microfiber towels and I could tell it was going to get worse down the road.
Anyway, I usually run the AMP power steps on about 5 of my previous rigs and I really like those a lot. But…on this truck I really appreciate the fact that the way these fenders flare on the Raptors, they throw up a lot of rocks that will eventually thrash everything along the sides and I’ve heard some large rocks hit the bottom of the side steps and I was glad I had them on there. I’ve been on fire trails where it sounds like it’s raining hell down there.
I decided to take them off so I could see what was going on. Looks like Ford, and their infinite wisdom sprayed their material while the steps were laying flat so there’s nothing wrapping around the bottom edge. The Ford finish is so thin you can’t believe it. It is paper thin. Once the very bottom lower edge starts to lift, it will keep on going.. I was pretty surprised how solidly built these things are. They are a pretty good chunk of solid aluminum as far as I can tell.
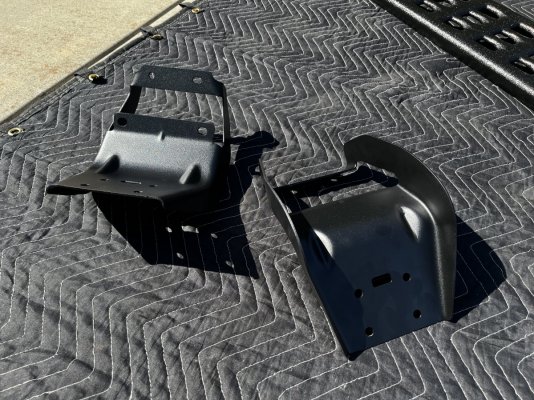
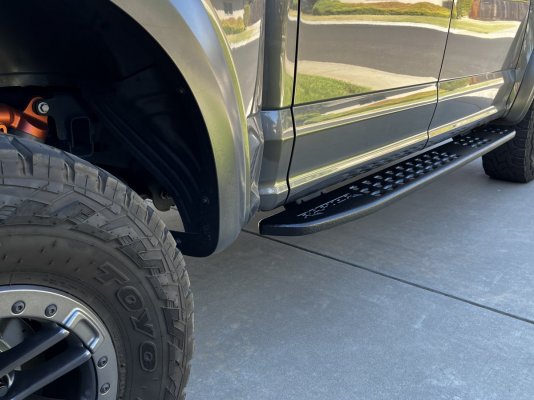
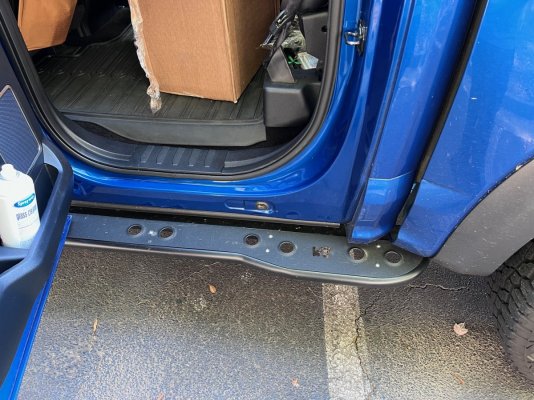
I took the steel mounts off of the steps. The mounts have three nuts that hold them onto the body and then they wrap around and there are four small screws holding the board onto the mount. I took all 4 steel mounts to my powder coating guy that I use all of the time. I had him put a very very light textured black satin powder coat on all of the mounts. They turned out beautiful. All four mounts are exactly the same with the same part number stamped on them. I will try to include this in an image. He charged me $100 to do all four including the chemical bath to remove the original OEM paint. You will be surprised on the leading edge of the lower steel mount how many divots and chips are on there from hundreds of stones. If you take yours off and put them back on, I called Ford and the torque spec for those nuts is 17 foot pounds.
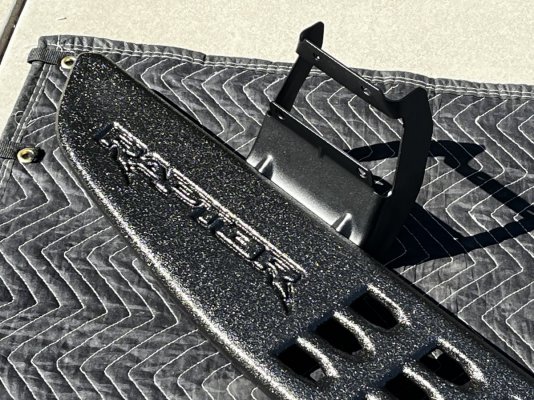
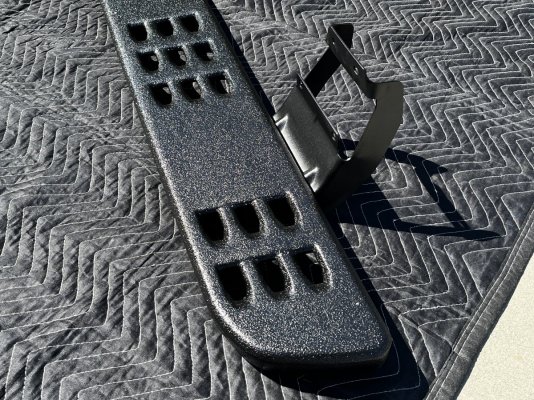
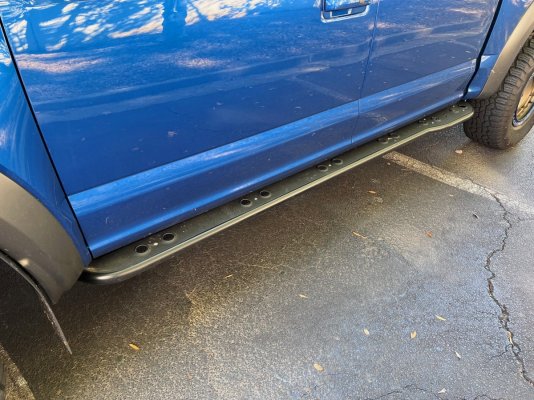
I took the side steps down to my Line-X guy and I had him do the premium finish with the UV protective finish coating and I had him go all the way around the bottom edges. They look like the finish will last forever, and they should be very easy to maintain and won’t snag your microfibers but they still have pretty damn good grip. I asked my guy to do a very fine texture spray. He tried to get all of the loose factory material off of there and then used a special bedliner bonding primer and then completed the finish. He charged me $315 to do both steps. They are a little tricky to photograph but they have the same finish you see on the premium bedliner if you have those in your trucks. I usually use Adams In-And-Out spray or Maxima SC1 (these are the two best detail sprays I’ve ever used). You can get the SC1 one at Cycle Gear. I’ve been using it on dirt bikes and Harleys and that’s how I found out about it. I will attach some images.
And lastly, I had the same issues I’ve seen all over the forums with people trying to figure out what to do with their factory tips. I had been wondering that myself. I’ve seen some guys do some good work with rattle cans on those tips and that’s probably the best way forward but I figured I would try something different.
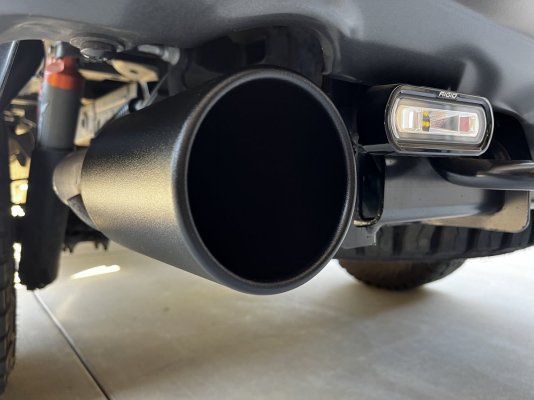
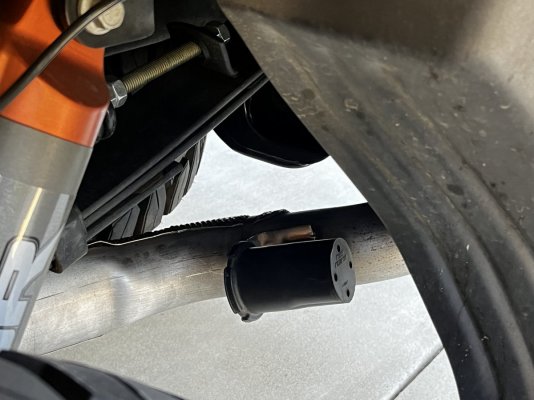
Since I was heading over to my Powdercoat guy, I pulled off my tailpipes and had him powder coat the tips the same satin finish very fine texture that I used on the steel side step mounting brackets. Since the tips are not removable, in order to get the tailpipes suitable for the 450° oven for the powder coating, I needed to cut off the tack welded rubber vibration isolator that’s on the driver side tailpipe. Just tack-welded it exactly where it was after everything came out of the oven. You could probably leave it off if you wanted to - it’s just supposed to reduce some harmonic resonance at certain frequencies. Probably not noticeable but I am a freak, lol. I wasn’t worried about just buying some new tailpipes, but every time you look around there’s some kind of caveat about what fits what… Corsa says that the tailpipes they have will only fit into their exhaust/muffler… The Borla ones are said to work with factory muffler but they didn’t really have one in a tip finish that I liked, and some of the other 5 inch tips would be fine but they get a little close to my Rigid LED back up lights as far as clearance due to the diameter. Some of the other ones don’t have heat shields near the spare tire and I was pretty set on making sure I have those due to the pretty tight clearances back there and I run a full size 35/12.50/17 Toyo RT as my spare. My powder coat guy charged me $125 to do both tips.
If you want me to post the name and code for the powders, I can do that. Just wanted to throw this out there in case anyone else was having issues.
Just wanted to show you what I finished in case any of you guys have the same problems that I had with the finish on the OEM Ford raptor side steps that are starting to degrade/lose adhesion around the edges. I had a small spot below the drivers door on the very lower edge that was starting to lift and catch on things like microfiber towels and I could tell it was going to get worse down the road.
Anyway, I usually run the AMP power steps on about 5 of my previous rigs and I really like those a lot. But…on this truck I really appreciate the fact that the way these fenders flare on the Raptors, they throw up a lot of rocks that will eventually thrash everything along the sides and I’ve heard some large rocks hit the bottom of the side steps and I was glad I had them on there. I’ve been on fire trails where it sounds like it’s raining hell down there.
I decided to take them off so I could see what was going on. Looks like Ford, and their infinite wisdom sprayed their material while the steps were laying flat so there’s nothing wrapping around the bottom edge. The Ford finish is so thin you can’t believe it. It is paper thin. Once the very bottom lower edge starts to lift, it will keep on going.. I was pretty surprised how solidly built these things are. They are a pretty good chunk of solid aluminum as far as I can tell.
I took the steel mounts off of the steps. The mounts have three nuts that hold them onto the body and then they wrap around and there are four small screws holding the board onto the mount. I took all 4 steel mounts to my powder coating guy that I use all of the time. I had him put a very very light textured black satin powder coat on all of the mounts. They turned out beautiful. All four mounts are exactly the same with the same part number stamped on them. I will try to include this in an image. He charged me $100 to do all four including the chemical bath to remove the original OEM paint. You will be surprised on the leading edge of the lower steel mount how many divots and chips are on there from hundreds of stones. If you take yours off and put them back on, I called Ford and the torque spec for those nuts is 17 foot pounds.
I took the side steps down to my Line-X guy and I had him do the premium finish with the UV protective finish coating and I had him go all the way around the bottom edges. They look like the finish will last forever, and they should be very easy to maintain and won’t snag your microfibers but they still have pretty damn good grip. I asked my guy to do a very fine texture spray. He tried to get all of the loose factory material off of there and then used a special bedliner bonding primer and then completed the finish. He charged me $315 to do both steps. They are a little tricky to photograph but they have the same finish you see on the premium bedliner if you have those in your trucks. I usually use Adams In-And-Out spray or Maxima SC1 (these are the two best detail sprays I’ve ever used). You can get the SC1 one at Cycle Gear. I’ve been using it on dirt bikes and Harleys and that’s how I found out about it. I will attach some images.
And lastly, I had the same issues I’ve seen all over the forums with people trying to figure out what to do with their factory tips. I had been wondering that myself. I’ve seen some guys do some good work with rattle cans on those tips and that’s probably the best way forward but I figured I would try something different.
Since I was heading over to my Powdercoat guy, I pulled off my tailpipes and had him powder coat the tips the same satin finish very fine texture that I used on the steel side step mounting brackets. Since the tips are not removable, in order to get the tailpipes suitable for the 450° oven for the powder coating, I needed to cut off the tack welded rubber vibration isolator that’s on the driver side tailpipe. Just tack-welded it exactly where it was after everything came out of the oven. You could probably leave it off if you wanted to - it’s just supposed to reduce some harmonic resonance at certain frequencies. Probably not noticeable but I am a freak, lol. I wasn’t worried about just buying some new tailpipes, but every time you look around there’s some kind of caveat about what fits what… Corsa says that the tailpipes they have will only fit into their exhaust/muffler… The Borla ones are said to work with factory muffler but they didn’t really have one in a tip finish that I liked, and some of the other 5 inch tips would be fine but they get a little close to my Rigid LED back up lights as far as clearance due to the diameter. Some of the other ones don’t have heat shields near the spare tire and I was pretty set on making sure I have those due to the pretty tight clearances back there and I run a full size 35/12.50/17 Toyo RT as my spare. My powder coat guy charged me $125 to do both tips.
If you want me to post the name and code for the powders, I can do that. Just wanted to throw this out there in case anyone else was having issues.