What did you do to your Gen 3 today?

Disclaimer: Links on this page pointing to Amazon, eBay and other sites may include affiliate code. If you click them and make a purchase, we may earn a small commission.

Kings4thecup

Full Access Member
Joined
Feb 15, 2020
Posts
121
Reaction score
61
Location
Woodland Hills, CA
Busy weekend here. 1)Diesel Industries - 3rd brake light antenna mount with Ridgid chase lights 2) Icom dual band radio installed 3)Builtright dash Molle panel (HD) 4) Naviks AV input system with Apple TV connection (converted new Apple TV to run on USB 5v. Super easy install with great support from NAVIKS (I accidentally flipped some of the dip switches and that were able to tell me instantly which one to adjust for my truck.View attachment 441426
damn...i need to do that naviks system
 

khildebr

Full Access Member
Joined
Jul 13, 2021
Posts
187
Reaction score
285
Location
Pleasant Valley
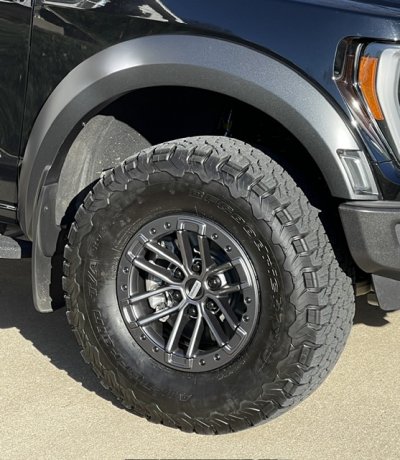
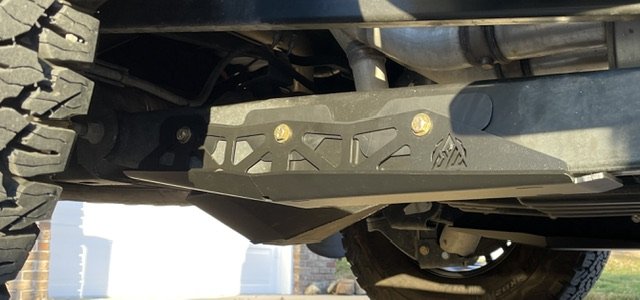
Nice weather here in KC, so got the rims swapped out to Gen 2 ones (yeah it’s retro but IMHO they’re the best looking rims Ford ever put on the Raptor) and installed some SwarfWorks Rear Trailing Arm Guards that I had picked up back around Thanksgiving. Tomorrow will be spent installing the COBB Air Intake and Radiator Shroud that I picked up at about the same time. Since it doesn’t fit in the garage, I had to wait for some better weather to get around to it. Apologies to @John M BUNMAN for the poor application of tire shine I’m sure i’ll get grief from him once he shows up again :D

IMG_1667.jpeg

IMG_1674.jpeg

 
Last edited:

QCRappy

FRF Supporting Member
Supporting Member
Joined
Dec 4, 2012
Posts
1,100
Reaction score
483
Location
Charlotte, NC
Nice weather here in KC, so got the rims swapped out to Gen 2 ones (yeah it’s retro but IMHO they’re the best looking rims Ford ever put on the Raptor) and installed some SwarfWorks Rear Trailing Arm Guards that I had picked up back around Thanksgiving. Tomorrow will be spent installing the COBB Air Intake and Radiator Shroud that I picked up at about the same time. Since it doesn’t fit in the garage, I had to wait for some better weather to get around to it. Apologies to @John M BUNMAN for the poor application of tire shine I’m sure i’ll get grief from him once he shows up again :D

View attachment 443540

View attachment 443541

I need to install my trailing arm guards. How hard was the install?
 

khildebr

Full Access Member
Joined
Jul 13, 2021
Posts
187
Reaction score
285
Location
Pleasant Valley
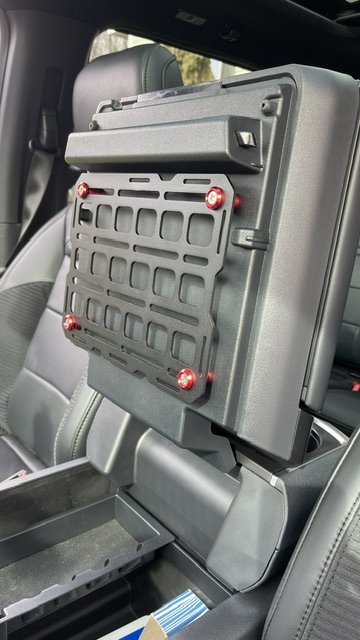
Got the COBB Air Intake and Radiator Shroud installed and in the process managed to drop the screw holding the air inlet into the endless void that is the engine compartment never to be seen again (unless it turns up in one of my wheels :mad:). Went to get one from the Ford parts department and of course it’s not in stock. Otherwise the install process for both items went smoothly. Also remembered that I had gotten a MOLLE panel from BuiltRight to go on the underside of the lid to the center console for Christmas. So that was installed along with ESI Tailgate seal.

Time to sit back, enjoy an adult beverage and admire the work done this week.

IMG_1683.jpeg
 

khildebr

Full Access Member
Joined
Jul 13, 2021
Posts
187
Reaction score
285
Location
Pleasant Valley
I need to install my trailing arm guards. How hard was the install?
Super easy. Didn’t even need the jack to do it. Just a wrench and nut driver with socket. Take the bolts and spacers out along with the inserts. Set everything close to the trailing arm. Place the inserts into each side of the trailing arm and hold them in pace with one hand. Then use your other hand to move the guard up onto the trailing arm which will hold the inserts in place and allow you to put the spacers back in along with the bolts. Put the wrench on the nut and use the nut driver (or socket wrench) to tighten things up. They don’t offer a torque spec, so I just went with what the nut driver tightened it up to and will check for looseness down the road. Took all of 15 minutes.
 

QCRappy

FRF Supporting Member
Supporting Member
Joined
Dec 4, 2012
Posts
1,100
Reaction score
483
Location
Charlotte, NC
Super easy. Didn’t even need the jack to do it. Just a wrench and nut driver with socket. Take the bolts and spacers out along with the inserts. Set everything close to the trailing arm. Place the inserts into each side of the trailing arm and hold them in pace with one hand. Then use your other hand to move the guard up onto the trailing arm which will hold the inserts in place and allow you to put the spacers back in along with the bolts. Put the wrench on the nut and use the nut driver (or socket wrench) to tighten things up. They don’t offer a torque spec, so I just went with what the nut driver tightened it up to and will check for looseness down the road. Took all of 15 minutes.
Thank you! it seems pretty simple based upon the product. I have the black as well, thinking I may try and get them close to the fox orange
 

khildebr

Full Access Member
Joined
Jul 13, 2021
Posts
187
Reaction score
285
Location
Pleasant Valley
Thank you! it seems pretty simple based upon the product. I have the black as well, thinking I may try and get them close to the fox orange
Sounds like a good plan and should look nice. I will note that the fit of the guard over the inserts and trailing arm is pretty tight. So you may want to do a quick test fit to see how much room you have for an extra layer of paint. It shouldn’t be an issue but always good to check first.
 

scottybs

Active Member
Joined
Feb 3, 2023
Posts
89
Reaction score
128
Location
WA
Got the COBB Air Intake and Radiator Shroud installed and in the process managed to drop the screw holding the air inlet into the endless void that is the engine compartment never to be seen again (unless it turns up in one of my wheels :mad:). Went to get one from the Ford parts department and of course it’s not in stock. Otherwise the install process for both items went smoothly. Also remembered that I had gotten a MOLLE panel from BuiltRight to go on the underside of the lid to the center console for Christmas. So that was installed along with ESI Tailgate seal.

Time to sit back, enjoy an adult beverage and admire the work done this week.

View attachment 443858
Damn… you hardcore…. Made it heavier
 
Top