You are using an out of date browser. It may not display this or other websites correctly.
You should upgrade or use an alternative browser.
You should upgrade or use an alternative browser.
The Last Gen 2 Shock Swap Thread
- Thread starter Stricken
- Start date
Disclaimer: Links on this page pointing to Amazon, eBay and other sites may include affiliate code. If you click them and make a purchase, we may earn a small commission.
nipplesNchowder
Active Member
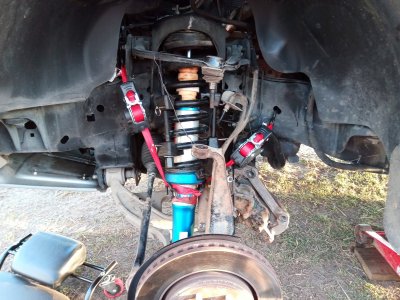
Okay so I got the drivers side done. Doesn't really fit and I question if it was worth it but anyways, ill decide if I think its worth it after I do the next one. The photo I uploaded should serve as a bit of a cheat sheet on how to rig things up, not that its the smartest way to do it, just that I managed to make it work somehow
You absolutely need spring compressors and ratchet straps to get the shock in there.
Some info:
Brake bolts x 2: 21 mm each (I actually dont even know if you have to take these off, on second though, but I took mine off)
Upper control arm nut: 21mm flat wrench + 10mm socket
Steering arm nut: 21 mm flat wrench + 10 mm socket
Link end nut: 18 mm flat wrench + 8mm socket
Top hat nuts x 3: 15mm each (a deep and shallow socket is nice)
Lower shock bolt: 27mm, with a 30 mm nut. Bring a breaker bar.
First thing I noticed after letting the jack down and putting weight on the shock is that the bump stop is already buried. Its weird, because I could swear that other people had some travel. Whats also weird is that I could put my gen 1 spring on the gen 2 shock without using a spring compressor.. Anyways ill post more info tomorrow once I figure out whats up

Last edited:
nipplesNchowder
Active Member
I now have both front shocks replaced with gen 2s.
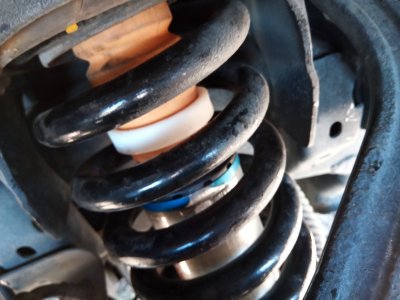
I will give some important advice. Don't get rammy and rip the old shocks out without paying extremely close attention to the orientation of the two top hat flange thingys (the two steel ring washer things that bolt on at the top of the shock). Before/during removal of the shocks, use a paint marker and mark them in a way that allows you to identify the top and the front of the hardware. You need to put them back in exactly as you took them out, and if you don't mark them you risk installing them upside down and completely throwing your gen 2 shocks out of alignment. If installed wrong, your springs will kink and rub on your shocks and make rubbing noises every time you hit a bump. You will have to rip your shock out entirely just to fix the issue, and it's just about as much fun as putting them in
I added a pic, this is the result of improperly installed top hat flanges. I obviously made this mistake. The photo is taken after I fixed the issue, but it shows the damage it does it you install wrong like me.
Also I used a knife and cut out 1 section of the orange Gen 2 bump stops, anybody else cut any? It definitely improved the ride and I'm tempted to cut out more

After its all said and done, I can confirm the truck rides better .. but it's not amazing enough to justify an "upgrade" if you don't need one. The only benefit to this mod is saving money on the actual shocks
I will give some important advice. Don't get rammy and rip the old shocks out without paying extremely close attention to the orientation of the two top hat flange thingys (the two steel ring washer things that bolt on at the top of the shock). Before/during removal of the shocks, use a paint marker and mark them in a way that allows you to identify the top and the front of the hardware. You need to put them back in exactly as you took them out, and if you don't mark them you risk installing them upside down and completely throwing your gen 2 shocks out of alignment. If installed wrong, your springs will kink and rub on your shocks and make rubbing noises every time you hit a bump. You will have to rip your shock out entirely just to fix the issue, and it's just about as much fun as putting them in
I added a pic, this is the result of improperly installed top hat flanges. I obviously made this mistake. The photo is taken after I fixed the issue, but it shows the damage it does it you install wrong like me.
Also I used a knife and cut out 1 section of the orange Gen 2 bump stops, anybody else cut any? It definitely improved the ride and I'm tempted to cut out more

After its all said and done, I can confirm the truck rides better .. but it's not amazing enough to justify an "upgrade" if you don't need one. The only benefit to this mod is saving money on the actual shocks
Last edited:
I now have both front shocks replaced with gen 2s.
I will give some important advice. Don't get rammy and rip the old shocks out without paying extremely close attention to the orientation of the two top hat flange thingys (the two steel ring washer things that bolt on at the top of the shock). Before/during removal of the shocks, use a paint marker and mark them in a way that allows you to identify the top and the front of the hardware. You need to put them back in exactly as you took them out, and if you don't mark them you risk installing them upside down and completely throwing your gen 2 shocks out of alignment. If installed wrong, your springs will kink and rub on your shocks and make rubbing noises every time you hit a bump. You will have to rip your shock out entirely just to fix the issue, and it's just about as much fun as putting them in
I added a pic, this is the result of improperly installed top hat flanges. I obviously made this mistake. The photo is taken after I fixed the issue, but it shows the damage it does it you install wrong like me.
Also I used a knife and cut out 1 section of the orange Gen 2 bump stops, anybody else cut any? It definitely improved the ride and I'm tempted to cut out more
View attachment 122179
After its all said and done, I can confirm the truck rides better .. but it's not amazing enough to justify an "upgrade" if you don't need one. The only benefit to this mod is saving money on the actual shocks
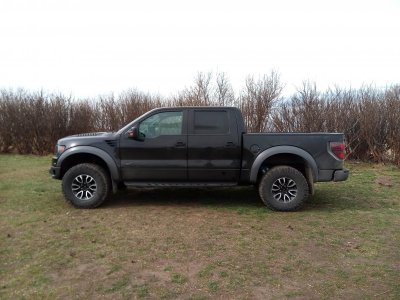
Could you throw up a pic of final truck height after install?
Sent from my iPhone using Tapatalk
nipplesNchowder
Active Member
Could you throw up a pic of final truck height after install?
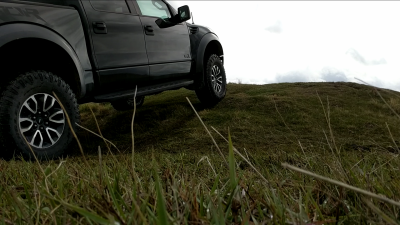
Truck definitely sits higher with the gen 2 shocks on, at least an 1" on the back and probably even more than that on the front. I dont really have a photo to compare it to though but I now have way more clearance to crawl around under the truck so im not just imagining things

waveslayer
Full Access Member
I have some gen 2 shocks and leafs for same in Orange County if anyone wants them
My wife thinks I only have 3 guns
My wife thinks I only have 3 guns
5280_TIM
Full Access Member
PM sent
Sent from my SM-G965U using Tapatalk
Sent from my SM-G965U using Tapatalk
I finally got this done yesterday, Gen 2 shocks all the way around. These turned out to be much easier to install than expected, no spring compressors or straps required if you remove the 13 mm nut under the cap in the center of the hub. In the back I used a two foot long 2x4 to compress the shock to get it in the top shock mount.
Test drive consisted of ten miles city streets and about ten miles of highway. One of the city streets had six speed tables in a half mile stretch that I normally avoid. The raptor handled it all very well and the ride quality was superb.
Test drive consisted of ten miles city streets and about ten miles of highway. One of the city streets had six speed tables in a half mile stretch that I normally avoid. The raptor handled it all very well and the ride quality was superb.
nipplesNchowder
Active Member
I finally got this done yesterday, Gen 2 shocks all the way around. These turned out to be much easier to install than expected, no spring compressors or straps required if you remove the 13 mm nut under the cap in the center of the hub. In the back I used a two foot long 2x4 to compress the shock to get it in the top shock mount.
Test drive consisted of ten miles city streets and about ten miles of highway. One of the city streets had six speed tables in a half mile stretch that I normally avoid. The raptor handled it all very well and the ride quality was superb.
I've had mine on for a month now. Zero issues, and I've tested it fairly thoroughly. Did you cut any of the front bump stops out?

I've had mine on for a month now. Zero issues, and I've tested it fairly thoroughly. Did you cut any of the front bump stops out?
No, I decided to leave them as they were otherwise I would have used the bumps from the gen 1 shocks. I did give it some thought and deemed it similar to after market bumps without the cost.
Similar threads
- Replies
- 67
- Views
- 3K
- Replies
- 4
- Views
- 480
- Replies
- 4
- Views
- 1K
- Replies
- 31
- Views
- 2K
Forum statistics
Latest posts
-
lander wyoming 8/1-8/3
- Latest: The Car Stereo Company
-
-
Sunday 4/6 Dinner in the Atl sign up
- Latest: The Car Stereo Company

