Tailgate appliqué installation

Disclaimer: Links on this page pointing to Amazon, eBay and other sites may include affiliate code. If you click them and make a purchase, we may earn a small commission.

Joined
Feb 20, 2023
Posts
9
Reaction score
9
Location
SLO, CA
Yes, I did the install today. It was rather easy, but I took some time over the last few weekends to get the prep right so I would not have any issues with everything. Overall, I think my method where I used 3M VHB tape and a sealant worked very well.

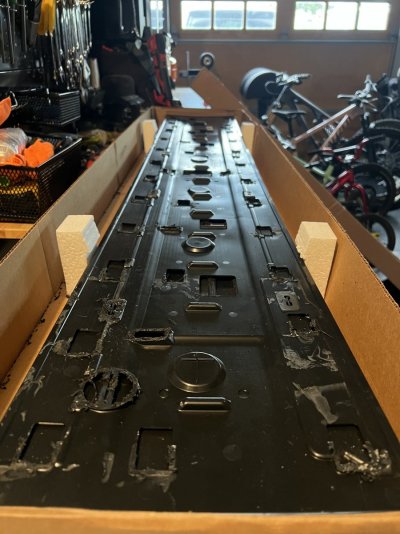
Sorry I do not have any photos of the work I did to the back of the applique as I forgot to take a few when doing the prep, but essentially what I did was buy one of those Milwaukee M12 oscillating multi-tools and some narrower and wide blades to make the cutting easier. You could use a Dremel if you have the patience too (I did not after removing a few of the tabs lol).

Here are the part numbers and stuff I used:
View attachment 394359

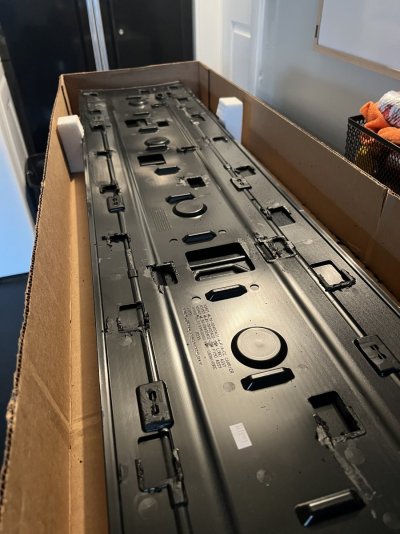
- I spent an hour or so afterwards using the Dremel and a disk made for plastic cutting to smooth a lot of my cuts out. I vacuumed the backside off and cleaned with isopropyl alcohol (IPA).
- After smoothing it all out, I went to the truck and removed the blue ford oval and the raptor logo and cleaned the tailgate off. Goo-Gone and some isopropyl alcohol worked wonders here.
- Polished the areas where the Raptor Logo used to be after removing the double sided tape and then washed the tailgate with an all-purpose cleaner spray I used for detailing.

View attachment 394355

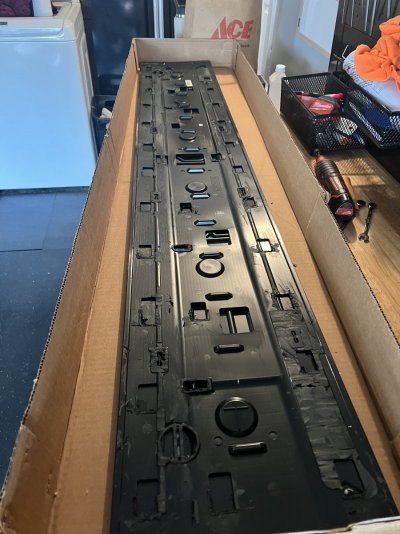
- Did some test fitting to line the applique up. Fit well. Also made sure it was smooth enough on the backside to lay flat with all the cutting I had done. Added blue painters tape to the truck to help me line it up and keep any sealant off areas where I did not want it. The painters tape I'm talking about goes laterally on the top and bottom of the applique and is not pictured. I pulled it off after the sealant was applied. Any sealant on the applique was able to be wiped off with IPA and a microfiber towel.

View attachment 394356

- Wiped down the areas I planned to use the VHB tape at with the 3M adhesion promoter. Highly recommend this stuff as it aids in holding my C8's skirts on greatly lol.
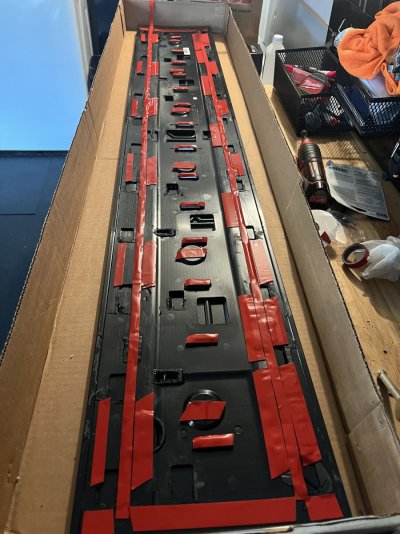
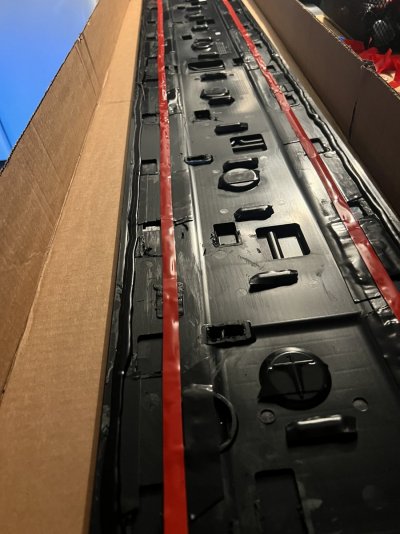
- I added the 3M VHB tape to a lot of the areas of the applique. See the areas I shaded in Red. If you apply the tape well it will not interfere with the next step and it can be pulled off. By this I mean, cut the tape a little long but leave a "tongue" you can pull when the applique is on the tailgate. It'll allow you to position it along that top groove and slowly pull the backing off as you press in on the applique.
View attachment 394357

- On the OUTWARD side of the 3M VHB tape I used a sealant. You might not need this, but I opted to do it because I wanted the backside to be weather sealed as well since I took that blue ford oval off and it creates an opening into the inside of the internal structure of the tailgate.
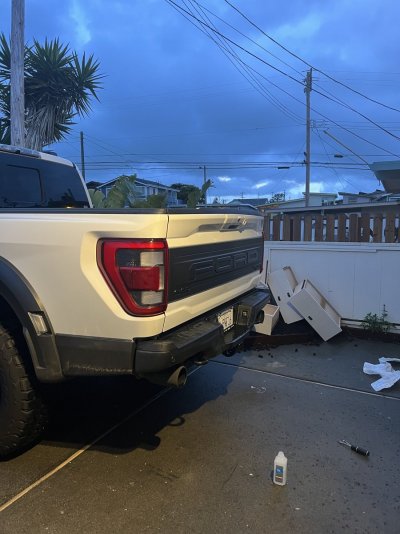
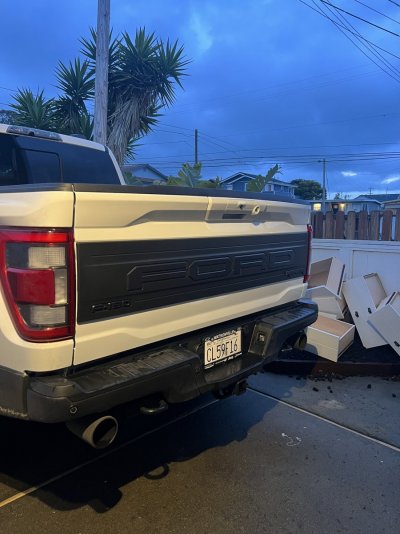
- Then I went out to the truck with some clamps and some microfibers to not scratch the applique up and placed it on. If you opt for the sealant route you can kind of play with the location a bit more before you take the VHB tape backing off.

View attachment 394358

Let me know if you have any questions. I thought it was fairly straight forward as well and pretty easy. Much cheaper than going the new tailgate route lol

Hey Lanthas,

Just had mine show up. Could you detail for me the prep work a little bit more? I am looking at the tabs and wondering if you only had to remove the grey pins or if you actually cut the black plastic base off to totally delete them.

Great write up, much appreciated
 

Lanthas

Member
Joined
Jan 26, 2019
Posts
31
Reaction score
41
Location
San Diego
Hey Lanthas,

Just had mine show up. Could you detail for me the prep work a little bit more? I am looking at the tabs and wondering if you only had to remove the grey pins or if you actually cut the black plastic base off to totally delete them.

Great write up, much appreciated
Yeah for sure I can go into a little more depth. I used an oscillating tool with a 2 inch wide blade and cut the tabs down to the base. The only ones I did not need to cut down or remove were the ones in the center that have no pins or anything and are barely raised off the center of the applique. If you look at the photos of the applique I shared in post #24, I cut down everything and removed all the bolts in order to make everything at the same level as, or lower, than those little slightly raised ridges in the center that in my #30 post that has all the red lines denoting where I put thin 3M VHB tape at. I wanted everything to be close to flush with the edges as I was going to keep it flat against the tailgate.

Probably did not need tape on all those center ridges in my #30 post as if you use adhesion promoter on the applique where you intend to apply the 3M VHB tape, and use some isopropyl alcohol to ensure the tailgate is clean before pressing the applique on.

One thing I wish I gave a shot first was to remove the Ford Oval first and checked to see if the large bolt/pin thing in the upper center of the backside of the applique would fit in there before cutting it down, as that would have made lining the applique up much easier. I do recommend the sealant for weatherproofing and using some clamps to hold it on for an hour or so while it dries. Otherwise If you didn't want to go that route with the sealant, I'd look or a way to keep water/dust out of that Ford Oval Emblem area since there is some electronics in the interior bit of the tailgate. I did not check to see if the applique would fit flush over the Ford Oval to just keep it sealed up after I cut all the tabs/pins/bolts off.

Let me know if you need any other help/guidance.
 
Joined
Feb 20, 2023
Posts
9
Reaction score
9
Location
SLO, CA
Yeah for sure I can go into a little more depth. I used an oscillating tool with a 2 inch wide blade and cut the tabs down to the base. The only ones I did not need to cut down or remove were the ones in the center that have no pins or anything and are barely raised off the center of the applique. If you look at the photos of the applique I shared in post #24, I cut down everything and removed all the bolts in order to make everything at the same level as, or lower, than those little slightly raised ridges in the center that in my #30 post that has all the red lines denoting where I put thin 3M VHB tape at. I wanted everything to be close to flush with the edges as I was going to keep it flat against the tailgate.

Probably did not need tape on all those center ridges in my #30 post as if you use adhesion promoter on the applique where you intend to apply the 3M VHB tape, and use some isopropyl alcohol to ensure the tailgate is clean before pressing the applique on.

One thing I wish I gave a shot first was to remove the Ford Oval first and checked to see if the large bolt/pin thing in the upper center of the backside of the applique would fit in there before cutting it down, as that would have made lining the applique up much easier. I do recommend the sealant for weatherproofing and using some clamps to hold it on for an hour or so while it dries. Otherwise If you didn't want to go that route with the sealant, I'd look or a way to keep water/dust out of that Ford Oval Emblem area since there is some electronics in the interior bit of the tailgate. I did not check to see if the applique would fit flush over the Ford Oval to just keep it sealed up after I cut all the tabs/pins/bolts off.

Let me know if you need any other help/guidance.

You’re the man! Thank you. I am going to go the sealant route just to be safe and will probably try and just leave the emblem attached if clearance allows. Thanks again dude
 

Lanthas

Member
Joined
Jan 26, 2019
Posts
31
Reaction score
41
Location
San Diego
You’re the man! Thank you. I am going to go the sealant route just to be safe and will probably try and just leave the emblem attached if clearance allows. Thanks again dude
Absolutely. Let me know if there's any other questions that you have. The sealant I used in the picture has a quick working time of like 15-20 mins, but its totally doable if you use that "ridge" on the tailgate to align the top of the applique. Also highly recommend putting down painters tape slightly outside the edge of where the applique will sit so you don't get any spill over onto the paint. Then you can use a microfiber covered in isopropyl to smooth the sealant out a little and then pull the painters tape up. If that makes sense at all lol
 
Joined
Feb 20, 2023
Posts
9
Reaction score
9
Location
SLO, CA
Absolutely. Let me know if there's any other questions that you have. The sealant I used in the picture has a quick working time of like 15-20 mins, but its totally doable if you use that "ridge" on the tailgate to align the top of the applique. Also highly recommend putting down painters tape slightly outside the edge of where the applique will sit so you don't get any spill over onto the paint. Then you can use a microfiber covered in isopropyl to smooth the sealant out a little and then pull the painters tape up. If that makes sense at all lol
Makes sense, I picked up the same sealant, VHB and adhesion promotor you posted. I did a rough cut on the appliqué yesterday and think I got it pretty close. Tried my dremel but like you suggested, switched over to my multi tool after cutting the first two tabs off. I am going to hit it with my dremel sander a bit to clean it up before install. Ill attach some photos.

In regards to the sealant did you apply it to the raised outermost edge of the appliqué (like the 1/4” lip) or just inside that?

941184A1-D5F1-465A-8427-FDC90A9EE9F7.jpeg
19069284-0BD5-412B-8163-6E4E8A25945F.jpeg
 

ZorroV

FRF Supporting Member
Supporting Member
Joined
Sep 2, 2022
Posts
65
Reaction score
38
Location
Los Angeles, CA
Yes, I did the install today. It was rather easy, but I took some time over the last few weekends to get the prep right so I would not have any issues with everything. Overall, I think my method where I used 3M VHB tape and a sealant worked very well.

Sorry I do not have any photos of the work I did to the back of the applique as I forgot to take a few when doing the prep, but essentially what I did was buy one of those Milwaukee M12 oscillating multi-tools and some narrower and wide blades to make the cutting easier. You could use a Dremel if you have the patience too (I did not after removing a few of the tabs lol).

Here are the part numbers and stuff I used:
View attachment 394359

- I spent an hour or so afterwards using the Dremel and a disk made for plastic cutting to smooth a lot of my cuts out. I vacuumed the backside off and cleaned with isopropyl alcohol (IPA).
- After smoothing it all out, I went to the truck and removed the blue ford oval and the raptor logo and cleaned the tailgate off. Goo-Gone and some isopropyl alcohol worked wonders here.
- Polished the areas where the Raptor Logo used to be after removing the double sided tape and then washed the tailgate with an all-purpose cleaner spray I used for detailing.

View attachment 394355

- Did some test fitting to line the applique up. Fit well. Also made sure it was smooth enough on the backside to lay flat with all the cutting I had done. Added blue painters tape to the truck to help me line it up and keep any sealant off areas where I did not want it. The painters tape I'm talking about goes laterally on the top and bottom of the applique and is not pictured. I pulled it off after the sealant was applied. Any sealant on the applique was able to be wiped off with IPA and a microfiber towel.

View attachment 394356

- Wiped down the areas I planned to use the VHB tape at with the 3M adhesion promoter. Highly recommend this stuff as it aids in holding my C8's skirts on greatly lol.
- I added the 3M VHB tape to a lot of the areas of the applique. See the areas I shaded in Red. If you apply the tape well it will not interfere with the next step and it can be pulled off. By this I mean, cut the tape a little long but leave a "tongue" you can pull when the applique is on the tailgate. It'll allow you to position it along that top groove and slowly pull the backing off as you press in on the applique.
View attachment 394357

- On the OUTWARD side of the 3M VHB tape I used a sealant. You might not need this, but I opted to do it because I wanted the backside to be weather sealed as well since I took that blue ford oval off and it creates an opening into the inside of the internal structure of the tailgate.
- Then I went out to the truck with some clamps and some microfibers to not scratch the applique up and placed it on. If you opt for the sealant route you can kind of play with the location a bit more before you take the VHB tape backing off.

View attachment 394358

Let me know if you have any questions. I thought it was fairly straight forward as well and pretty easy. Much cheaper than going the new tailgate route lol
Came out really clean... Amazing job and a awesome write up.
 

Lanthas

Member
Joined
Jan 26, 2019
Posts
31
Reaction score
41
Location
San Diego
Makes sense, I picked up the same sealant, VHB and adhesion promotor you posted. I did a rough cut on the appliqué yesterday and think I got it pretty close. Tried my dremel but like you suggested, switched over to my multi tool after cutting the first two tabs off. I am going to hit it with my dremel sander a bit to clean it up before install. Ill attach some photos.

In regards to the sealant did you apply it to the raised outermost edge of the appliqué (like the 1/4” lip) or just inside that?

View attachment 398494
View attachment 398495
Yes to the sealant being on the outermost raised edge. If you used it in a sealant gun it would come out rather uniform along that edge. However I first attached the 3M VHB tape to the area just outside of the outermost raised edge and like I said, I left enough off the ends (cut the excess tape so it was rectangular on the applique), but left some excess tape backing so I could pull it off once I had it mounted in the position I wanted and the tape would then bond to the tailgate once I was happy with it. The painters tape was there to prevent excess smearing and overflow of sealant. 4 clamps used as well to hold it there while the tailgate was in the down position.

Hope this answers your questions!
 
Joined
Feb 20, 2023
Posts
9
Reaction score
9
Location
SLO, CA
Completed the install today. I cleaned up my cuts with just a little bit of 180 grit, I tried to use my Dremel but it was sanding down the plastic excessively. So I just a quick sand by hand and it was enough. I then got the appliqué cleaned with Simple Green and Dawn before wiping it down with isopropyl alcohol. Then I applied the adhesion promotor and 3M VHB to the appliqué… Side note, I had tested applying the VHB tape to a section without the adhesive promotor and it definitely struggled to stick, I would argue the adhesion promotor is almost necessary. I used some 30lb test fishing line to cut off the Raptor badge but left the Ford emblem attached.
4F159CCC-F77F-4468-BB79-BAAC7C71410C.jpeg


I probably went a little over the top with the VHB, this is how I placed the tape.

F44311F9-9F60-46A6-9519-C0D6E536C73B.jpeg

Per @Lanthas I used the 3M windshield urethane to weatherproof it, which was key. I placed it as he did just outside the VHB tape and it allowed me to lightly set on the appliqué and center it before really pushing the VHB on. The sealant is pretty tacky so it was easy to line up without another person. I was a little sloppy taping off the tailgate so there was some excess sealant to clean up, but it cleans up easy with the isopropyl alcohol and a rag. It also comes out and drys black, so on a white or light colored truck, you would definitely want to take your time and clean off the all the excess in the grooves. I used a bunch of microfiber towels and q-tips.

Again, huge thanks to @Lanthas for guinea pigging this one and for the write up

853231C9-7F19-4B48-B11A-67D9EDCF3B36.jpeg

Last thing I noticed. The 3M windshield urethane is super thick, I initially tried to use my manual caulk gun but one pump was only getting me about a 1/2” bead of sealant….I ended up using a Milwaukee M12 caulk gun that I luckily had lying around and that knocked it out in like 30 seconds.

50517110-636A-4658-B442-5715156C1CAF.jpeg
577BF6AD-048F-43F0-A400-45A6E5A46D75.jpeg
 

Lanthas

Member
Joined
Jan 26, 2019
Posts
31
Reaction score
41
Location
San Diego
Glad it all worked out well man, and yeah I knew I had to try it since I was hating the way the truck looked without the applique! Was about to tell the parts department to just order a whole new assembly since I couldn't find any totaled 3rd Gens to take the tailgate. Glad you got it all sorted and on the Raptor too. I do agree that the adhesion promoter is required as the material the applique is made of and how slippery it is on the backside allows it to slide off easily without the promoter. Learned a lot of this and some preferred methods from C8 Corvette mods lol
 

Forum statistics

Threads
95,468
Posts
2,009,262
Members
59,076
Latest member
ja5657
Top