Rigid SR-Q backup lights mounting template is the wrong size?

Disclaimer: Links on this page pointing to Amazon, eBay and other sites may include affiliate code. If you click them and make a purchase, we may earn a small commission.

Shark

Full Access Member
Joined
May 21, 2011
Posts
162
Reaction score
312
Location
Frisco, TX
My latest project is putting some lights on. I installed the Rigid fog light dually kit up front without a hitch and now I'm on the rear bumper to install the SR-Q flush mount lights I just received. The first thing I did was place one of the lights on the paper mounting template and I immediately notice that the template is way off - by maybe an inch too small. I am really glad I didn't tape it up and start cutting! I don't know if this is the wrong template or if they screwed up and reduced it in printing or something. Did anybody else run into this or know about another template that can be downloaded - I really wanted to work on this today since I have some free time. I emailed Rigid but don't expect a response on a Sunday.

The supplied template has curves in it but I may just draw up a rectangular template of my own and get on with it.
 

pat'sRAPTOR

FRF Addict
Joined
Jul 17, 2011
Posts
5,590
Reaction score
2,068
Location
Everywhere
pictures of the difference?

---------- Post added at 12:32 PM ---------- Previous post was at 12:30 PM ----------

also are you sure the template isn't for the back part that sticks into the bumper? cause you're suppose to have the front part sit over the bumper so you can attach the hardware to the bumper to hold it on. not questioning your intelligence just covering all the bases to help you out haha
 
OP
OP
Shark

Shark

Full Access Member
Joined
May 21, 2011
Posts
162
Reaction score
312
Location
Frisco, TX
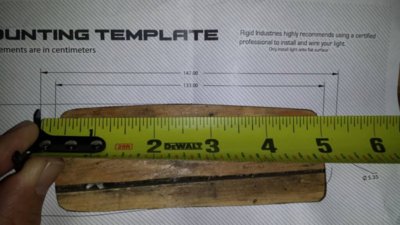
The template is for the area you cut out to insert the back of the light to sit flush on the bumper, and also has the drill locations for the mounting bolts. It is clearly off, the distance between the center of the holes is supposed to be 147mm but when you measure the actual template it is only 135mm, way off. I already made up my own template using paint and printed it to actual size so I'm good now.
 

MagicMtnDan

FRF Addict
Joined
Oct 28, 2011
Posts
7,661
Reaction score
1,795
Location
Magic Mountain
Just in case you haven't seen the how-to thread on installing Rigid lights (maybe these are different lights than the ones you're using?):

http://www.fordraptorforum.com/f81/rigid-flush-mount-leds-rear-bumper-pics-how-19436/

And here's a quote from Reptar's how-to:

Rigid gives you a cardboard template. The rubber gaskets can distort easy, so it's great they give you a thick card stock template so you know the location is perfect.
 
OP
OP
Shark

Shark

Full Access Member
Joined
May 21, 2011
Posts
162
Reaction score
312
Location
Frisco, TX
Maybe my lights were old stock from where I purchased them, or maybe they have cheaped out lately, but no cardboard template - just a paper one that wasn't even close. I got them in though after making my own template and they didn't turn out too bad if I say so myself. I'll save the wiring for next week.

13838907463_95b0fb0ccc_c.jpg
 
Last edited:

Raptoe13

Full Access Member
Joined
Jun 9, 2013
Posts
193
Reaction score
104
Location
Chickasha, OK
Same here. The paper template was about 5-10% too small for the set I just installed in my rear bumper. Added 30 min to the job reaming the holes out larger. Looks like they made copies of the template on an office copy machine and it didn`t come out 100% to size. I used the rubber gasket on the other side after I noticed the issue.
 

Raptoe13

Full Access Member
Joined
Jun 9, 2013
Posts
193
Reaction score
104
Location
Chickasha, OK
Here`s a pic. Clearly the template states 147mm (whats up with the metric system?) between the two mounting points. I measure 5 3/8". Since I don't have a european tape measure it took me a bit to do the conversion, but 147mm is 5 25/32 or 5 3/8" is 136.53mm. Luckily, it was smaller, not bigger. Also I was lucky to have not drilled the mounting holes before I tried stuffing the light in. Just cost me more time and a scratched up light housing.
 

Attachments

  • uploadfromtaptalk1391989914386.jpg
    uploadfromtaptalk1391989914386.jpg
    81 KB · Views: 140
Top