Rear bumper adjustment

Disclaimer: Links on this page pointing to Amazon, eBay and other sites may include affiliate code. If you click them and make a purchase, we may earn a small commission.

Donmatteo

FRF Addict
Joined
Jul 5, 2018
Posts
1,570
Reaction score
1,570
Location
Santa Clarita / Coronado
I was washing the truck yesterday and noticed the rear bumper is 1/4inch lower on the passenger side and a 1/4inch closer to the bed on the driver side.

I did a lazy Quick Look but didnt see any adjustment bolts. I'm sure they are they are there.

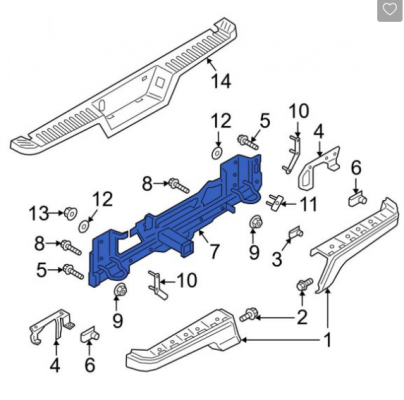
Does anyone have a pictures or a schematic of the rear bumper mounts?

yes, I did a search. None of the threads had a schematic or any answers that weren't memes or some pithy comments.
 
Last edited:

HighwaySentinel

︻デ┳═ー - - - - - - -
Joined
Dec 13, 2020
Posts
1,792
Reaction score
3,939
Location
California
1701904504248.png

I don't see anything in here that looks adjustable. For the front to back, you may be able to add a 1/4' spacer if the bolt is long enough. Not sure how you would adjust up and down.


This video appears to be similar in components.
 

dfw62

Member
Joined
Mar 1, 2023
Posts
44
Reaction score
44
Location
MA and FL
I was able to adjust it with some sims. It's level and gapped correctly now.
I posted a similar question some months back and got a couple of useless replies. Glad to see you got some good info.

The video shows having to remove the plastic tread plate. Based on your experience would it be possible to access the necessary bolts without removing it?

Seems crazy that we need to add shims to align our bumpers.

Thanks.
 

Sig Fanboy

Full Access Member
Joined
Apr 2, 2023
Posts
786
Reaction score
1,717
Location
WV
I removed the bumper from my Gen 2 to install an ADD bumper and did not have to remove the plastic tread part to get it off. I also have a Gen 3 and looked under it and believe, but truthfully not certain, that it removes in the same manner. I believe the only adjustment is that the bolt holes on the plate that is the frame horn are oblong and not round. I guess in theory a person could enlarge the bolt holes somewhat to raise or lower one side or shift slightly left or right.
The bumper is three sections, not counting the hitch. To remove the left and right section from the center section requires removing the plastic tread part.
 
OP
OP
Donmatteo

Donmatteo

FRF Addict
Joined
Jul 5, 2018
Posts
1,570
Reaction score
1,570
Location
Santa Clarita / Coronado
I did have to elongate the bolt holes but not by a lot to raise the passenger side and lower the driver side to level them. Just took a little off each side. Measure 5 times, cut once in this case. . the shim was needed to get the gaps between the body and bumper just right by pushing out the driver side a touch.

I didn't have to remove the tread plate. All in all, maybe 30min of work. I didn't remove the bumper to elongate the holes either. I just remove the bolts one at a time that needed the adjustment and put them back in lose and tightened them down when it was level and square. A good floor jack is helpful for this.
 
Top