PD1744's Build

Disclaimer: Links on this page pointing to Amazon, eBay and other sites may include affiliate code. If you click them and make a purchase, we may earn a small commission.

OP
OP
PD1744

PD1744

Full Access Member
Joined
Jan 21, 2020
Posts
294
Reaction score
605
Location
SC
PAINTED LCAs

I missed adding this in my update posts yesterday, but a while back I also painted my lower control arms. Got the idea from a post on this forum. My passenger side was badly stained from the blown shock and looked like crap no matter how much I cleaned or polished them. Turned out decent for a small amount of work. Happy with it.

IMG_7339.JPG
 
OP
OP
PD1744

PD1744

Full Access Member
Joined
Jan 21, 2020
Posts
294
Reaction score
605
Location
SC
Updates from the past week or so.

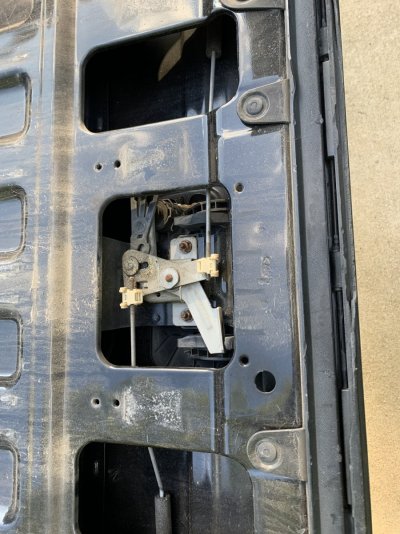
TAILGATE RELEASE

Adjusted my tailgate latch release. It was starting to get to the top of the pull, which before long might have failed to release. Quick and easy fix. Now it pops quick and easy.

IMG_7581.JPG


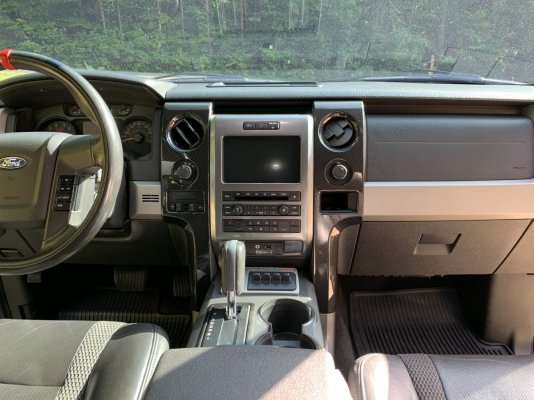
TRIM COVER

Attempted to make my cheap plasticky interior feel less cheap and plasticky by sticking some cheap plastic parts on there.

IMG_7586.JPG

Surprisingly pleased with this mod. Cheap, quick & simple to install, easily reversible if I don't like it. Not usually a fan of the fake CF look, but it does a great job of breaking up all that dated silver plastic. Not to mention the fact that I got the parts for free because they delivered it a few days late. Win! I'm probably going to add a few more pieces to compliment this without going too crazy, but I'm happy with it.


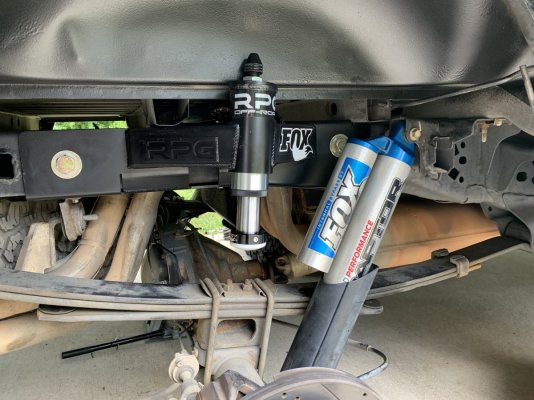
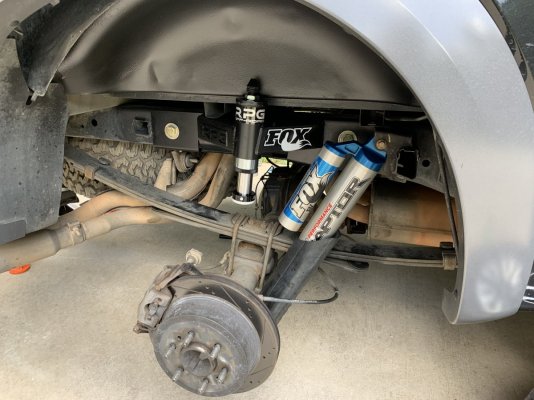
RPG BUMP KIT

Got this put one the other day. Beefy parts. Took about 5 and a half weeks to deliver. Install was a little trickier than I anticipated. I figured I could knock it out in 2 hours, so of course it took me 5 hours working by myself. Fitment was good. Finish was decent, but the powder coating definitely suffered some dings in transit. Pretty standard for heavy metal parts. I would have made few different design choices if I'd have engineered this kit, but it will definitely get the job done.

IMG_7597.JPG

IMG_7598.JPG

The truck already rides noticeably better even without my leaf spring upgrade just from the added frame rigidity and the extra weight out back.

Originally when I placed my order for Deavers (June 30th) I was given a two week lead time. Reached out mid July for an update and that turned into 5 weeks. Asked for an update mid August and was told 2 more weeks. So here we are 2 months later and the most recent update is another 1-2 weeks out... So yeah, we'll see.


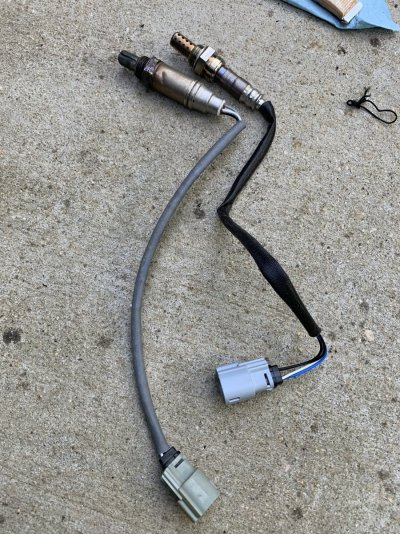
O2 SENSOR

Swapped out that sensor that gave me an issue. Problem actually never came back after clearing the code and I actually ordered the wrong part the first time. Anyway got it done. Bought an O2 sensor socket for the job and that thing was worthless. Regular wrench got the job done.

IMG_7603.JPG

And for the record, I have NOT experienced a fuel mileage increase going to 37s lol. Woulda been cool though.
 

Popper864

FRF Supporting Member
Supporting Member
Joined
Jul 31, 2020
Posts
83
Reaction score
33
Location
South Carolina
@PD1744 How do those Eibachs ride compared to Mid-perch? Getting new shocks soon, thought about going ahead and upgrading coils while its all in pieces.
 
OP
OP
PD1744

PD1744

Full Access Member
Joined
Jan 21, 2020
Posts
294
Reaction score
605
Location
SC
@PD1744 How do those Eibachs ride compared to Mid-perch? Getting new shocks soon, thought about going ahead and upgrading coils while its all in pieces.

They ride a little stiffer. About an inch over mid ride height for me. My buddy out west just did his and gained 2" so YMMV. I like them, but wasn't necessarily looking for a stiffer ride. Hope that helps. Where in SC are you?
 

Popper864

FRF Supporting Member
Supporting Member
Joined
Jul 31, 2020
Posts
83
Reaction score
33
Location
South Carolina
They ride a little stiffer. About an inch over mid ride height for me. My buddy out west just did his and gained 2" so YMMV. I like them, but wasn't necessarily looking for a stiffer ride. Hope that helps. Where in SC are you?
Im still debating it, i enjoy the current ride. Huge reason why i opted for a raptor. I may put new shocks on mid-perch and go from there. Im located in Spartanburg. You?
 
OP
OP
PD1744

PD1744

Full Access Member
Joined
Jan 21, 2020
Posts
294
Reaction score
605
Location
SC
Im still debating it, i enjoy the current ride. Huge reason why i opted for a raptor. I may put new shocks on mid-perch and go from there. Im located in Spartanburg. You?

Yeah, honestly I probably wouldn't recommend them for you then. I would go fresh shocks, mid-perch, and ditch the sway bar and see how you like it. Costs nothing. I loved that set-up. I normally prefer a progressive spring rate like the stock ones. I couldn't justify going to Geisers because I knew the Eibachs would be a stop gap between 3.0's and/or mid-travel, but I wanted to try them out. My trucks spend the majority of their time on road, so I too prefer the pillowy ride. Also the shock valving isn't right for the Eibach spring rate. Only real thing I got is confidence to clear 37's on bottom perch and a nice little silver pop in the wheel well.

I'm about 1:20 mins east of you toward Charlotte in Lake Wylie. If you're ever up this way, you're welcome to check it out and see what you think.
 

Popper864

FRF Supporting Member
Supporting Member
Joined
Jul 31, 2020
Posts
83
Reaction score
33
Location
South Carolina
Yeah, honestly I probably wouldn't recommend them for you then. I would go fresh shocks, mid-perch, and ditch the sway bar and see how you like it. Costs nothing. I loved that set-up. I normally prefer a progressive spring rate like the stock ones. I couldn't justify going to Geisers because I knew the Eibachs would be a stop gap between 3.0's and/or mid-travel, but I wanted to try them out. My trucks spend the majority of their time on road, so I too prefer the pillowy ride. Also the shock valving isn't right for the Eibach spring rate. Only real thing I got is confidence to clear 37's on bottom perch and a nice little silver pop in the wheel well.

I'm about 1:20 mins east of you toward Charlotte in Lake Wylie. If you're ever up this way, you're welcome to check it out and see what you think.
Thanks for the info, I may be up that way in a month or two. Id like to feel the ride difference and compare ride height in person before i invest. Ill shoot you a direct message if i do make it up that way. For now mid- perch with the new shocks.
 
OP
OP
PD1744

PD1744

Full Access Member
Joined
Jan 21, 2020
Posts
294
Reaction score
605
Location
SC
No luck repairing that little HAM radio so far. Still ongoing.

Used FORscan to re-calibrate for the new circumfrance of these 36.5" tires. Riding around with a laptop like Fast & Furious.

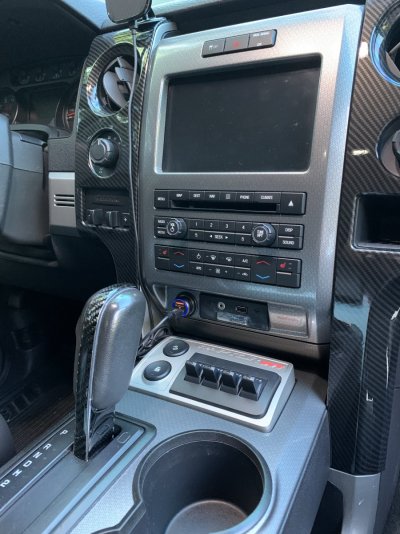
Applied these fake CF stickers to my shifter:
IMG_7612.JPG

Not as sold on these ones. Partially my fault probably (more on that in a bit). These are thick and I thought it might work because I've tried and failed several times at just wrapping this thing. But to be fair, as I probably mentioned before, I'm the worst vinyl wrapper ever so... Anyway, After I stuck everything down, I realized I didn't check the position of the shift lever all the way back, so of course the thing didn't allow me to get into second and first, though now that I think about it, why would I ever need to because we have 'M'. Anyway, I ripped it back up and tried to reposition it. So now the very front of it, where the bend is most extreme, is starting to peel up. I'll be taking it off shortly.

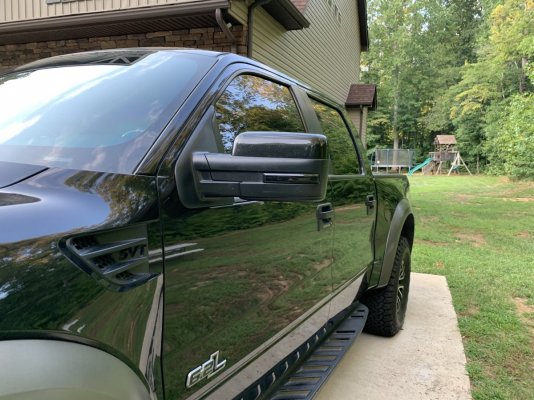
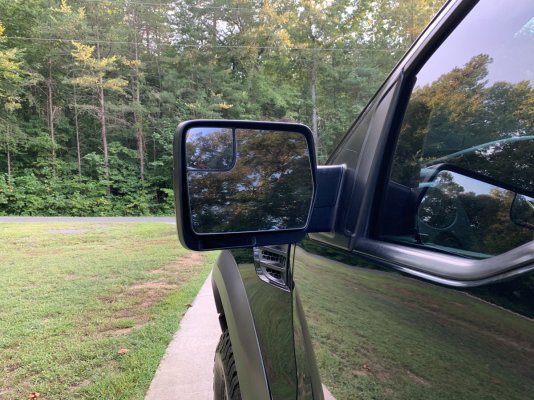
Then installed some smoked sequential blinkers in the front and rear of the side mirrors. The fronts, where those faded orange reflectors are, can also be switchback marker lights.
IMG_7627.JPG

IMG_7628.JPG


View attachment IMG_7629_Trim.mp4

So, story time. Install should have been simple and straight forward. You have to drill a little hole to run the wires for the front side lights, but the blinkers get signal from the rear ones. Seems like they were made to be paired (even though I bought them seperate) and there are already pins and connectors in place. Only knock was I had to file down the corners of the rear side blinkers to fit properly. Not a big deal, I read this in a review as well. Also, I did not wire the markers to function as such, because I didn't feel like running the wires inside at the time. So for now, I just tapped the puddle lamp so they only light up white when the puddle lamps are on. I'm probably going to leave it like this as they are pretty underwhelming behind that smoked lens compared to the Morimoto DRL's.

Anyway, I don't know who can relate, but I seem to be going through one of those rough patches where everything I touch I break and everything seems to be going wrong. Not the first time I've felt like this, won't be the last. So yeah, with this job I definitely did more harm than good. The smoked lenses look great on the black truck and the sequential amber blinkers look good as well. However, as I pried the passenger side mirror off the entire glass just shattered. A combination of everything being brittle on this old truck and my heavy hands. Then as I pried the driver side off, I basically broke the entire motor assembly. Oof. So a new piece of glass and motor set me back about a hundred bucks. Doing all of this work right before we were set to take a road trip, so I drove out of town with a shattered passenger mirror and the other side rigged together with zip ties.

THEN, we take our 4 hour trip out of town and as soon as we arrive, my wife goes "What is THAT?", as she points out the beautful CV grease all over the back of the passenger side wheel well. Yep and that's the side with the brand new OEM axle. FML. Inner boot had a huge gash in it. Not sure at all what cause it. Did a poor job of band aiding it back up to get us through our trip.

Anyway, came home today and took apart my old axle with the intention of rebuilding it off of the truck. Was straight forward, but as I'm rushing and doing a poor job of everything, I neglected to index the race and cage and shaft (if some prefer). Don't be like me. Inside joint looks like this for the curious:
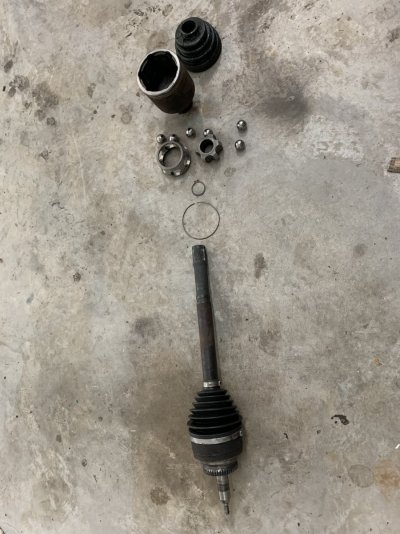
IMG_7632.JPG

So this week looks like after work as parts arrive: Tuesday hopefully new boot kits come in and I can rebuild this guy. It's been the same boot failed both times and I have yet to identify why. I can believe that the old one was just dried out and ready as it totally disconnected at the small clamp. But the new one had a very long straight gash inside the biggest fin. Maybe like 2 inches or so. I'm considering using the outside boot to rebuild the inner joint as it's longer with more fins. Thoughts on this? Wednesday, maybe put the axle in. Thursday, the driver side mirror motor. Friday, passenger side mirror. And these are just Raptor related BS I'm working through. Not the mention the bajillion other things seemingly going to ****. When it rains it pours gents. I've made it a point to steer clear of my engine build project while I'm messing everything I touch up.
 
Top