You are using an out of date browser. It may not display this or other websites correctly.
You should upgrade or use an alternative browser.
You should upgrade or use an alternative browser.
PD1744's Build
- Thread starter PD1744
- Start date
Disclaimer: Links on this page pointing to Amazon, eBay and other sites may include affiliate code. If you click them and make a purchase, we may earn a small commission.
Closed the book on the engine mount saga yesterday evening. Hopefully for good.
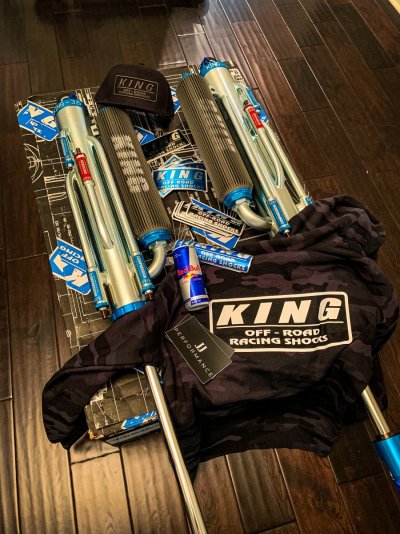
RPG RST18 bypass rack finally arrived so that I can install these bad boys this weekend:
It also reminded me that this was the second weekend in a row that the Raptor was bricked in the driveway because the previous weekend I had snapped a brake bleeder installing some Crown Performance extended brake lines from Freedom Motorsports.
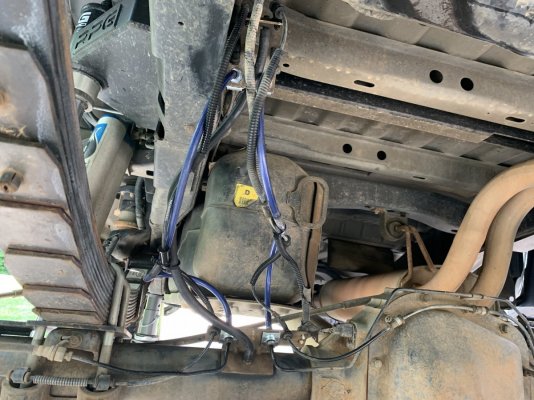
So I had to get that repair done during an already busy weekend.
Also just placed an order for a front bumper.
RPG RST18 bypass rack finally arrived so that I can install these bad boys this weekend:

It also reminded me that this was the second weekend in a row that the Raptor was bricked in the driveway because the previous weekend I had snapped a brake bleeder installing some Crown Performance extended brake lines from Freedom Motorsports.

So I had to get that repair done during an already busy weekend.
Also just placed an order for a front bumper.
RPG RST18
Install went down over late last week and the weekend. Very little info available that I could find anywhere on this, but was pretty straight forward. Time to install I'd put around 14 hours spread out over a weekend, doing it for the first time, and taking my time. Could easily say I could knock this out in one day now that I know how, but first time is always a learning process. Overall not terribly difficult.
My caveat today is I am not a fitter, welder, fabricator etc. and this job requires some competency in these areas. I'm just some dude trying my best with what I've got. This is by no means a 'how you should do it'. It's just how I did it. That's out of the way, so let's go.
So first, when I placed the order, I was quoted a 2-3 week lead time. At 3 weeks, I checked in for a status update and was told 2-3 weeks.... Mmmmkaaaaay. I think it finally shipped around the 5 week mark, but then was hung up in shipping. Took twice as long as it should have. All told about a month and half total. That as well as some refund issues I had to work through with the supplier, let's just say it wasn't super smooth. Dealing with RPG direct has been pretty good so far though, and my local shop JJ Performance CLT who got both front and rear shocks for me have been rock stars.
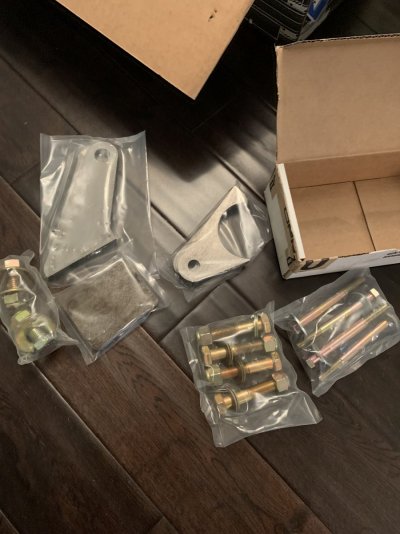
Rack showed up crated nicely. Minimum damage to the finish from what I could tell. Zero instructions, and a box of tabs, plates, and fasteners. Rack to bed mount bolts (4x), shock mount fasteners (4x), Lower eyelet tabs (4x), lower eyelet plate/bump strike plate (2x), rack to RST tie-in tabs (2x) and it's fasteners (2x). Again, no real packing list or anything. You just sorta gotta eyeball it and figure out what's going on. But not too difficult.
I think it showed up last Monday and sort of sat in the end of my drive way crated for a couple of days. On Wednesday evening I busted the wrap and threw the rack in the bed. Bed bolts didn't give me too much of a fuss, but YMMV. Took maybe 20 mins.
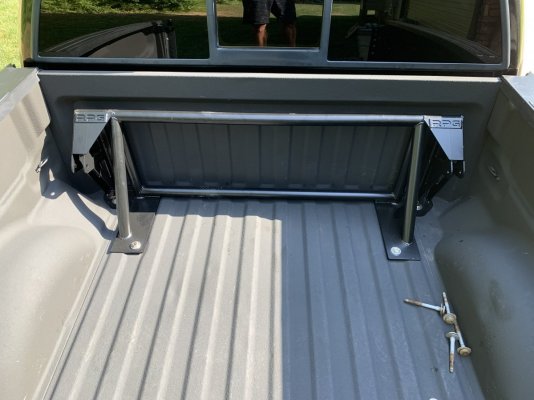
My plan last Friday was to get these big holes knocked in the bed. All in between while shuttling the kids around to their various activities. First thing you'll notice is that the horizontal bar in this bed support will have to go. Easy peasy.
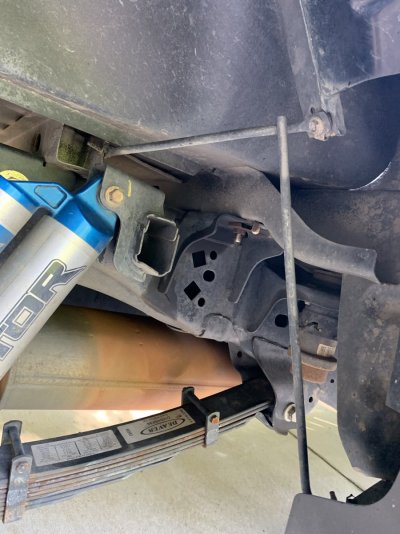
On my first side, I pulled the tire and shock to give myself as much room to work as possible.
Parts next to each other:
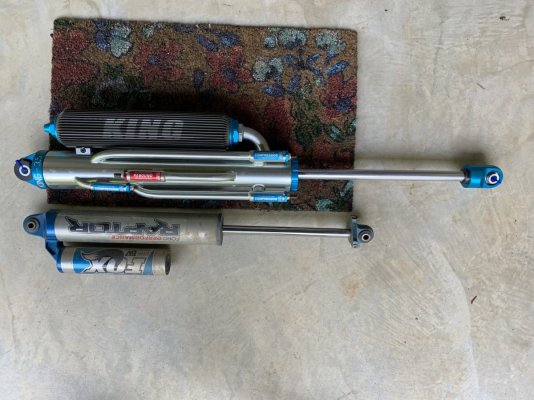
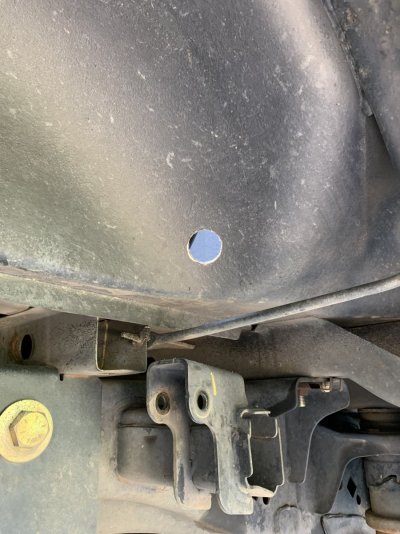
So here's how I laid the hole out and my thought process behind it. In retrospect probably overthought this. I'll try to provide an abridged version following. First I tried to approximate how the shock would come through and knocked a small hole there:
cont...
Install went down over late last week and the weekend. Very little info available that I could find anywhere on this, but was pretty straight forward. Time to install I'd put around 14 hours spread out over a weekend, doing it for the first time, and taking my time. Could easily say I could knock this out in one day now that I know how, but first time is always a learning process. Overall not terribly difficult.
My caveat today is I am not a fitter, welder, fabricator etc. and this job requires some competency in these areas. I'm just some dude trying my best with what I've got. This is by no means a 'how you should do it'. It's just how I did it. That's out of the way, so let's go.
So first, when I placed the order, I was quoted a 2-3 week lead time. At 3 weeks, I checked in for a status update and was told 2-3 weeks.... Mmmmkaaaaay. I think it finally shipped around the 5 week mark, but then was hung up in shipping. Took twice as long as it should have. All told about a month and half total. That as well as some refund issues I had to work through with the supplier, let's just say it wasn't super smooth. Dealing with RPG direct has been pretty good so far though, and my local shop JJ Performance CLT who got both front and rear shocks for me have been rock stars.
Rack showed up crated nicely. Minimum damage to the finish from what I could tell. Zero instructions, and a box of tabs, plates, and fasteners. Rack to bed mount bolts (4x), shock mount fasteners (4x), Lower eyelet tabs (4x), lower eyelet plate/bump strike plate (2x), rack to RST tie-in tabs (2x) and it's fasteners (2x). Again, no real packing list or anything. You just sorta gotta eyeball it and figure out what's going on. But not too difficult.

I think it showed up last Monday and sort of sat in the end of my drive way crated for a couple of days. On Wednesday evening I busted the wrap and threw the rack in the bed. Bed bolts didn't give me too much of a fuss, but YMMV. Took maybe 20 mins.

My plan last Friday was to get these big holes knocked in the bed. All in between while shuttling the kids around to their various activities. First thing you'll notice is that the horizontal bar in this bed support will have to go. Easy peasy.

On my first side, I pulled the tire and shock to give myself as much room to work as possible.
Parts next to each other:

So here's how I laid the hole out and my thought process behind it. In retrospect probably overthought this. I'll try to provide an abridged version following. First I tried to approximate how the shock would come through and knocked a small hole there:

cont...
Your about as bad as watching a tv series “live”RPG RST18
Install went down over late last week and the weekend. Very little info available that I could find anywhere on this, but was pretty straight forward. Time to install I'd put around 14 hours spread out over a weekend, doing it for the first time, and taking my time. Could easily say I could knock this out in one day now that I know how, but first time is always a learning process. Overall not terribly difficult.
My caveat today is I am not a fitter, welder, fabricator etc. and this job requires some competency in these areas. I'm just some dude trying my best with what I've got. This is by no means a 'how you should do it'. It's just how I did it. That's out of the way, so let's go.
So first, when I placed the order, I was quoted a 2-3 week lead time. At 3 weeks, I checked in for a status update and was told 2-3 weeks.... Mmmmkaaaaay. I think it finally shipped around the 5 week mark, but then was hung up in shipping. Took twice as long as it should have. All told about a month and half total. That as well as some refund issues I had to work through with the supplier, let's just say it wasn't super smooth. Dealing with RPG direct has been pretty good so far though, and my local shop JJ Performance CLT who got both front and rear shocks for me have been rock stars.
Rack showed up crated nicely. Minimum damage to the finish from what I could tell. Zero instructions, and a box of tabs, plates, and fasteners. Rack to bed mount bolts (4x), shock mount fasteners (4x), Lower eyelet tabs (4x), lower eyelet plate/bump strike plate (2x), rack to RST tie-in tabs (2x) and it's fasteners (2x). Again, no real packing list or anything. You just sorta gotta eyeball it and figure out what's going on. But not too difficult.
View attachment 359863
I think it showed up last Monday and sort of sat in the end of my drive way crated for a couple of days. On Wednesday evening I busted the wrap and threw the rack in the bed. Bed bolts didn't give me too much of a fuss, but YMMV. Took maybe 20 mins.
View attachment 359864
My plan last Friday was to get these big holes knocked in the bed. All in between while shuttling the kids around to their various activities. First thing you'll notice is that the horizontal bar in this bed support will have to go. Easy peasy.
View attachment 359865
On my first side, I pulled the tire and shock to give myself as much room to work as possible.
Parts next to each other:
View attachment 359866
So here's how I laid the hole out and my thought process behind it. In retrospect probably overthought this. I'll try to provide an abridged version following. First I tried to approximate how the shock would come through and knocked a small hole there:
View attachment 359867
cont...
End with a to be continued then the rest of us have to wait.
Then I ran a string from the upper shock mount to the stock lower shock mount, which is in pretty good position already. This would give me and eye to eye center line. If my string couldn't run taught through my hole, then I would cut until it did. Luckily I nailed it the first go. Then I took some depth and width measurements of the new shocks and factored in some space. Then I used my string and some squares and Pythagorean theorem and lasers and stuff to lay it out all scientific and shit.
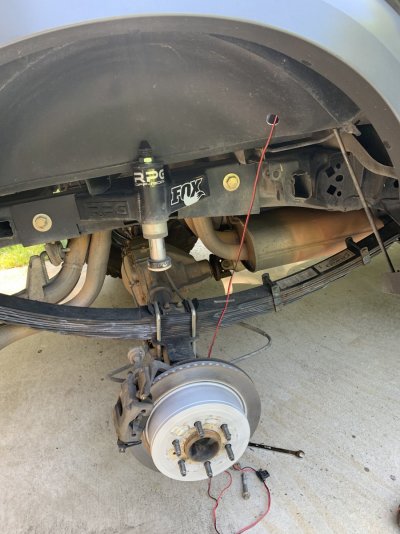
I used a combination of step bits (to radius corners), cutoff wheel, jig saw, and sawzall to cut the holes. Just whatever could get in where I was currently working. Overall it cuts pretty easy. you will have to remove the pinch seam at that location.
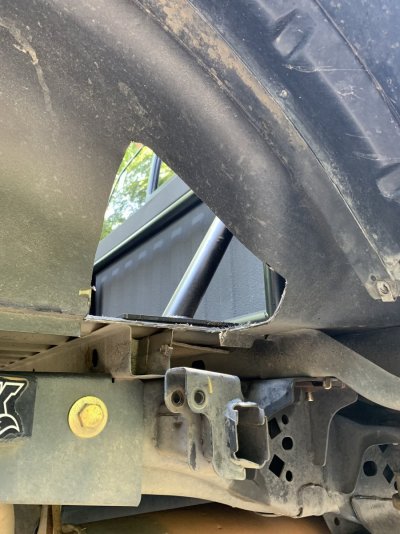
Side 2 went much quicker obviously. I just measured and transferred over the pattern.
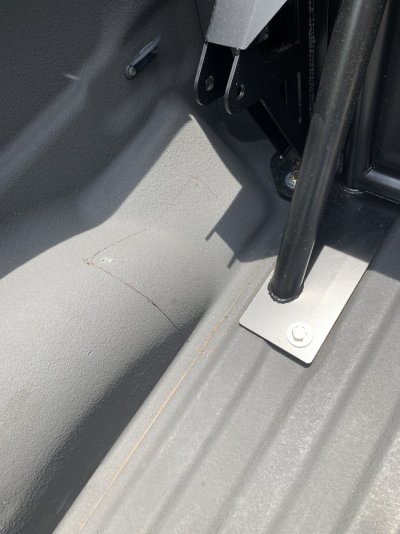
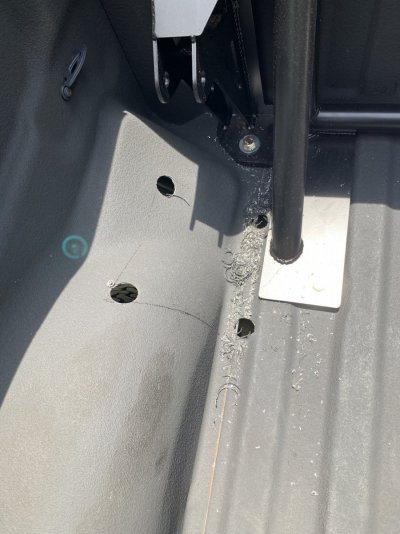
Tip: unbolting the rack, will give you much better access to cut:
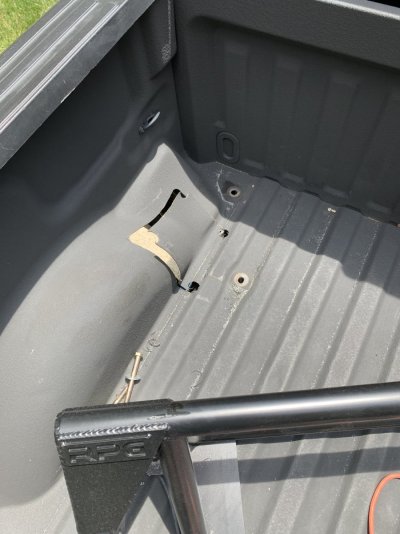
Overall maybe 3 hours to do this. Could have been much quicker. RPG just got back to me with their guidance (after the fact) and they say:
"For the RST18, we don't yet have a template for the cutting but here is a rundown of where to cut,
Going inward, you will cut up to the rack where the mounting plate runs. You will then go 5" past the mounting point, towards the tailgate. Go all the way up the wheel well, and go down to meet roughly 7" from the cab (right above the fuel hose)."
Mine turned out nice and tight though, which I like and also like that I angled my rear cut 25* with the shock. Looks cool. Hope it was enough lol. We did end up fitting, trimming, cycling and trimming again, so was a bit of a process to maintain the nice tight fit vs just opening it all up.

I used a combination of step bits (to radius corners), cutoff wheel, jig saw, and sawzall to cut the holes. Just whatever could get in where I was currently working. Overall it cuts pretty easy. you will have to remove the pinch seam at that location.

Side 2 went much quicker obviously. I just measured and transferred over the pattern.


Tip: unbolting the rack, will give you much better access to cut:

Overall maybe 3 hours to do this. Could have been much quicker. RPG just got back to me with their guidance (after the fact) and they say:
"For the RST18, we don't yet have a template for the cutting but here is a rundown of where to cut,
Going inward, you will cut up to the rack where the mounting plate runs. You will then go 5" past the mounting point, towards the tailgate. Go all the way up the wheel well, and go down to meet roughly 7" from the cab (right above the fuel hose)."
Mine turned out nice and tight though, which I like and also like that I angled my rear cut 25* with the shock. Looks cool. Hope it was enough lol. We did end up fitting, trimming, cycling and trimming again, so was a bit of a process to maintain the nice tight fit vs just opening it all up.
Your about as bad as watching a tv series “live”
End with a to be continued then the rest of us have to wait.
Only 5 pics per post homie.
TrueOnly 5 pics per post homie.
Saturday morning was the long day. Was going to try and get as much done as I could and recruited the help of my 68 year old dad who can still outwork me on my best day.
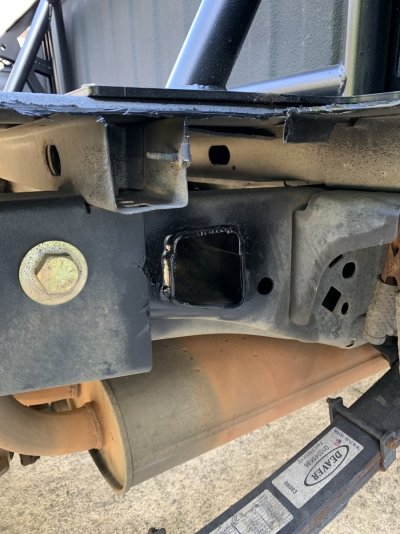
Hacked off the upper shock mount using a cutt-off wheel and plasma cutter. I didn't cut if flush. Didn't care to or see any reason to:
Cut off lower shock mount using same tools:
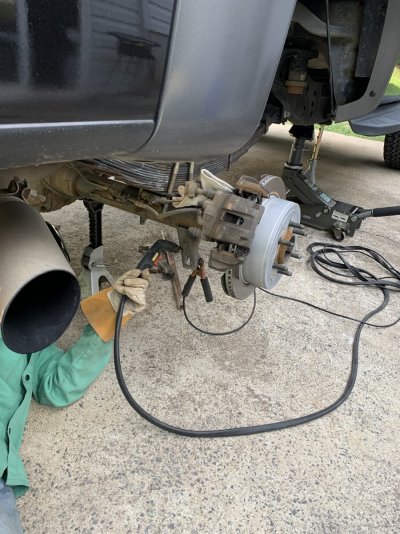
Tip here: go ahead and pull the U-bolt's out of the way. For my set-up, I had to remove them anyway.
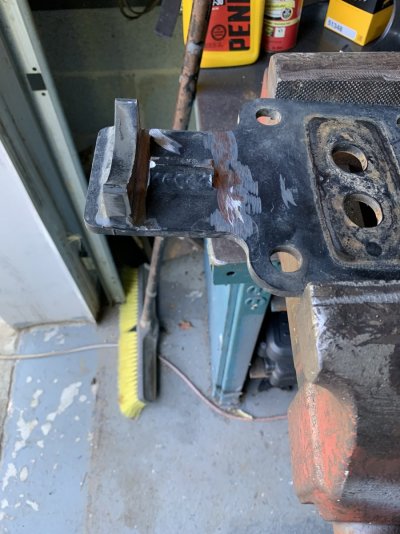
So after staring at and figuring out how it when on, it appears that RPG's set-up was designed to work with strike plate if you have their bump kit. In retrospect, I guess I could have removed the strike plate and just welded the new one in with the tabs. Whoops. Guess I opted to do it the hard way. We ground out a grove and the other end of this rib to key the shock tabs in to. Would only be applicable if you have their bump kit and want to re-use that strike plate:
What the finished product looks like:
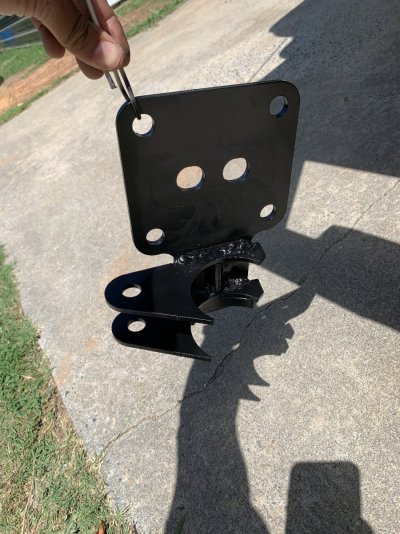
Again, this required a little bit of fitting, which would not have been an issue if I'd have not reused this plate, which I did not think about until just now. Well damn.
Installed:
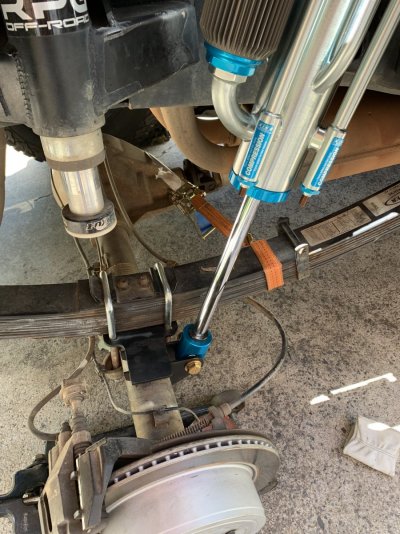
Ratchet straps to manipulate the axle, leaf spring, and compress the shock were the move. This side (passenger) seemed to really fall out of whack. Second side not so much. So we did one side on Saturday and it took about six hours total. Lots of fitting and learning and cutting and cutting more etc.
Hacked off the upper shock mount using a cutt-off wheel and plasma cutter. I didn't cut if flush. Didn't care to or see any reason to:

Cut off lower shock mount using same tools:

Tip here: go ahead and pull the U-bolt's out of the way. For my set-up, I had to remove them anyway.
So after staring at and figuring out how it when on, it appears that RPG's set-up was designed to work with strike plate if you have their bump kit. In retrospect, I guess I could have removed the strike plate and just welded the new one in with the tabs. Whoops. Guess I opted to do it the hard way. We ground out a grove and the other end of this rib to key the shock tabs in to. Would only be applicable if you have their bump kit and want to re-use that strike plate:

What the finished product looks like:

Again, this required a little bit of fitting, which would not have been an issue if I'd have not reused this plate, which I did not think about until just now. Well damn.
Installed:

Ratchet straps to manipulate the axle, leaf spring, and compress the shock were the move. This side (passenger) seemed to really fall out of whack. Second side not so much. So we did one side on Saturday and it took about six hours total. Lots of fitting and learning and cutting and cutting more etc.
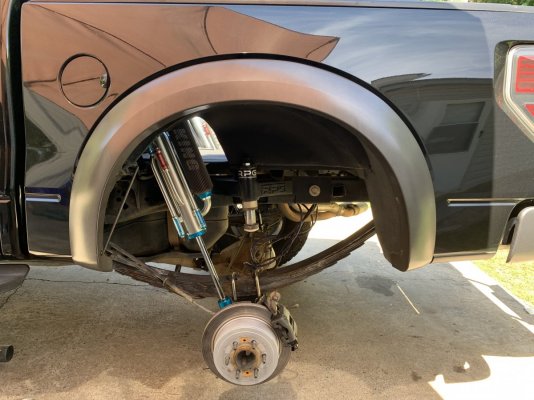
Driver side on Sunday was super smooth. Finished in under 3 hours. This side you have to deal with the fuel tank, so if that sketches you out I recommend covering it with a damp towel.
Driver side installed:
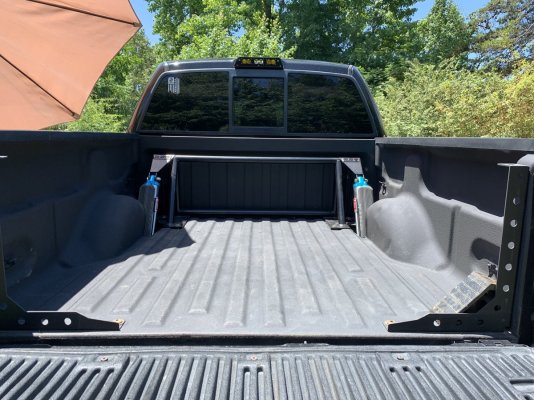
View from the top side:
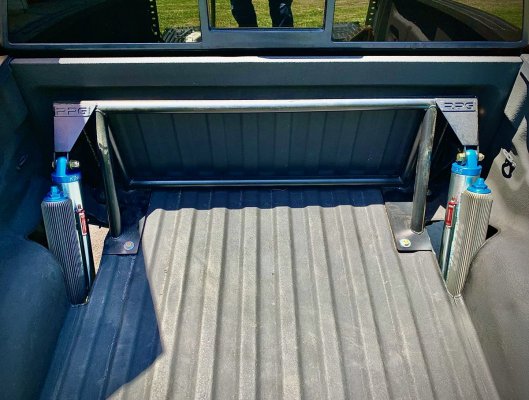
A little edge trim to finish things up:
Drooped out on one side:
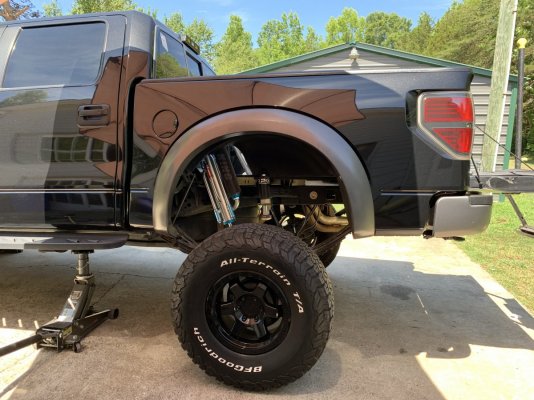
Before shot for comparison:
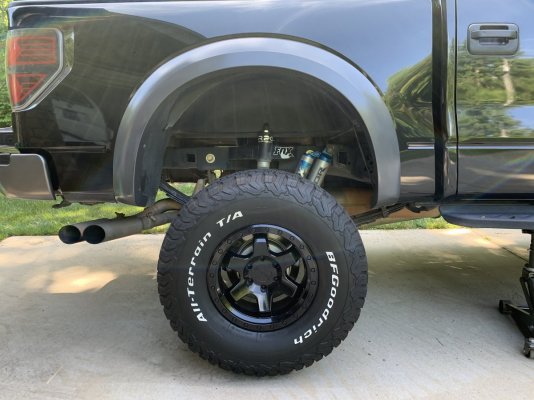
And that's it. Haven't done the tie-in tab yet. Eventually. Maybe.
Driver side installed:

View from the top side:

A little edge trim to finish things up:

Drooped out on one side:

Before shot for comparison:

And that's it. Haven't done the tie-in tab yet. Eventually. Maybe.
Steven_Born
Active Member
I really appreciate all of the work as well as the willingness to share the details both good and learnings. It would be amazing if more of us did this. Incredible work.
Similar threads
- Replies
- 0
- Views
- 1K
- Replies
- 138
- Views
- 49K
- Replies
- 23
- Views
- 30K
Members online
- Siyx
- Mad Zeus
- debauch
- Zach M
- Gallagher817
- MagneticG2
- F-22OR
- Roush2568
- hyrepower
- taquitos
- mikemxbike4
- austinoutdoors
- Sharkus29
- Gotdesl
- cduff406
- londonstarr22
- TomDirt
- jk47
- Stig757
- New recaros
- kevo_lo
- HLCRaptor
- vk35
- peytb10
- Rustyseatbelt
- gmdjr21
- Areyf
- Dr JL
- TXRaptor37
- elusion23
- Lonsway24
- asg0524
- 98infinity
- konstantinos88
- Quaz
- dinocrisis
- 310Raptor
- BLJ
- Dudebrodude
- Coleblack
- Mind Goblin
- SurfRaptor
- HORN HIGH ACES
- Peterb
- mudvillerob
- rushneck
- dj30417
- MotoDad
Total: 2,778 (members: 51, guests: 2,727)

