Mod – run mirror side spotlights at any speed
What does this mod do? Allows you to run your side mirror spotlights at any speed. Normally there is a 5 MPH limit to running the spotlights
Can’t this be done in Forscan? No. The side mirror spotlights power source is hard wired to a power source that only is powered below 5 MPH
How does this mod work? The power source for the side mirror spotlights is changed at the control module from a power source only powered below 5 MPH to one that is powered at all times
How easy is this mod? Overall pretty easy. However there is some work in tight spaces and there are some small difficult parts to manipulate to release wires
How long does this mod take? If someone were experienced with car electronics this could literally be a 5-10 minutes job. If you can't get the little latches and restraints to cooperate, well it could take forever without success. I was happy when it all fell into place and got the result of a fully functioning set of spotlights that can operate at any speed at no cost.
Is this mod reversible? If you do it as outline here, yes
Where did this mod come from? F150 forum. LINK All pics are from the F150 forum except for the solder aid tool pic which is mine.
How to:
Note - Some folks pull the #16 fuse under hood before doing this because you could blow a fuse with the exposed grey wire. Do this mod at your own risk. I am not responsible if you screw up your truck or use these lights in a way that causes problems with LEO or other drivers.
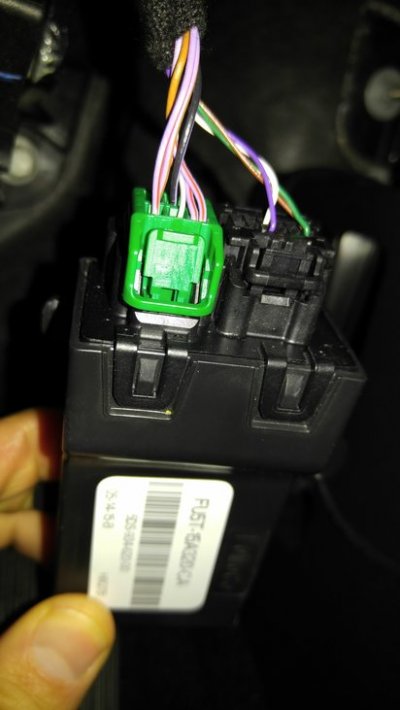
The relevant control module is a small black module with a black connector and a green connector coming out of it. The control module is located under driver side dash, right above accelerator. To get to it you have to lay down on your back with head near pedals and look up. It will be towards center console side. You can slip module out of the dash and then access it better once its demounted. It has three tabs mounting it to the dash, one circular tab and two rectangular slot tabs.
This is what the module looks like once its pulled off the dash.

Once you have the module released from the dash, pull the green connector out. Then remove a white plastic restraint that is on the back of the green connector. There is one tab on the white restraint that you can manipulate with a small flathead screwdriver to release it.
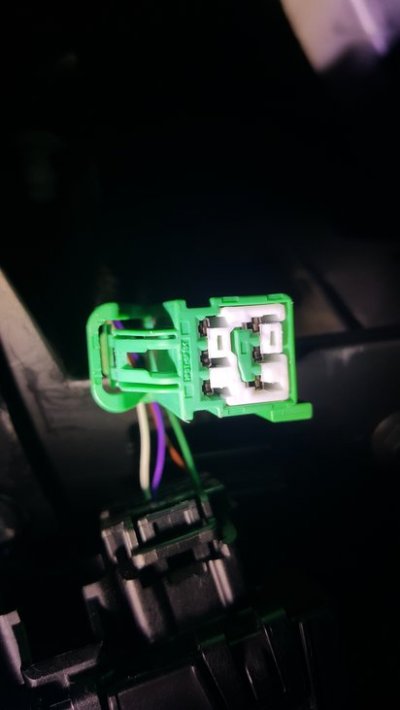
This is a picture of the white restraint

The white restraint has a tab at about the 2 o' clock location has a hole in it and I manipulated that to get the restraint to release

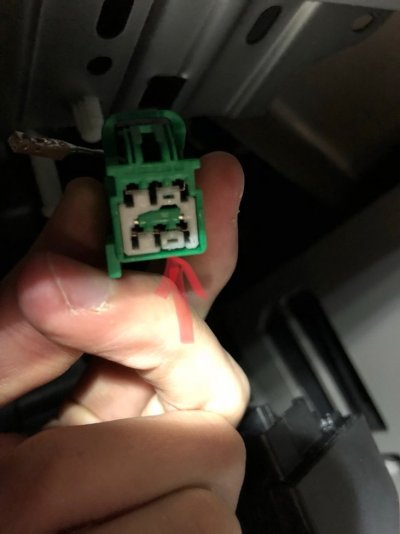
This shows the green connector and this red line points to where we will next need to release the grey wire.

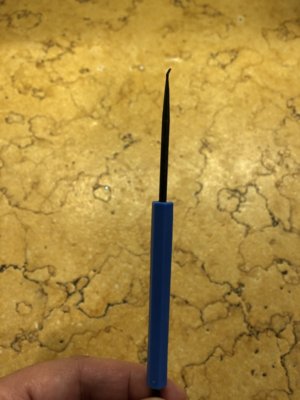
To release the grey cable there is a hidden lock inside the pin location that you need to release and then the grey cable will come right out. Apparently there are tools made just to release cable from these units, but I used a very narrow soldering tool with a slight bend on it to hook the release and let it out. Others used a jewelers screwdriver or a tiny allen wrench, but I tried those and I couldn't get the release to engage. One of the reasons that thread on the f150 forum is so long is people complaining about the grey wire and asking how to release it. It is a bitch to get out. But once you know the trick, it slides right out. If you use brute force, you would destroy the wire, its securely in there. Some folks who couldn't get it out instead resorted to cutting the grey wire and using it instead as the jumper. That would work, but i'd prefer to not be cutting my wiring harness ... This is the tool I used to release the hidden locking tab in the green connector that releases the grey wire

Anyways once you have the grey wire out, wrap the exposed contact end with electrical tape or perhaps shrink wrap to insulate it.
Make a short jumper wire – by cutting a wire about 1.5 – 2 inches long. Strip about 3/8” of each end of the wire. Fold in half. Put the jumper in pins 1 and 2 on the green connector. It should hold in place with friction. I’d guess I used about a 16 or 18 ga stranded wire. If you use stranded wire, make sure the strands are tight or that you tin them to prevent them going into the wrong pin.
This is what it looks like with the module out, the grey wire pulled (but not wrapped) and the jumper inserted.

Now put everything back together. White restraint back on green connector. Green connector into module. Module mounted back under dash. Fuse back in place if you pulled it. Bada bing, bada boom. Your spotlights should now work at any speed.
There are several other variations on this approach (such as going into the modules themselves and rewiring), but I think this is cleanest.
Good luck
What does this mod do? Allows you to run your side mirror spotlights at any speed. Normally there is a 5 MPH limit to running the spotlights
Can’t this be done in Forscan? No. The side mirror spotlights power source is hard wired to a power source that only is powered below 5 MPH
How does this mod work? The power source for the side mirror spotlights is changed at the control module from a power source only powered below 5 MPH to one that is powered at all times
How easy is this mod? Overall pretty easy. However there is some work in tight spaces and there are some small difficult parts to manipulate to release wires
How long does this mod take? If someone were experienced with car electronics this could literally be a 5-10 minutes job. If you can't get the little latches and restraints to cooperate, well it could take forever without success. I was happy when it all fell into place and got the result of a fully functioning set of spotlights that can operate at any speed at no cost.
Is this mod reversible? If you do it as outline here, yes
Where did this mod come from? F150 forum. LINK All pics are from the F150 forum except for the solder aid tool pic which is mine.
How to:
Note - Some folks pull the #16 fuse under hood before doing this because you could blow a fuse with the exposed grey wire. Do this mod at your own risk. I am not responsible if you screw up your truck or use these lights in a way that causes problems with LEO or other drivers.
The relevant control module is a small black module with a black connector and a green connector coming out of it. The control module is located under driver side dash, right above accelerator. To get to it you have to lay down on your back with head near pedals and look up. It will be towards center console side. You can slip module out of the dash and then access it better once its demounted. It has three tabs mounting it to the dash, one circular tab and two rectangular slot tabs.
This is what the module looks like once its pulled off the dash.

Once you have the module released from the dash, pull the green connector out. Then remove a white plastic restraint that is on the back of the green connector. There is one tab on the white restraint that you can manipulate with a small flathead screwdriver to release it.
This is a picture of the white restraint

The white restraint has a tab at about the 2 o' clock location has a hole in it and I manipulated that to get the restraint to release

This shows the green connector and this red line points to where we will next need to release the grey wire.
To release the grey cable there is a hidden lock inside the pin location that you need to release and then the grey cable will come right out. Apparently there are tools made just to release cable from these units, but I used a very narrow soldering tool with a slight bend on it to hook the release and let it out. Others used a jewelers screwdriver or a tiny allen wrench, but I tried those and I couldn't get the release to engage. One of the reasons that thread on the f150 forum is so long is people complaining about the grey wire and asking how to release it. It is a bitch to get out. But once you know the trick, it slides right out. If you use brute force, you would destroy the wire, its securely in there. Some folks who couldn't get it out instead resorted to cutting the grey wire and using it instead as the jumper. That would work, but i'd prefer to not be cutting my wiring harness ... This is the tool I used to release the hidden locking tab in the green connector that releases the grey wire

Anyways once you have the grey wire out, wrap the exposed contact end with electrical tape or perhaps shrink wrap to insulate it.
Make a short jumper wire – by cutting a wire about 1.5 – 2 inches long. Strip about 3/8” of each end of the wire. Fold in half. Put the jumper in pins 1 and 2 on the green connector. It should hold in place with friction. I’d guess I used about a 16 or 18 ga stranded wire. If you use stranded wire, make sure the strands are tight or that you tin them to prevent them going into the wrong pin.
This is what it looks like with the module out, the grey wire pulled (but not wrapped) and the jumper inserted.

Now put everything back together. White restraint back on green connector. Green connector into module. Module mounted back under dash. Fuse back in place if you pulled it. Bada bing, bada boom. Your spotlights should now work at any speed.
There are several other variations on this approach (such as going into the modules themselves and rewiring), but I think this is cleanest.
Good luck
Last edited:

