How to adjust bumper for Rigid D2 Fog lights

Disclaimer: Links on this page pointing to Amazon, eBay and other sites may include affiliate code. If you click them and make a purchase, we may earn a small commission.

CrownOffroad

FRF Supporting Member
Supporting Member
Joined
Apr 9, 2012
Posts
1,025
Reaction score
638
Location
San Diego, CA
Haven't had a chance to get some nice daylight pictures of the D2s installed on the hood mounts yet but will post some up this week. Concerning my D2s themselves, no issues whatsoever. Even the wiring harness was in perfect working order.

I'm still amazed at the amount of light that a 3"x3" cube can produce! If you're on the fence about these things, just order them! You'll be very happy!
 

iSurvive

FRF Addict
Joined
Feb 26, 2012
Posts
1,272
Reaction score
780
Location
Highlands Ranch, CO
I have (4) Dually's, (1) 20" LED, and (1) 40" LED from Rigid and all went perfectly each time. My only issue with lights was from a different manufacturer, Vision X Lighting, but they fixed my issue immediately.

If Rigid was willing to fix your problems quickly, then that says a lot for them long term. The quality of the lights is equal or above anything on the market.
 

MTGOAT

Full Access Member
Joined
Apr 10, 2012
Posts
69
Reaction score
12
subscribing:

I am in the middle of mounting these SOBs. I think I might need to adjust the bumper as well. I can't get the outside light to physically fit in the bumper space... I tried drilling a new hole in the plate a 1/2" back but it still wont fit... it is a bit frustrating considering it is a "bolt in" design, but I guess every truck is different.

Oh, I also lost one of the tiny screws that holds the face plate on the light when I was flipping them around. It fell right through my deck. I sure hope ACE carries this tiny screw.
 
OP
OP
justvettn

justvettn

FRF Addict
Joined
Feb 9, 2012
Posts
4,316
Reaction score
890
Location
GTA
The key to mounting these properly is that you must make sure that the bracket sits behind the upper lip of the bumper opening, otherwise it will cause the light to feel like it does not fit or fit tightly.
 

MTGOAT

Full Access Member
Joined
Apr 10, 2012
Posts
69
Reaction score
12
roger that, I am about to embark yet again, the rain has stopped for now. Thanks for the info.
 

iSurvive

FRF Addict
Joined
Feb 26, 2012
Posts
1,272
Reaction score
780
Location
Highlands Ranch, CO
subscribing:

I am in the middle of mounting these SOBs. I think I might need to adjust the bumper as well. I can't get the outside light to physically fit in the bumper space... I tried drilling a new hole in the plate a 1/2" back but it still wont fit... it is a bit frustrating considering it is a "bolt in" design, but I guess every truck is different.

Oh, I also lost one of the tiny screws that holds the face plate on the light when I was flipping them around. It fell right through my deck. I sure hope ACE carries this tiny screw.

All of the issues with these lights/brackets are related to the bumper; however, you need to mount the lights on the bracket properly spaced. That's why I recommend mounting them on the brackets and then testing them in the opening. Adjust the spacing and alignment as needed.

If all Raptor bumpers were mounted the exact same way, these lights would be closer to plug and play. Once you adjust the bumper, you will be able to line up the bracket on the frame EXACTLY like the instructions show.

Re-read my instructions on the first page of this thread. It is 10 times easier if you use a clamp to hold the bracket on the frame while testing the light spacing, marking the holes to drill, and mounting it to the frame with self-tapping screws (or bolts).

Since I do not have auto tools, I did spend some extra money. The 1" deep socket, a 1" ratchet, the 1" ratchet extensions, and a few misc items. Over $100. Stupid bumper!!
 

MTGOAT

Full Access Member
Joined
Apr 10, 2012
Posts
69
Reaction score
12
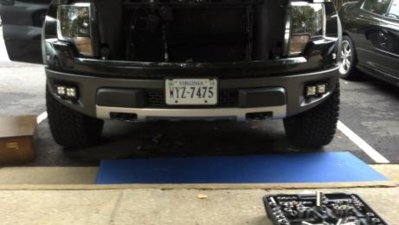
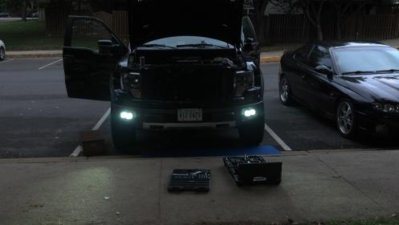
Got it figured out. Ended up borrowing my buddies socket set. I loosened the bumper just enough so I could move it a little at a time. I mounted the lights to the bracket and then installed the bracket and adjusted the bumper as needed. There is a pretty decent gap around the bumper and the fascia now but it isn't terrible. I used a socket as a spacer and moved it around the bumper as I tightened it up to ensure the spacing was the same all the way across.

The wiring was pretty straight forward and the harness was perfect. Hooking up the AUX switches was a PITA as we all know. I wonder why Ford made it so damn difficult, why didn't they just run the wires through for god's sake?

All in all it wasn't terribly hard, the info on here helped keep me from getting too pissed off after messing with the brackets the first time. Thanks.

attachment.php


I adjusted the exposure on my camera in order to be able to see the individual lights and not just blinding light.

attachment.php
 

Attachments

  • duallys_1.jpg
    duallys_1.jpg
    20.3 KB · Views: 423
  • duallys_2.jpg
    duallys_2.jpg
    16.2 KB · Views: 413

iSurvive

FRF Addict
Joined
Feb 26, 2012
Posts
1,272
Reaction score
780
Location
Highlands Ranch, CO
Nice work MTGOAT. I'm telling you it takes extreme patience or alcohol or both (and swearing of course) to get through this mod.

I was so frustrated with nothing fitting properly, then I discovered the bumper issue and all was much better. I also adjusted one side of the bumper, then the other. I used my fingers to make sure the gap was the same all the way around the bumper.

The two square lights in each opening, the staggered installation, and the wicked looking light housings are perfect for the Raptor. If you can add the 20" in the middle some day, you will love it!!
 

RigidIndustries

Supporting Vendor
Supporting Vendor
Joined
Aug 15, 2012
Posts
88
Reaction score
56
Location
Mesa, Az
Hey guys all of the photos are looking awesome. Glad to see you got it figured out. Its great to see everyone on the forum helping each other out.

As for quality control we thrive to have the best customer service and i appreciate you bringing it to my attention. If there's any problem any of you have please don't hesitate to contact me or making a call to the office. A few things get by the assembly & packaging line. We are working on a daily basis to make sure this never happens.

Thank you to all of you for choosing Rigid Industries for all of your LED Lighting needs. And purchasing a product made here in the USA by Americans.
 
Top