rdsc
Member
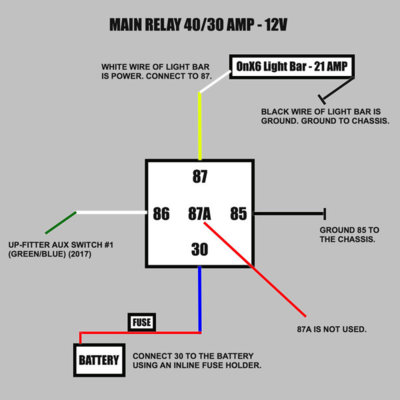
Alright so I ran into an issue trying to install a Baja Designs OnX6 Light Bar recently. The biggest amperage switch on the GEN2's is 15 amps. My light bar is 21 amps. So after some research, and a whole lotta help from 4x4TruckLEDs.com (Seriously this gent helped me put this altogether and I didn't even get the light from him, amazing customer service! He's got a customer in me now.)
So, here’s the deal. For those of you that don't know you can still run a higher amperage light via the up-fitter switches, you just have to install a relay in between. Essentially the up-fitter switch powers the relay, and the relay powers the light.
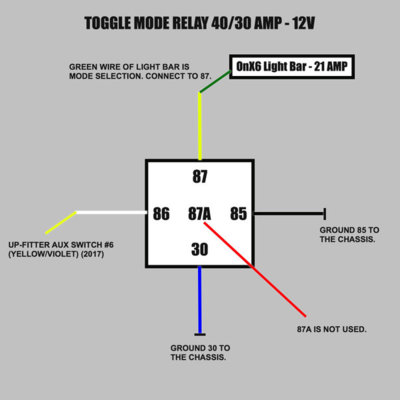
The Baja Designs OnX6 Light Bar also has a mode selection feature. High, Low, and Strobe. To utilize this feature I installed a second relay and tied this relay into my 6th Up-fitter switch. So with the light on (Aux #1) I can then toggle my Aux #6 switch to control the mode selection. If I toggle it twice (ON then OFF) the light switches to Low Beam, toggle twice again (ON then OFF) back to High Beam. If I toggle it three times (ON then OFF then ON) it switches to the Strobe function...
Pretty cool right?
Here's what you need...
1. (2) 40/30 AMP - 12 Volt Relay's (Assuming Your Light Bar is Under 30 AMPS)
2. 12 Gauge In-Line Fuse Holder
3. 25 AMP Fuse (Again Dependant on Your Light Bar's AMPS)
4. 4 Feet of 12 Gauge Wire
5. Various Crimp Connection Ends
6. Various Sizes of Heat Shrink
7. Zip Ties
That's pretty much it, install time for me took about 2 hours. But I took my time, I drew out my diagram on a white board and triple-checked all my connections. I used heat shrink to seal up all my connection points as well.
Diagram pictures attached below. Hopefully this helps others.
Cheers,


Last edited:

