GEN 2 Getting Wiring Into Center Console

Disclaimer: Links on this page pointing to Amazon, eBay and other sites may include affiliate code. If you click them and make a purchase, we may earn a small commission.

Robtor310

FRF Addict
Joined
Jul 19, 2016
Posts
1,486
Reaction score
869
Location
Redondo Beach CA
So im messing around and I think im going to put my Icom Radio in the console. Seems like a good central location. Not much room behind the rear seats.

My question is, where is there a good entry point? I cant seem to find a spot to drill into to make a hole that I can get wires through. Do you think I need to take a seat out and come from up under the side?

Ill remove whatever panels I need to but I figure someone on here and pulled the console panels off and may have some insight to the most efficient order of operations....

Thanks in advance
 

J.Bodolay

Full Access Member
Joined
Jan 11, 2011
Posts
177
Reaction score
229
So im messing around and I think im going to put my Icom Radio in the console. Seems like a good central location. Not much room behind the rear seats.

My question is, where is there a good entry point? I cant seem to find a spot to drill into to make a hole that I can get wires through. Do you think I need to take a seat out and come from up under the side?

Ill remove whatever panels I need to but I figure someone on here and pulled the console panels off and may have some insight to the most efficient order of operations....

Thanks in advance

I had to bring wires in from the front (Power, radio head) and the rear (antenna).
For the front entry I pulled the trim panels on either side of the console (they run towards the center stack/under the dash). Everything was snap in but the very front (1 philips screw I believe, each side, all the way forward at the dash). From there, my path to the battery was via the drivers side firewall boot.
For the rear entry, I ran the front seats all of the way forward. snapped off the rear top console (behind the flip up lid) and drilled a whole bottom side just above carpet level into the rear cavity. From there you can drill from inside the center console back into the rear cavity and fish your wiring as needed. Path to the roof (antenna) was under the carpet, behind the seat, up the rear pillar and under the headliner and up through the roof (via the pulled interior dome light)
Hope that helps.
 
OP
OP
Robtor310

Robtor310

FRF Addict
Joined
Jul 19, 2016
Posts
1,486
Reaction score
869
Location
Redondo Beach CA
I had to bring wires in from the front (Power, radio head) and the rear (antenna).
For the front entry I pulled the trim panels on either side of the console (they run towards the center stack/under the dash). Everything was snap in but the very front (1 philips screw I believe, each side, all the way forward at the dash). From there, my path to the battery was via the drivers side firewall boot.
For the rear entry, I ran the front seats all of the way forward. snapped off the rear top console (behind the flip up lid) and drilled a whole bottom side just above carpet level into the rear cavity. From there you can drill from inside the center console back into the rear cavity and fish your wiring as needed. Path to the roof (antenna) was under the carpet, behind the seat, up the rear pillar and under the headliner and up through the roof (via the pulled interior dome light)
Hope that helps.

Jay, first off thanks for the info.

The trim panels that run all the way up the sides, all I can really snap off is the black lower textured panels. It that the one your talking about. No phillips on there either.

Im going to use your idea for the rear entry point.

Where did you run the antenna wire into the cab? I see a plug on each side but theyre under the seats. If I have to remove a seat I will but im wondering if theres an easier entry point. I saw another guy on here with a SCREW that had a convenient grommet under the floor mat. My SCAB has a cutout in the sound deadening where it should be but no hole....
 

J.Bodolay

Full Access Member
Joined
Jan 11, 2011
Posts
177
Reaction score
229
Jay, first off thanks for the info.

The trim panels that run all the way up the sides, all I can really snap off is the black lower textured panels. It that the one your talking about. No phillips on there either.

Im going to use your idea for the rear entry point.

Where did you run the antenna wire into the cab? I see a plug on each side but theyre under the seats. If I have to remove a seat I will but im wondering if theres an easier entry point. I saw another guy on here with a SCREW that had a convenient grommet under the floor mat. My SCAB has a cutout in the sound deadening where it should be but no hole....

If "the car stereo company" has photos, that might be your best help.
1. Trim panels: They are the panels on either side of console running up to dash: they snap on/off except...I believe at the very front....Thought I remembered a screw holding them in. just work it carefully. Should allow enough of a raceway to get your wiring from the console into the dash.
2. Rear entry point: Once you pull the top rear cover off, it is easy to see the access in the rear cavity. Caution: The floor of the console compartment is higher than the bottom of the cavity. About 2" of offset.
3. Antenna: I went with roof mount for VHF/UHF. Centered L/R and about a foot forward of the rear of the cab. I pulled the rear interior dome light, drilled the roof and added a doubler plate to beef up the aluminum skin. For my bed mounted HF antenna HF, I went out the cab floor at the back right corner....I originally considered going straight out the back, but the clearance between the bed and the back of the cab is very tight.
Pictures of another radio operators custom under dash mount are in this 800A build thread link. VHF/UHF roof photo of mine are at #10 http://www.fordraptorforum.com/f260/800a-offroad-build-52822/#post1107446
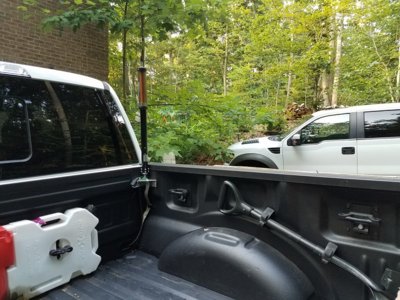
Below is my HF antenna. Bed mounted via a fabricated aluminum mount. Feed/control lines and ground strap exit the bed just to the right of the rotopax.
 

Attachments

  • HF mount.jpg
    HF mount.jpg
    252.4 KB · Views: 64
Last edited:
OP
OP
Robtor310

Robtor310

FRF Addict
Joined
Jul 19, 2016
Posts
1,486
Reaction score
869
Location
Redondo Beach CA
@Robtor310 text me. i have pics. i pulled a center console recently when i stripped a truck for sound deadening. i can go step by step for you. (831) 254-7562

Thanks man, sent you a text.

If "the car stereo company" has photos, that might be your best help.
1. Trim panels: They are the panels on either side of console running up to dash: they snap on/off except...I believe at the very front....Thought I remembered a screw holding them in. just work it carefully. Should allow enough of a raceway to get your wiring from the console into the dash.
2. Rear entry point: Once you pull the top rear cover off, it is easy to see the access in the rear cavity. Caution: The floor of the console compartment is higher than the bottom of the cavity. About 2" of offset.
3. Antenna: I went with roof mount for VHF/UHF. Centered L/R and about a foot forward of the rear of the cab. I pulled the rear interior dome light, drilled the roof and added a doubler plate to beef up the aluminum skin. For my bed mounted HF antenna HF, I went out the cab floor at the back right corner....I originally considered going straight out the back, but the clearance between the bed and the back of the cab is very tight.
Pictures of another radio operators custom under dash mount are in this 800A build thread link. VHF/UHF roof photo of mine are at #10 http://www.fordraptorforum.com/f260/800a-offroad-build-52822/#post1107446
Below is my HF antenna. Bed mounted via a fabricated aluminum mount. Feed/control lines and ground strap exit the bed just to the right of the rotopax.

Jay, thanks for the help man!
 
Top