Fox Live Valve rear shocks on Gen 1??

Disclaimer: Links on this page pointing to Amazon, eBay and other sites may include affiliate code. If you click them and make a purchase, we may earn a small commission.

eastreich

Member
Joined
Jun 1, 2018
Posts
25
Reaction score
38
Location
Montana
Would be interesting to see this work!

Are you doing a simple 3 channel switch(soft/med/hard) or writing logic to integrate auto adjustment between modes based on shock shaft velocity?

How I understand the OE setup to work is that is constantly adjusts based off variety of inputs, shaft velocity via ride height sensors, accelerometer, etc. I wouldnt be surprised if if uses vehicle speed as well.

The Baja mode logic will call for full stiff when ride height sensors show vehicle airborne, however the rest of the time I believe it varies the compression based off all the other data.

Definitely keep us posted!

I was initially thinking of a 3 position rocker switch with soft/med/hard, but am now probably going with a 10 position rotary with soft at one end and hard at the other. If I can make it look like the terrain/mode dial in a Gen2 or my wife's Explorer all the better.

If I ever get around to it, I would do a simple logic setup that mimics a Honda Talon Live Valve setup. Turn the wheel and outboard shocks stiffen, brake and front gets harder, etc...

If I do anything additional off the bat it will be to tie it into the tow/haul mode so it stiffens up the back shocks at a set ratio to the fronts when I've got it loaded down. Find the wire that enables the light to come on in the dash and use that as the trigger to alter the juice to rear shock actuators accordingly.

Not worried about position sensors when I get the wheels off the ground. Bumps will take care of that.

I just want to have fun with this and not have it completely consume all my spare time!
 

wrbsti

Member
Joined
Jun 25, 2019
Posts
17
Reaction score
7
Location
Gilbert, AZ
I was initially thinking of a 3 position rocker switch with soft/med/hard, but am now probably going with a 10 position rotary with soft at one end and hard at the other. If I can make it look like the terrain/mode dial in a Gen2 or my wife's Explorer all the better.

If I ever get around to it, I would do a simple logic setup that mimics a Honda Talon Live Valve setup. Turn the wheel and outboard shocks stiffen, brake and front gets harder, etc...

If I do anything additional off the bat it will be to tie it into the tow/haul mode so it stiffens up the back shocks at a set ratio to the fronts when I've got it loaded down. Find the wire that enables the light to come on in the dash and use that as the trigger to alter the juice to rear shock actuators accordingly.

Not worried about position sensors when I get the wheels off the ground. Bumps will take care of that.

I just want to have fun with this and not have it completely consume all my spare time!

The Talon logic would be pretty slick!

I think the tow/haul can be tapped into directly from the center console, some guys have upgraded to a B&M shifter with built in buttons for up/down shift, but has a separate button that wires in, sounds like the harness is pretty basic and easily accessible once console is removed, might be easier to get to/find vs the back of cluster
 

Browsing

Member
Joined
Jul 27, 2020
Posts
13
Reaction score
5
Location
Virginia
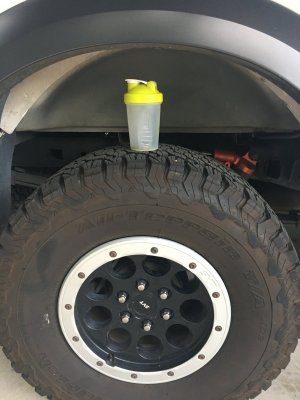
You can see my live valve peeking out here. I posted some pictures in the “last gen 2 shock swap” thread but these apply here as well. Upgrade? Maybe because mine were shot. Cheaper than a rebuild? Yep! Mine were $800 from a local dealer with 20 miles on there. Have to unhook the rear end to fit these on. If you’re in Virginia, shoot me a PM and we can catch a ride.

8C606AEF-5376-44C7-9869-3F8E01D7DE39.jpeg
 

eastreich

Member
Joined
Jun 1, 2018
Posts
25
Reaction score
38
Location
Montana
Okay, FINALLY getting around to this project.

You all can thank the 'vid for getting me going as it messed me up enough that my dirt bike racing season got shut down 6 weeks ago so on to the Live Valve project now that I've got enough energy and motivation to not go right to bed after I get home from work!

Camburg UCAs on my shop floor, KHC front buckets will be here Tuesday. Have new lower ball joints and IWEs to go in as well...

DON'T consider this is a functional Live Valve, but let's call it a poor man's Fox Intelligent Quick Switch (iQS).

I've been running the rear 3.0 LVs in full hard for the last 8000 miles or so. I've usually got 2 Husky 450s in the bed along with all our tools, and with those at full stiff it has been a great ride bombing down I-15 between Montana and Johnson Valley. As long as I keep the truck loaded, it is still a big improvement over stock when bombing around Ord Mountain or taking the Canyon Route to get from I-40 to Anderson Dry Lake.

This also has led me to wire these things up separately front/rear. This way when I'm loaded down or towing I can stiffen the rear suspension accordingly and then go back to a more matched setup when I'm empty.

If this all works the way I think it will, next winter I will get some Arduino, teach myself that programming, and try to set this up with an IMU so it will stiffen/soften accordingly when turning/accelerating/braking. For now though, baby steps...

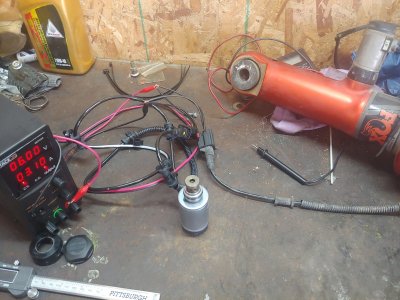
I've got the front shocks on my workbench right now with one LV removed so I can watch the needle as I move knobs around. As a PAIR the LV needles start to move at 2A, and fully open at 3.8. This is with my el-cheapo TackLife power supply set initially to 13v and playing with the fine current control. When they valves get fully open I've got 10.00v and 3.8A. Fully closed is at 6.00v and 2.0A. The solenoid sitting on my workbench is getting warm after say 10 minutes but it isn't something I'm worried about long term as the one still installed on the shock is cool as the shock body is acting as a heat sink.

I'm still debating if I'm going to do switches that do two or three positions, or just say f it and use a pair of rotary potentiometers. I'm leaning towards the latter if I'm honest. Need to do some math in the morning to figure out what resistance range I need to get and order those up first thing. I've got what I think is a slick setup for where the control unit will go, but I will wait to show that at the very end of the project.

That's it for now. More updates shortly!
 

eastreich

Member
Joined
Jun 1, 2018
Posts
25
Reaction score
38
Location
Montana
One more thing...

I know that some have probably subscribed to this thread, so I will post updates as I progress here.

Once I get it all done, however, I will post a stand alone thread with all the pics, etc... just so it is easier to find for anyone else in the future.
 

eastreich

Member
Joined
Jun 1, 2018
Posts
25
Reaction score
38
Location
Montana
Playing a bit more today, and learned a few more things.

Basically, I did some additional searching and realized my voltage/current supply was in an over current state. It did not come with a manual, as that part must still be in a container sitting out in the Pacific off the coast of Long Beach. So reset my power supply with a constant 12v, and a current limit that wouldn't kick it off voltage control to current control.

So, long story short:

The LV needle starts to open at right around 4v give or take a tenth or two depending on direction and temp of the solenoid. It is fully open at 6.4v, again, give or take a tenth or two. I found that it lags a bit in opeing when going down from higher voltage in comparison to when you are going up. I'm going to chalk this up to internal drag and spring pressure that isn't going to be there when it is installed in the shock and under a few hundred psi of pressure. I'm running the valve in open atmosphere so that part of the equation is missing. There is about .15mm of float in the needle sitting out in the open that you can push it in before it bottoms on the internal mechanism no matter what depth the solenoid is holding it at.

The opening is not entirely linear. There looks to be a step change around 4.6v in the opening, and again at 5.4v. Therefore, I am going to do a regular switch with resistors to act as step downs to get the valve input voltage where it needs to be. Looking at a 4 or 5 step input voltage to the the valves, with 4.2, 4.8, 5.4, 6.0, and 6.6v outputs for 5 setpoints from hard to soft.

Parts are ordered to make that happen. Not going to install the shocks until I have the switch working the way I want. But it shouldn't be too long for that stuff to get here.

0402211730.jpg
 

gotsboost

Full Access Member
Joined
Mar 1, 2021
Posts
133
Reaction score
171
Location
kansas
Playing a bit more today, and learned a few more things.

Basically, I did some additional searching and realized my voltage/current supply was in an over current state. It did not come with a manual, as that part must still be in a container sitting out in the Pacific off the coast of Long Beach. So reset my power supply with a constant 12v, and a current limit that wouldn't kick it off voltage control to current control.

So, long story short:

The LV needle starts to open at right around 4v give or take a tenth or two depending on direction and temp of the solenoid. It is fully open at 6.4v, again, give or take a tenth or two. I found that it lags a bit in opeing when going down from higher voltage in comparison to when you are going up. I'm going to chalk this up to internal drag and spring pressure that isn't going to be there when it is installed in the shock and under a few hundred psi of pressure. I'm running the valve in open atmosphere so that part of the equation is missing. There is about .15mm of float in the needle sitting out in the open that you can push it in before it bottoms on the internal mechanism no matter what depth the solenoid is holding it at.

The opening is not entirely linear. There looks to be a step change around 4.6v in the opening, and again at 5.4v. Therefore, I am going to do a regular switch with resistors to act as step downs to get the valve input voltage where it needs to be. Looking at a 4 or 5 step input voltage to the the valves, with 4.2, 4.8, 5.4, 6.0, and 6.6v outputs for 5 setpoints from hard to soft.

Parts are ordered to make that happen. Not going to install the shocks until I have the switch working the way I want. But it shouldn't be too long for that stuff to get here.

View attachment 165157


Whats the word man? I was about to buy a voltage controller myslelf.
 

eastreich

Member
Joined
Jun 1, 2018
Posts
25
Reaction score
38
Location
Montana
Any update ? We're all interested in this build !
So, I've been running the adjustable constant current power source for the last few months. It works very well. I have a 110V CV/CC source that I stuck in my center console. I pop the lid to adjust the current. It is not the slickest way to do it (I will get to that), but for my testing purposes it works. And works great! When cruising around empty with the wife I set it to 7.0A (soft) and it floats like mostly worn out stock 2.5s. For normal driving 6.0A (mid) is spot on the money. Corners in the canyon coming up or off road, dial it to 5.0A and the tire is the limitation in the corners if you don't slide out of the seat first.

To clean it up, I was going to get an 8 switch SwitchPro setup from SDHQ to replace my 4 OEM toggles. They have a soft/med/hard button covers and the SwitchPro holds memory for the selection when you turn the ignition off.

However...

I was harrassing a Fox rep about standalone LV controllers (as in, could I repurpose a Honda or Polaris SxS unit) on the midway at the Mint 400 on Friday. He told me to give SDi a call. Said their system is standalone and an improvement over the OEM Ford system in the Gen 2 Raptors.

So some research was involved on Saturday as i had a bunch of downtime after taking out my back 10mi into the motorcycle race and i ended up running the main pit for my best friend who was also riding Ironman but didn't do the same dumb $hi+ as me and was able to finish.

The SDi E-Click system is made as an upgrade for the 2019 on up OEM LVs, OR with additional wiring to add with LV shocks to 2017/18 Raptors. Obviously, with the cocnversion buckets we can use the LVs and this controller too, although for the Gen1 trucks we would have to come up with our own way to mount the control touchscreen.

There is a thread on the Gen2 suspension discussion about the E-Click system. To put it shortly, there are 3 drive modes, it can compensate for loading in the bed, and has independent user adjustements to control the shocks in all 3 planes: i.e. when you step on the brakes and it pitches forward it will stiffen the front to your desired level. Same with acceleration, corner lean, etc...

So, time is money. Do I want to spend $2100 for this SDi E-Click? Not really, but at $700 or so for the SwitchPro another couple hundred for more electrical parts, and weeks of my time programming? Yeah, Santa isn't bringing me a rear bump kit for Christmas. Still getting new rear springs though, and some RCV IWE eliminators for the 3rd IWE I blew apart on Saturday.

I will be talking to the guy I get my bike suspension parts from (who is an SDi dealer) about getting the E-Click setup.
 
Top