- Joined
- Dec 16, 2016
- Posts
- 18,222
- Reaction score
- 28,661
Many of us know there’s not an abundance of room behind the seats (SCREW, not sure about the SCABs) and if you actually haul stuff, under the seat subs are not ideal. I’ve wrapped the stock enclosure and amped the Kicker 8” up to 300w, and that’s probably good up to about 260-270 before I hear some less desirable sounds on some heavy bass songs.
MTI has a literal truck load of options, including behind the seat.
Has anyone tried a behind the seat Subwoofer from Mobile Toys?
I finally took the plunge on their 10” behind the seat box. For my plans, a single 10” is fine.
I sprung for the JL Audio amp as well, as eventually I’ll be doing a sound processor and slightly more power to the stereo.
1st up: delivery, not as expected. sub came, but no amp. The amp is still in transit as of this writing.
The box the sub came in was huge, and the sub is wrapped several times with bubble wrap and the remaining fill is styrofoam peanuts. An entire “giant lawn leaf bag” full of them.
2nd: there are no instructions and there needs to be, but you don’t know that by looking at it.
here’s what you’ll need to complete the install:
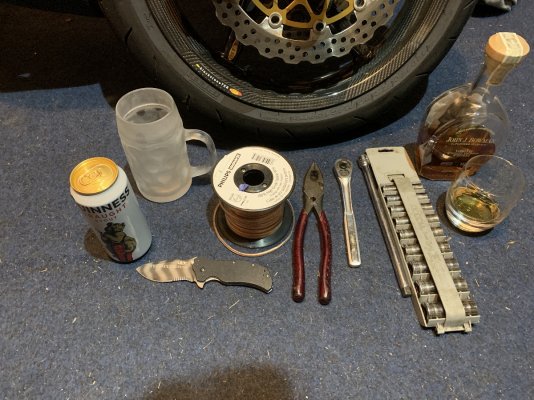
Left to right:
You cannot fit the MTI box behind the seat without removing the insulation. You might be able to lock the seat backs, but you might not be unlocking them. Also, if you have the factory sub, you must remove the center stud from the floor:

here’s how the sub sits if you do nothing - no removing the stock sub box stud or trimming the insulation on the cab wall.
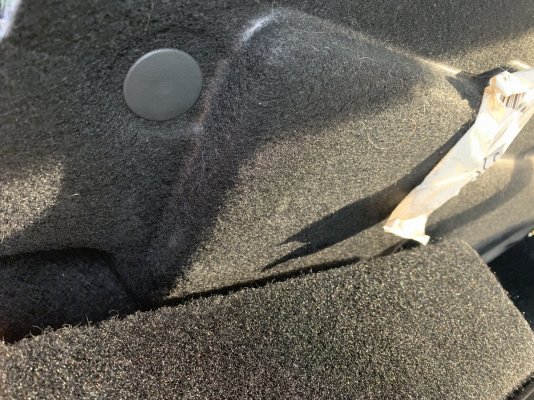
here’s the section behind the passenger side seat back. The sub is about 14” tall, and this area is 12.5” I tried all manner of stuff and relented, calling MTI.
I got word back the next day from the builder. guidance as follows:
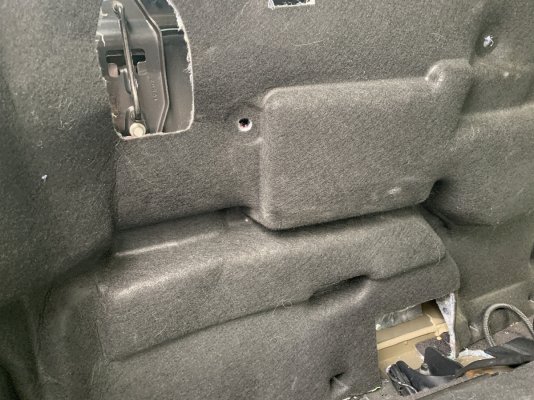
here’s what it looks like before the cutting. The stock jack sits here normally and needs to find a good home. Pulling this insulation is easy. There are 2 push pin “Christmas tree” fasteners in the rear wall, pry with the decent serrated knife and pull them. lift up on the rear insulation and pull the left side from behind the trim and it will just bend out of the way.
By now, you will probably be on Guinness #2.
There are 2 rear wall items you need to deal with:
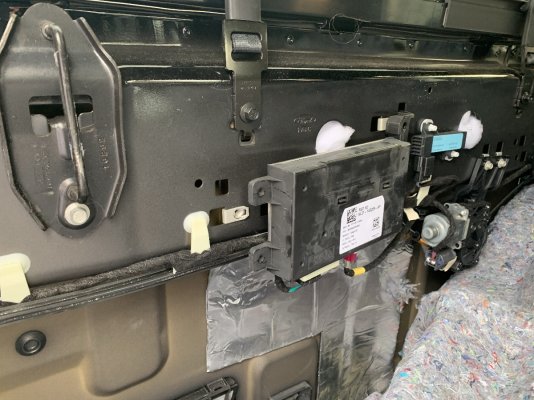
On the left, loosen the rear module screws, x3. Both connectors hang down below that “lip” on the rear wall, which is coincidentally, 14.2” from the floor. Just enough for the MTI box to fit. You need to make sure the rear module connections don’t hang below that lip.
On the right is the power rear sliding window motor. I cut the insulation such that it is still covered.
MTI says you have to cover that rear cab vent and pull it, but I disagree. The cab floor is contoured and the bottom of MTI’s sub contacts the contour and there is at least 3/8” between the back of the sub box and the cab vent assembly. I may cover the vent loosely, but not remove it.
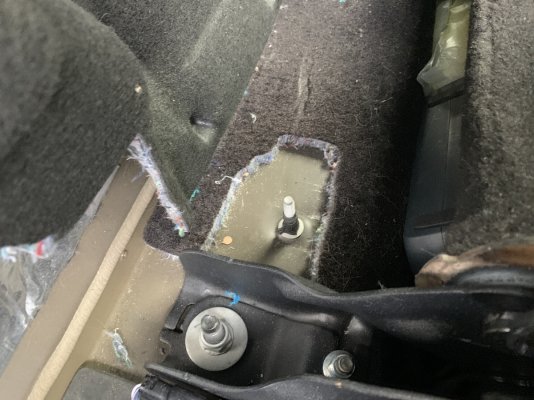
The factory sub box stud needs to be removed, 10mm deep well socket, lefty-loosey, and you’re done. extra credit if you fill the hole with silicone or some kind of insulator.
Here’s the rear cab vent:
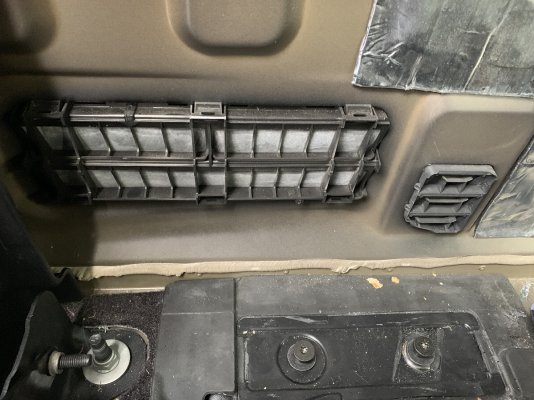
the stock jack mounting points are on the bottom. right. You may be tempted to add dynamat now if that’s your plan. Wait.
Mock it up, mark it and get to work:
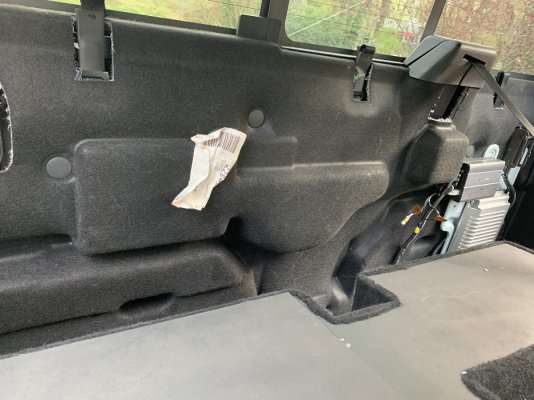
Now you cut. If you know the proper tool to cut this cab insulation, use it. As I said before, my ZT was the least bad tool in inventory. If you mark it out, probably 10-20 minutes of cutting, possible cursing, spilling the Guinness if you’re not careful, and possibly some trimming.
About time for Guinness #3
Test fit:
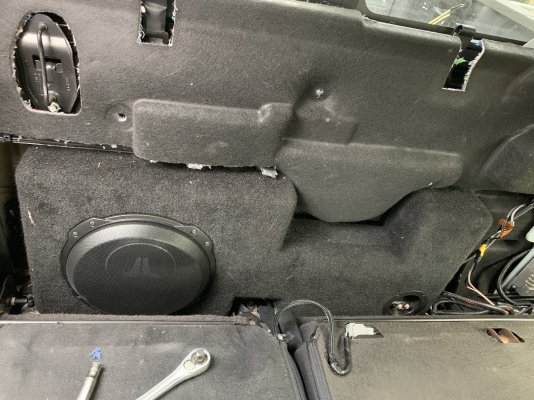
this fits much better, seat backs can be raised and, you can almost raise the rear passenger seat. almost, but not quite.
So what happens if you raise the seat back?
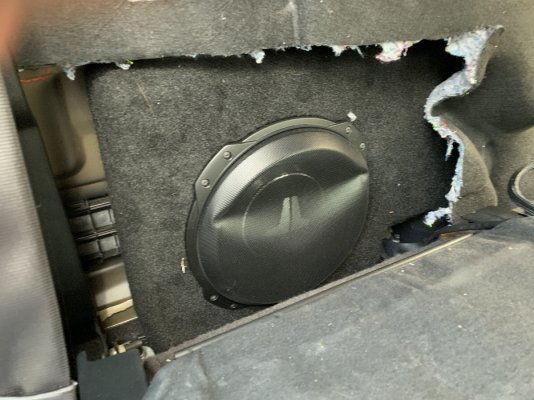
Further texting with MTI revealed the sub box should not have the speaker cover on. Just in time, because by now I’m done with Guinness #3 and you probably are too if you’ve avoided the pitfalls above. knowing what we know now, here’s how it ends up
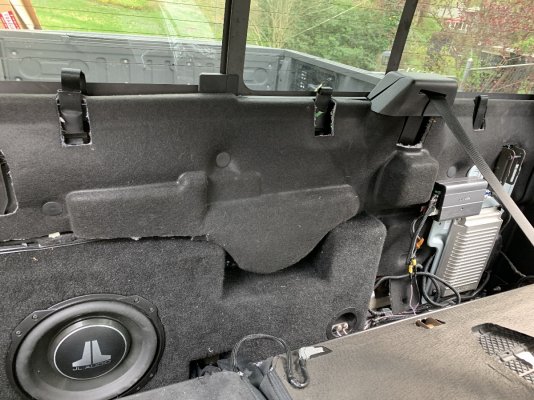
seat back will go up, but the speaker will impact the rear of the passenger seat in this position. Seat down, adjust the amp gain, and it is much improved. Just the sub is several x more expensive than the Kicker 8” many of us used before, but it’s worth it.
Now you get to try out the new found bass. pour bourbon of choice into the glass, and enjoy some tunes .
MTI has a literal truck load of options, including behind the seat.
Has anyone tried a behind the seat Subwoofer from Mobile Toys?
I finally took the plunge on their 10” behind the seat box. For my plans, a single 10” is fine.
I sprung for the JL Audio amp as well, as eventually I’ll be doing a sound processor and slightly more power to the stereo.
1st up: delivery, not as expected. sub came, but no amp. The amp is still in transit as of this writing.
The box the sub came in was huge, and the sub is wrapped several times with bubble wrap and the remaining fill is styrofoam peanuts. An entire “giant lawn leaf bag” full of them.
2nd: there are no instructions and there needs to be, but you don’t know that by looking at it.
here’s what you’ll need to complete the install:

Left to right:
- Guinness x 3 pints. Trust me.
- Pint Glass, frosting optional. Some heathens drink Guinness from a bottle or can, but when their reckoning arrives, they will wish they’d not sinned.
- A decent, serrated knife, pictured a zero tolerance zt350. Why? You’ll need to cut the rear insulation. There’s probably a right tool for this job. The above pictured knife was the least wrong tool in my inventory, to include 3 sets of shears, 3 more pairs of scissors, a few razors, and Ford’s rear backing laughed at them all.
- speaker wire.
- tool to manipulate/strip speaker wire. Linemans pliers pictured.
- socket driver
- socket extension
- 10mm socket
- Bourbon, for when you are done and listening to all the bass you have been missing. A. Smith Bowman’s John Bowman pictured.
- a proper glass to enjoy said bourbon.
You cannot fit the MTI box behind the seat without removing the insulation. You might be able to lock the seat backs, but you might not be unlocking them. Also, if you have the factory sub, you must remove the center stud from the floor:
here’s how the sub sits if you do nothing - no removing the stock sub box stud or trimming the insulation on the cab wall.

here’s the section behind the passenger side seat back. The sub is about 14” tall, and this area is 12.5” I tried all manner of stuff and relented, calling MTI.
I got word back the next day from the builder. guidance as follows:
- cut the rear insulation to fit
- move the module behind the insulation on the rear wall
- tape over the cab vent

here’s what it looks like before the cutting. The stock jack sits here normally and needs to find a good home. Pulling this insulation is easy. There are 2 push pin “Christmas tree” fasteners in the rear wall, pry with the decent serrated knife and pull them. lift up on the rear insulation and pull the left side from behind the trim and it will just bend out of the way.
By now, you will probably be on Guinness #2.
There are 2 rear wall items you need to deal with:

On the left, loosen the rear module screws, x3. Both connectors hang down below that “lip” on the rear wall, which is coincidentally, 14.2” from the floor. Just enough for the MTI box to fit. You need to make sure the rear module connections don’t hang below that lip.
On the right is the power rear sliding window motor. I cut the insulation such that it is still covered.
MTI says you have to cover that rear cab vent and pull it, but I disagree. The cab floor is contoured and the bottom of MTI’s sub contacts the contour and there is at least 3/8” between the back of the sub box and the cab vent assembly. I may cover the vent loosely, but not remove it.

The factory sub box stud needs to be removed, 10mm deep well socket, lefty-loosey, and you’re done. extra credit if you fill the hole with silicone or some kind of insulator.
Here’s the rear cab vent:

the stock jack mounting points are on the bottom. right. You may be tempted to add dynamat now if that’s your plan. Wait.
Mock it up, mark it and get to work:

Now you cut. If you know the proper tool to cut this cab insulation, use it. As I said before, my ZT was the least bad tool in inventory. If you mark it out, probably 10-20 minutes of cutting, possible cursing, spilling the Guinness if you’re not careful, and possibly some trimming.
About time for Guinness #3
Test fit:

this fits much better, seat backs can be raised and, you can almost raise the rear passenger seat. almost, but not quite.
So what happens if you raise the seat back?

Further texting with MTI revealed the sub box should not have the speaker cover on. Just in time, because by now I’m done with Guinness #3 and you probably are too if you’ve avoided the pitfalls above. knowing what we know now, here’s how it ends up

seat back will go up, but the speaker will impact the rear of the passenger seat in this position. Seat down, adjust the amp gain, and it is much improved. Just the sub is several x more expensive than the Kicker 8” many of us used before, but it’s worth it.
Now you get to try out the new found bass. pour bourbon of choice into the glass, and enjoy some tunes .

