E&G Console Gun Vault

Disclaimer: Links on this page pointing to Amazon, eBay and other sites may include affiliate code. If you click them and make a purchase, we may earn a small commission.

OICNW-Rob

FRF Supporting Member
Supporting Member
Joined
Jan 3, 2020
Posts
51
Reaction score
70
Location
Bend, Oregon
You're welcome! Thank you for your patience during the COVID closure at E&G.

The bolts you have are good to go! All of the bolts have been updated in the E&G kits for over a year now! If you have any questions or concerns with installation, please reach out!


Nick,
Is E&G back up and running?
 

Oldfart

FRF Addict
Joined
Oct 21, 2017
Posts
6,008
Reaction score
14,916
Location
Saggy Balls Division of PA Trump Army
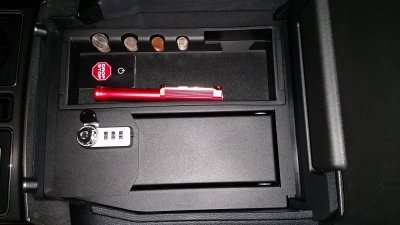
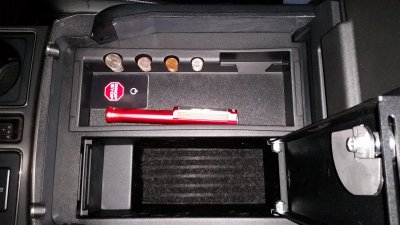
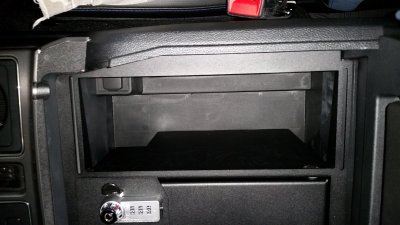
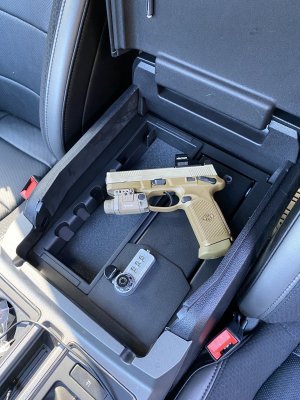
I got my E&G safe in this past weekend. The box has top notch build quality, great fit and finish. Very heavy duty build. I think it's just the right size for a pistol and a few mags, still room to throw in some extras if your going for a hike. I really like that you have 1/2 of the console free for random stuff. Thanks to Nick at Apollo Optics.

A few tips from when I put my vault in, hopefully save you some time and hassle.

The 2 things I ran into is that if you have an 802A, finding the tiny little very flat and hard to see tabs on either side of the USB port plugs was hard until you figure out where they are. There is a very small flat tab on either side of the USB plug I needed to put a small flat blade screwdriver under each one, then it popped right out. The other thing is poor directions and VERY poor photography on the install sheet. The thing that wasted a lot of time due to the poor directions is that once you remove the 2 10mm bolts from the rear/side of the console they tell you to get a "large" pry bar to pry up the right rear of the console so you can slide in the steel mounting plate.

What they neglect to mention, or show in their ****** photo, is you are prying up on the plastic part only of the console. There is a sort of honeycomb/ribbed part underneath you can safely pry on with a 12" or so wonder bar. NOT on the black metal bar that runs all the way across and is what I was prying on to start. Between the instructions telling me to use a "LARGE" pry bar and the poor photo I wasted a lot of time trying to carefully raise the black metal bar. I would not consider a foot long wonder bar, which very easily has more than enough power, to be a LARGE pry bar. I have 2 footers and 3 footers, those are large pry bars! That gloss black metal brace IS NOT MOVING and a simple 10" Wonder Bar is easily enough to carefully lift on the bottom of the console box to slip the plate underneath. Other than that it's a straight forward install.

20200525_141003.jpg


20200525_141020.jpg


View attachment 144492

20200525_142259.jpg
 
Last edited:

Johnkn

FRF Addict
Joined
Nov 29, 2018
Posts
1,259
Reaction score
894
Location
LaPlata, MD
I installed mine last weekend, 34 minutes start to finish at a slow, enjoyable pace which included 3 trips back into the garage. Agreed, no need for a 'pry bar' a long screwdriver worked perfectly, and yes you lift the plastic console base not the metal bracket below it.

Also, I did not remove any plugs on the back of the console of my 2019 802A truck. The largest harness there is held to the console with a plastic push pin, I just pulled that out to allow more slack in the cable bundle and moved the back of the console out of the way, it worked perfectly.. Thanks again Nick!
 
Last edited:

Oldfart

FRF Addict
Joined
Oct 21, 2017
Posts
6,008
Reaction score
14,916
Location
Saggy Balls Division of PA Trump Army
I installed mine last weekend, 34 minutes start to finish at a slow, enjoyable pace which included 3 trips back into the garage. Agreed, no need for a 'pry bar' a long screwdriver worked perfectly, and yes you lift the plastic console base not the metal bracket below it.

Also, I did not remove any plugs on the back of the console of my 2019 802A truck. The largest harness there is held to the console with a plastic push pin, I just pulled that out to allow more slack in the cable bundle and moved the back of the console out of the way, it worked perfectly.. Thanks again Nick!

Funny you mentioned that, because I saw that and thought about doing it that way but I was concerned that with needing a LARGE Pry Bar I didn't want to take any chance of nicking anything. I was expecting to really need some power to lift the console. If I ever need to do it again I would try just moving the rear cover enough out of the way, lift it the little bit that's needed, and slide the plate in. I'm not sure if you need to unhook anything if you're careful.
 
Last edited:

Nick@Apollo-Optics

Supporting Vendor
Supporting Vendor
Joined
Apr 3, 2011
Posts
7,480
Reaction score
3,125
Location
Houston, TX
Nick,
Is E&G back up and running?

Yes sir. They're still a bit backed up and processing orders somewhat slowly, but they are back up and running!

I got my E&G safe in this past weekend. The box has top notch build quality, great fit and finish. Very heavy duty build. I think it's just the right size for a pistol and a few mags, still room to throw in some extras if your going for a hike. I really like that you have 1/2 of the console free for random stuff. Thanks to Nick at Apollo Optics.

A few tips from when I put my vault in, hopefully save you some time and hassle.

The 2 things I ran into is that if you have an 802A, finding the tiny little very flat and hard to see tabs on either side of the USB port plugs was hard until you figure out where they are. There is a very small flat tab on either side of the USB plug I needed to put a small flat blade screwdriver under each one, then it popped right out. The other thing is poor directions and VERY poor photography on the install sheet. The thing that wasted a lot of time due to the poor directions is that once you remove the 2 10mm bolts from the rear/side of the console they tell you to get a "large" pry bar to pry up the right rear of the console so you can slide in the steel mounting plate.

What they neglect to mention, or show in their ****** photo, is you are prying up on the plastic part only of the console. There is a sort of honeycomb/ribbed part underneath you can safely pry on with a 12" or so wonder bar. NOT on the black metal bar that runs all the way across and is what I was prying on to start. Between the instructions telling me to use a "LARGE" pry bar and the poor photo I wasted a lot of time trying to carefully raise the black metal bar. I would not consider a foot long wonder bar, which very easily has more than enough power, to be a LARGE pry bar. I have 2 footers and 3 footers, those are large pry bars! That gloss black metal brace IS NOT MOVING and a simple 10" Wonder Bar is easily enough to carefully lift on the bottom of the console box to slip the plate underneath. Other than that it's a straight forward install.

View attachment 144490


View attachment 144491


View attachment 144492

View attachment 144494

I installed mine last weekend, 34 minutes start to finish at a slow, enjoyable pace which included 3 trips back into the garage. Agreed, no need for a 'pry bar' a long screwdriver worked perfectly, and yes you lift the plastic console base not the metal bracket below it.

Also, I did not remove any plugs on the back of the console of my 2019 802A truck. The largest harness there is held to the console with a plastic push pin, I just pulled that out to allow more slack in the cable bundle and moved the back of the console out of the way, it worked perfectly.. Thanks again Nick!

Glad you both got them installed! Thank you for your support!
 

motoman289

Active Member
Joined
Mar 15, 2017
Posts
50
Reaction score
23
Location
Michigan
Anyone know of or have any experience mounting this console safe along with their VHF? Interested in possibly going this route, but mounting my radio custom in the storage bin.
 

Nick@Apollo-Optics

Supporting Vendor
Supporting Vendor
Joined
Apr 3, 2011
Posts
7,480
Reaction score
3,125
Location
Houston, TX
Anyone know of or have any experience mounting this console safe along with their VHF? Interested in possibly going this route, but mounting my radio custom in the storage bin.

One of our sales guys, Chad, did that on his truck. I'll have him post his setup shortly.
 
Joined
Aug 7, 2019
Posts
6
Reaction score
33
Location
Petaluma, California
Thanks Nick! I have the E&G in my 2020. It took about 25 minutes and a beer to install. A hint for installing would be that you do not have to unplug the USB cables on the backside of the center console panel. There is enough slack if you just unplug the three other wires and push it to the side.

And yes, a "large" crowbar is not needed. You can use a long flathead screwdriver (which I did) and it works completely fine. You realistically only need to lift it for maybe a second to slide over the split in the metal baseplate.

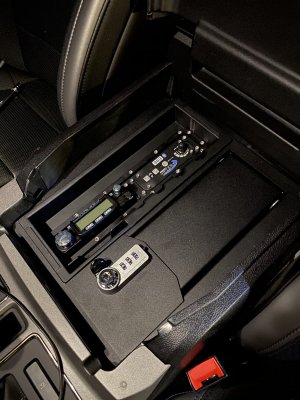
Then, since I run my radio setup out of my console, I trimmed the tray on my 2020 (I had done this on my 17, but I had a relief cut in it so it would sit flush with the passenger sidewall of the console. It didn't look right on this one, so I traced and trimmed out the new console tray. Then I was able to fit my dual radio/intercom bezel in there, and make it work.

I use the GJ Motorsports TBL for my antenna mount and coax. I have an external speaker under the driver seat so I can hear with the lid closed. And I have all my intercom wiring plumbed to the seat backs so I can easily plug in our headphones. Radio faces me, intercom faces co-pilot. He can deal with that stuff if we're using headsets. But I'd still rather have the radio face me since I'll always be in the driver seat when wanting to change channels, etc.

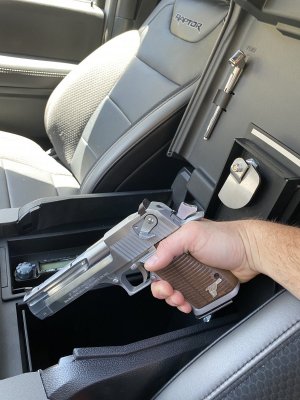
It's a super slick system, but it leaves you minimal room to store items. I utilize my door panels for a fair amount of stuff, as well as the cubby in front of the shifter. And you'll see in some subsequent photos, I use the hell out of my backseat. Stay tuned! (P.S. The Deagle doesn't fit, but the FNX .45 does!)

IMG_5143.jpg IMG_3260.jpg IMG_4198.jpg
 

Nick@Apollo-Optics

Supporting Vendor
Supporting Vendor
Joined
Apr 3, 2011
Posts
7,480
Reaction score
3,125
Location
Houston, TX
Thanks Nick! I have the E&G in my 2020. It took about 25 minutes and a beer to install. A hint for installing would be that you do not have to unplug the USB cables on the backside of the center console panel. There is enough slack if you just unplug the three other wires and push it to the side.

And yes, a "large" crowbar is not needed. You can use a long flathead screwdriver (which I did) and it works completely fine. You realistically only need to lift it for maybe a second to slide over the split in the metal baseplate.

Then, since I run my radio setup out of my console, I trimmed the tray on my 2020 (I had done this on my 17, but I had a relief cut in it so it would sit flush with the passenger sidewall of the console. It didn't look right on this one, so I traced and trimmed out the new console tray. Then I was able to fit my dual radio/intercom bezel in there, and make it work.

I use the GJ Motorsports TBL for my antenna mount and coax. I have an external speaker under the driver seat so I can hear with the lid closed. And I have all my intercom wiring plumbed to the seat backs so I can easily plug in our headphones. Radio faces me, intercom faces co-pilot. He can deal with that stuff if we're using headsets. But I'd still rather have the radio face me since I'll always be in the driver seat when wanting to change channels, etc.

It's a super slick system, but it leaves you minimal room to store items. I utilize my door panels for a fair amount of stuff, as well as the cubby in front of the shifter. And you'll see in some subsequent photos, I use the hell out of my backseat. Stay tuned! (P.S. The Deagle doesn't fit, but the FNX .45 does!)

View attachment 145312 View attachment 145313 View attachment 145314

Thanks for sharing the details, brother!
 
Top