dragonass23
Full Access Member
So, I recently bought a used 2018 Raptor. During the test drive I heard a rattling noise from the sunroof area. Saleman "got it fix" since it was piece of trim that needed popped back in.
Well, I get home and it is rattling again. Upon inspection, it is the drip channel. This drip channel is connected to the rail of the sunroof and apparently collect water that would drip from the sunroof if it is in the cracked open at an angle position vs. being wide open like a moon roof.
Anyways, a replacement part is $330 plus shipping. I decided to take mine out and try to repair it. Low and behold, it was repaired before. On the passenger side. It appears the part that was in my truck in 2mm longer on the passenger side than the driver's side, which may be causing the piece to break in the first place.
I wanted to share with the forum my fix.
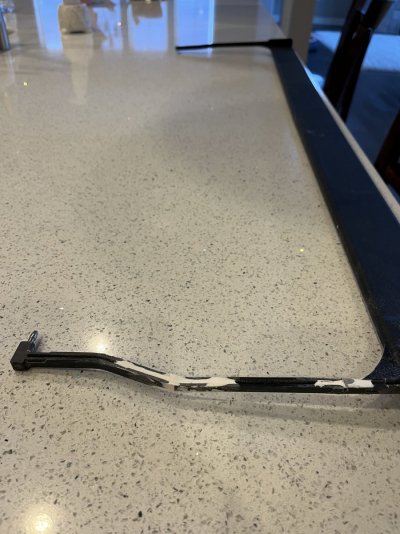
I didn't take any pictures before the fix, but you can probably see how the broken part would have looked!

First. To get the Drip Channel out, I took out the 6 torx screws (3 on each side) that hold the sunroof to the guides. With the sunroof out of the way, I was able to see the metal end (seen in the picture above). This is pressed into the guide. Using constant pressure from the inside of the truck towards the outside on the metal prong, it will pop out of the guide. I did this on both driver and passenger side and the drip channel came out. Mine was in three pieces.
I cleaned the prior fix out of the small channel that is in the part...
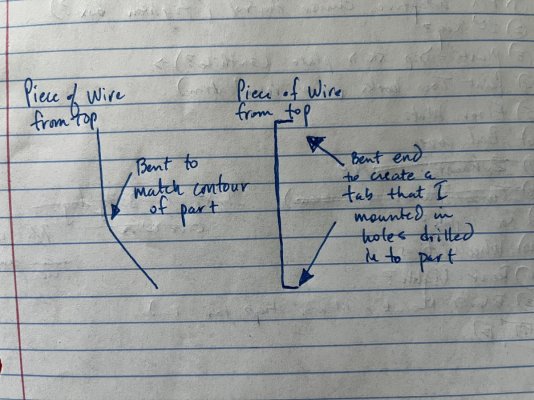
I then found a hook that is used to hang shop lights. It was very stiff. I straighted it. Once straighted, I used the good side of the drip channel to place a slight bend to match the countour of the drip channel. (see photo below). Also placed a 90 degree angle at each end (length should be long enough to go through the drip channel - explained later).

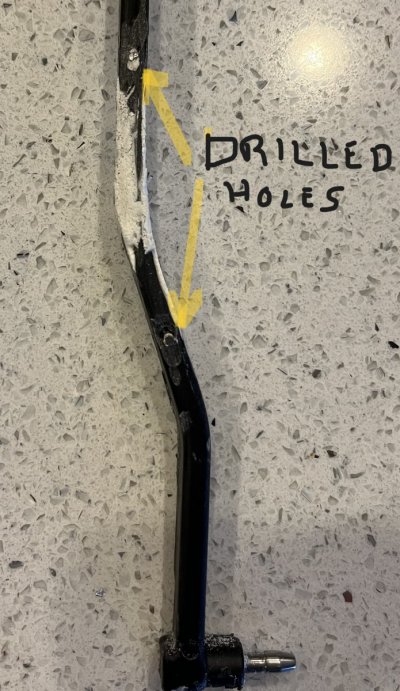
I then drilled a hold in the drip channel at the end of where the wire would land. I then filled the channel of the drip channel with JB weld (I only had Marine JB weld at home) and placed the wire in the channel and the bent ends through the holes I drilled. (See photo of the bottom showing where the wire is coming through).

Once the JB weld set up and cured, I cleaned up the ugliness a bit and ground off the wire that was protruding through the holes in the drip channel.
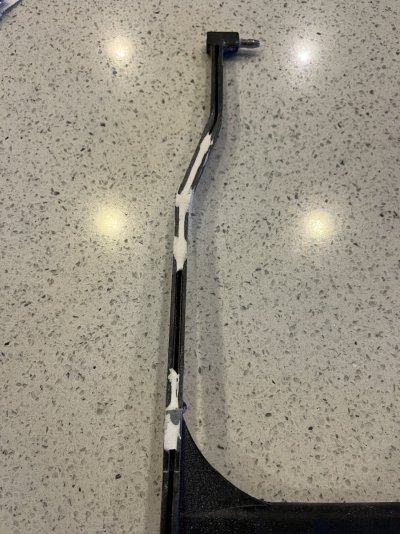
Here is a top view of the finished part.

Well, I get home and it is rattling again. Upon inspection, it is the drip channel. This drip channel is connected to the rail of the sunroof and apparently collect water that would drip from the sunroof if it is in the cracked open at an angle position vs. being wide open like a moon roof.
Anyways, a replacement part is $330 plus shipping. I decided to take mine out and try to repair it. Low and behold, it was repaired before. On the passenger side. It appears the part that was in my truck in 2mm longer on the passenger side than the driver's side, which may be causing the piece to break in the first place.
I wanted to share with the forum my fix.
I didn't take any pictures before the fix, but you can probably see how the broken part would have looked!

First. To get the Drip Channel out, I took out the 6 torx screws (3 on each side) that hold the sunroof to the guides. With the sunroof out of the way, I was able to see the metal end (seen in the picture above). This is pressed into the guide. Using constant pressure from the inside of the truck towards the outside on the metal prong, it will pop out of the guide. I did this on both driver and passenger side and the drip channel came out. Mine was in three pieces.
I cleaned the prior fix out of the small channel that is in the part...
I then found a hook that is used to hang shop lights. It was very stiff. I straighted it. Once straighted, I used the good side of the drip channel to place a slight bend to match the countour of the drip channel. (see photo below). Also placed a 90 degree angle at each end (length should be long enough to go through the drip channel - explained later).

I then drilled a hold in the drip channel at the end of where the wire would land. I then filled the channel of the drip channel with JB weld (I only had Marine JB weld at home) and placed the wire in the channel and the bent ends through the holes I drilled. (See photo of the bottom showing where the wire is coming through).

Once the JB weld set up and cured, I cleaned up the ugliness a bit and ground off the wire that was protruding through the holes in the drip channel.
Here is a top view of the finished part.


