Cutting into rear bumper! Is it tough?

Disclaimer: Links on this page pointing to Amazon, eBay and other sites may include affiliate code. If you click them and make a purchase, we may earn a small commission.

OP
OP
andreb

andreb

Full Access Member
Joined
Dec 23, 2014
Posts
187
Reaction score
158
Location
City by the Bay
an air/body saw is the best thing to use. i use blades with 24 teeth per inch.

I have on of those as well but always forget about it because its buried in the lower drawer of my main tool box. Think I have some fine TPI blades also. Makes sense, I got the lights last night and looking at the template they provide the sides are curved.
 

The Car Stereo Company

aka grumpy car stereo guy and frf rolodex
Supporting Member
Joined
Jul 8, 2012
Posts
32,646
Reaction score
23,710
Location
here, on frf
I have on of those as well but always forget about it because its buried in the lower drawer of my main tool box. Think I have some fine TPI blades also. Makes sense, I got the lights last night and looking at the template they provide the sides are curved.
i found that the 36 tooth blades dont work as well. harbor freight has some cheap blades you can buy and in the 24 tooth. the snap on and matco blades are $5 each. a pack of 5 from harbor freight is $7. unless you plan on using it more often, i would go with the cheap blades. not much of a difference when only cutting a small amount of metal
 
OP
OP
andreb

andreb

Full Access Member
Joined
Dec 23, 2014
Posts
187
Reaction score
158
Location
City by the Bay
here, took a pic

Yeah you actually own a good one! I bought mine at Harbor Freight and its a POS. No power and locks up regardless of air psi. I rarely use this on metal, mostly carbon fiber and FRP. Even then it barely does the job so I think its time to upgrade.

I got one hole cut out last weekend. Hope to finish this weekend. I used a stepped bit to drill the corners then a jigsaw with 24 tpi blades. Worked ok, the jigsaw chatters a bit so I used a couple layers of blue tape. The step bit creates a bit of heat so I had to be careful to not blister the paint beyond the edge of the light housing.

The template they provide worked great. I had to trim up the top and bottom just a bit with a carbide bur in the die grinder to clear the housing. I cleaned up the cut edges with a bandfile sander and sanding drum.
 

The Car Stereo Company

aka grumpy car stereo guy and frf rolodex
Supporting Member
Joined
Jul 8, 2012
Posts
32,646
Reaction score
23,710
Location
here, on frf
Yeah you actually own a good one! I bought mine at Harbor Freight and its a POS. No power and locks up regardless of air psi. I rarely use this on metal, mostly carbon fiber and FRP. Even then it barely does the job so I think its time to upgrade.

I got one hole cut out last weekend. Hope to finish this weekend. I used a stepped bit to drill the corners then a jigsaw with 24 tpi blades. Worked ok, the jigsaw chatters a bit so I used a couple layers of blue tape. The step bit creates a bit of heat so I had to be careful to not blister the paint beyond the edge of the light housing.

The template they provide worked great. I had to trim up the top and bottom just a bit with a carbide bur in the die grinder to clear the housing. I cleaned up the cut edges with a bandfile sander and sanding drum.
you put oil in it?
 

The Car Stereo Company

aka grumpy car stereo guy and frf rolodex
Supporting Member
Joined
Jul 8, 2012
Posts
32,646
Reaction score
23,710
Location
here, on frf
Yes, every time I use it. It cost me $24 I think so no surprise. I usually never buy cheap tools. I'm learning that HF air tools like this saw, the small bandfile and angled die grinder I bought have no power.
they work ok for a one time use, but being in the car audio industry where i have to cut metal on a daily basis, i have to have decent tools. the matco air saw was around $300 when i bought it a few years back. not sure of the price now days
 
OP
OP
andreb

andreb

Full Access Member
Joined
Dec 23, 2014
Posts
187
Reaction score
158
Location
City by the Bay
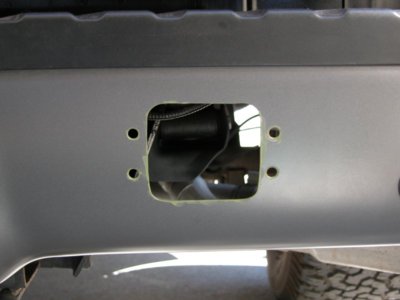
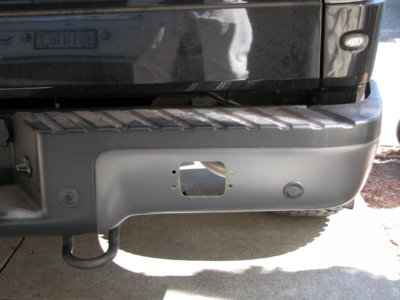
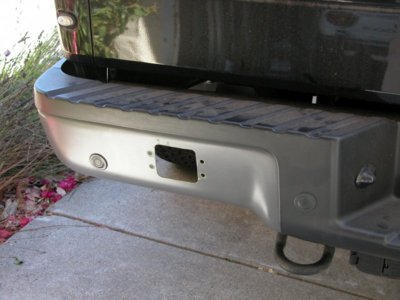
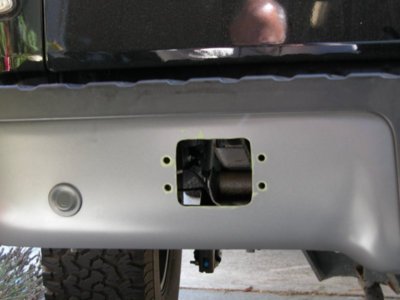
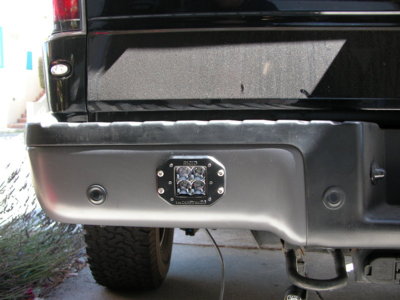
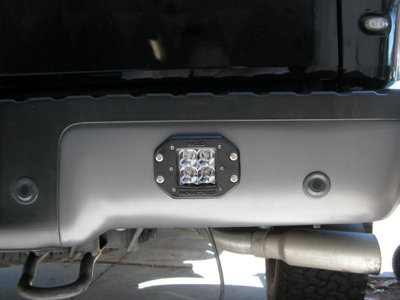
I finished this up a few weeks ago but wanted to close the loop for anyone following. I spent some time taking the air saw apart, polishing up the piston, matching the air transfer ports, seals, etc. and its actually working a lot better.

I was able to get the job done pretty quickly after that. The blades worked much better than the jigsaw that I started with. I could correct the cut line easier and if I bound it up the saw just stops where the jigsaw was jumping all over and could have scratched the paint.

I started with a .125" pilot hole, went to + .5" on all four corners with a Uni-bit then used the saw. A die grinder with a bur and band file were used to clean up and even the cut lines out. I found the template for the Rigid D2's to be spot on width wise but needed a little extra top and bottom. Overall I'm very happy with the fit and only a very small nick where the jigsaw blade jumped out of the hole.

I painted all the bare metal with a self-etching primer and then a zinc coat paint before installing the lights.

The rear bumper has a slight curve and the surface mount LED's come with a rubber gasket so it does allow for a bit of vertical adjustment but also a small gap for dirt to settle into. I may add a bead of silicone and foam tape to get rid of the gap. Its just cosmetic.
 

Attachments

  • DSCN7192.jpg
    DSCN7192.jpg
    49.7 KB · Views: 113
  • DSCN7193.jpg
    DSCN7193.jpg
    73.8 KB · Views: 98
  • DSCN7194.jpg
    DSCN7194.jpg
    85.4 KB · Views: 103
  • DSCN7195.jpg
    DSCN7195.jpg
    54.7 KB · Views: 95
OP
OP
andreb

andreb

Full Access Member
Joined
Dec 23, 2014
Posts
187
Reaction score
158
Location
City by the Bay
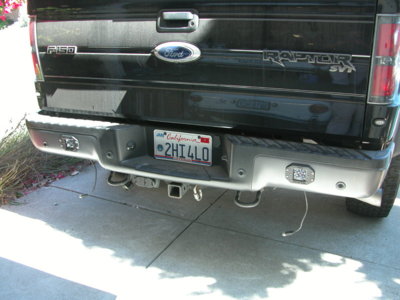
Just finished wiring up the power to these so I can finally start using them. Figured I would post some pictures of the finished install.
 

Attachments

  • DSCN7196.jpg
    DSCN7196.jpg
    94.4 KB · Views: 70
  • DSCN7197.jpg
    DSCN7197.jpg
    63 KB · Views: 67
  • DSCN7198.jpg
    DSCN7198.jpg
    96.9 KB · Views: 64
Top