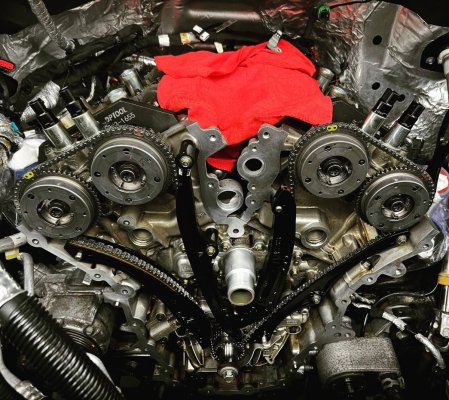
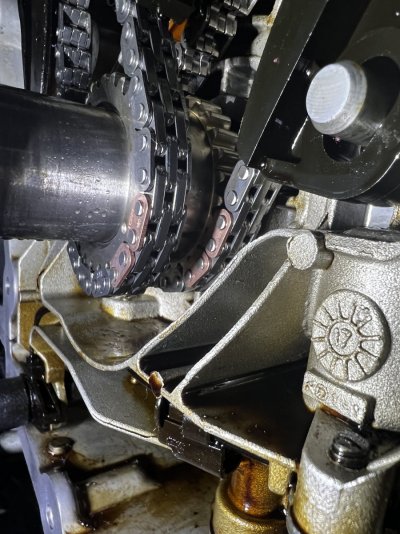
Everyone seems to be talking about cam phasers these days. You’ve either already had them done, or you may be on a wait list to get into your local dealer. Since there is so much hype on the subject, I thought it might be a good idea to show more of what happens during this service. Maybe you want to attempt it yourself. Maybe you value seeing the parts. Either way, strap in for my walk through 
Let’s start with, what are cam phasers anyway? Well, the manuals refer to this system as Variable Cam Timing (VCT), which allows the ECU to adjust the camshaft positions relative the crankshaft position while the engine is running. The VCT system works on hydraulic pressure from the engine oil. Each camshaft has a VCT actuator on the top of the head that regulates oil flow through the system. This oil flows through some porting in the camshaft and pushes on the “phaser” which are physically located on the end of each camshaft. Inside the phaser, the oil pressure advances the timing of the camshaft up to a mechanical stop. Think of it like a hydraulic piston working against a spring - because it is. I believe the ECU can adjust the camshaft to any angle within its range. All four camshafts are independently controlled and have their own position sensor. This is a fancy little motor.
Why do we have this? Well, this provides the best characteristics of camshaft profiles for drivability and power. Think about a cammed big block that can hardly keep an idle. Performance and idle don’t always go hand in hand. Except, when you can vary the cam timing at will. Now, you can adjust to have the ideal cam profile for starting/ idle and also have the ideal profile for WOT performance. Now that my little history lesson is over, let’s get into what it takes to change out these things.
When the cam phasers "go bad” they seem to lose or reduce their ability to phase. Maybe the spring on the end loses tension in the old design. Since these actuators work on hydraulic pressure, the system is “weakest” at engine startup when oil pressure is at its lowest. The startup rattle we hear is this hydraulic actuator rattling around until oil pressure is able to control the position. It only lasts a few seconds. That rattle can also stretch your chain. I have decided to install a completely new timing set on my truck including all four VCTs, solenoids, chains, and even a new crank gear.
A major portion of this service is done with the engine open to your surroundings. Cleanliness is a big concern when doing this service with the engine in the vehicle. Most shops will wrench on whatever you drop off as it sits. Dirt, dust, and all. I prefer to wash down my vehicle before I start, especially under the hood. You may not think a little sand is a big issue on stuff under the hood. But those little particles are often quite hard little bits that we should keep out of mechanics. After disconnecting the battery, I pop the hood, spray a little simple green, and hit it with the pressure washer on hot.
As with other motor work on this truck, you start by removing a lot of things to get at what you want to work on. Surprisingly, I never even needed to jack the truck up doing this work. The tires stayed on, but I removed the wheel well liners to get easier access to the boost tubes. Speaking of those, you will need to remove them in addition to the intake, the charge tube, the intake manifold, the fuel lines, high pressure pump, vacuum lines, AC belt, serpentine belt, Alternator, crankshaft pulley, water pump, ignition coils, drain the oil and coolant, disconnect the coolant lines, and pull the wire harness back and out of the way. I chose to cover the turbos with plastic bags to prevent any debris from falling in.
I wound up puling everything off the engine and out of the way before popping off any of the covers. If you follow the manuals to the tee, you would pop off the valve covers before pulling things off the front of the motor. Seemed like a better idea to mix both procedures together and get all the stuff out of the way prior to opening anything up. This reduces the risk of contamination entering the engine. I don’t know many people that love the stretchy belt. The serpentine was super easy to pull off. The crank pulley requires a puller to remove and an installer to put back on. No key, just a press fit. That crank bolt is torque to yield. Don’t re-use it.
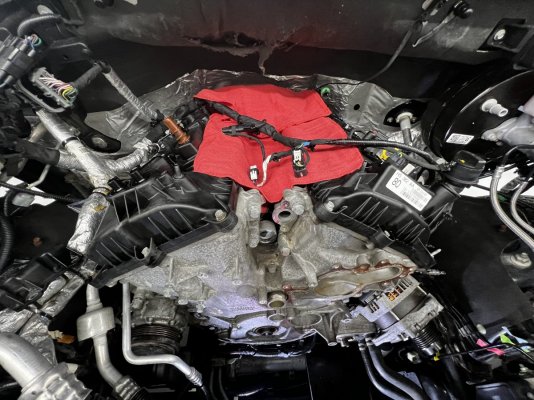
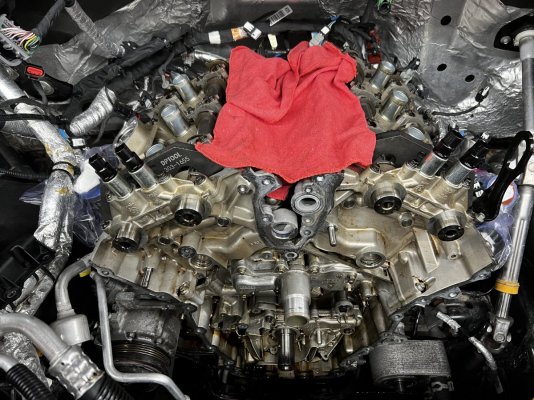
With a rag laid over the intake runners, I begin to pull the engine cases off. I start with the valve covers and loosen all fasteners. Believe these were M8. Happily, these are captured bolts and you don’t need to remember where each unique one goes. There are little dabs of silicone near the front of the motor holding these on. These dabs are where the front cover meets the engine block and will require a little prying to pop them off. There are little pry points designed into the valve covers. Mine were a little tight, but I was able to coerce them off without breaking anything. It is a good idea to work your way around the valve cover to evenly pry it up. Make sure you don’t tweak the VCT actuators up front. There are a bunch of rubber seals that tend to hold on. Some penetrating oil and patience seems to work best. Inspect all seals after you pull off the valve covers. These include seals for the ignition tubes and VCT actuators. Replace anything that doesn’t look smooth. These seals press out of and into the plastic covers. Throw away the big molded seal around the periphery of the cover and replace with a new one.
The manual wants you to replace all seals on the intake manifold and under the valve covers. This is the only part I was not able to source. News flash, the intake manifold gaskets (6) underneath the valve covers seem to be on perpetual backorder. If you are lucky enough to find labor for this service near you, this part is out nationwide at the moment with no idea of when it may be restocked. My local dealer says there is a note in the system to reuse the old gasket. Fingers crossed.
After the valve covers are off, it’s time to pull the front cover. A number of M15 bolts hold it on. A few of them are good at hiding. Once removed, you will need a pry bar to break loose the RTV seal to the block. The engine oil should have been drained previously but expect a little more to come out here. Once you pull the front cover out of the engine bay, you get a real good look at this motor!!
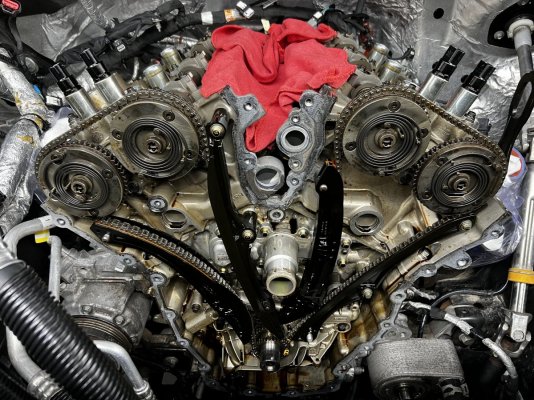
The first thing you want to do now is to align the motor with its timing marks. Put the old crank bolt back into the crankshaft and rotate the crank clockwise to advance the engine. I used a long handle 3/8” ratchet to advance while looking for my timing marks. What you will see are bright links on the timing chain that will align with marks on the phasers themselves.
Once the engine is timed, you install “camshaft holders” (special tool) that hold your camshafts in alignment while you remove the chains. I will admit that I had to fuss a little bit to get these to slide on. I can see some stretch in my old chain and these phasers weren’t silent. Now that it is timed, it is time to remove the phasers and timing chains. Before you start pulling everything off, you need to crack those camshaft bolts loose. Whew. Mine were TIGHT. These are torque to yield bolts and wow. Make sure you have a good T55. Impact rating is required. Out with the old parts, and get ready to clean her up.
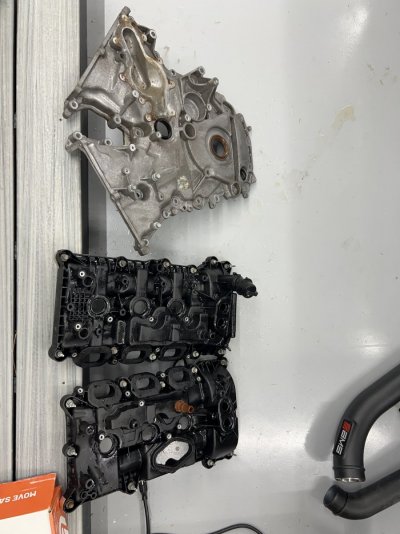
Here is where I chose to clean up all of the covers, inspect all the seals, and get them prepared to go back on.
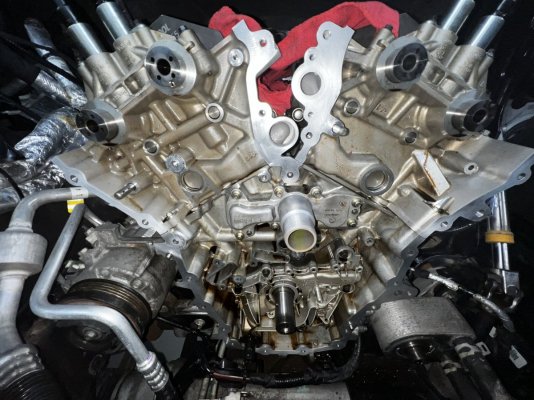
With all the stuff removed, it is time to clean up the block and prep the surfaces. I started by wiping everything out and getting rid of any excess oil. I then scraped the engine surfaces with a scraper and large razor blade to remove residual RTV. Apparently carbide scrapers are the new thing. I still like a stiff razor blade to remove old gasket material. Prodigious amounts of brake cleaner and a scotch pad came in handy to clean these up. Once clean and bright, wipe her down with solvent to remove any residual oils.
Let’s start with, what are cam phasers anyway? Well, the manuals refer to this system as Variable Cam Timing (VCT), which allows the ECU to adjust the camshaft positions relative the crankshaft position while the engine is running. The VCT system works on hydraulic pressure from the engine oil. Each camshaft has a VCT actuator on the top of the head that regulates oil flow through the system. This oil flows through some porting in the camshaft and pushes on the “phaser” which are physically located on the end of each camshaft. Inside the phaser, the oil pressure advances the timing of the camshaft up to a mechanical stop. Think of it like a hydraulic piston working against a spring - because it is. I believe the ECU can adjust the camshaft to any angle within its range. All four camshafts are independently controlled and have their own position sensor. This is a fancy little motor.
Why do we have this? Well, this provides the best characteristics of camshaft profiles for drivability and power. Think about a cammed big block that can hardly keep an idle. Performance and idle don’t always go hand in hand. Except, when you can vary the cam timing at will. Now, you can adjust to have the ideal cam profile for starting/ idle and also have the ideal profile for WOT performance. Now that my little history lesson is over, let’s get into what it takes to change out these things.
When the cam phasers "go bad” they seem to lose or reduce their ability to phase. Maybe the spring on the end loses tension in the old design. Since these actuators work on hydraulic pressure, the system is “weakest” at engine startup when oil pressure is at its lowest. The startup rattle we hear is this hydraulic actuator rattling around until oil pressure is able to control the position. It only lasts a few seconds. That rattle can also stretch your chain. I have decided to install a completely new timing set on my truck including all four VCTs, solenoids, chains, and even a new crank gear.
A major portion of this service is done with the engine open to your surroundings. Cleanliness is a big concern when doing this service with the engine in the vehicle. Most shops will wrench on whatever you drop off as it sits. Dirt, dust, and all. I prefer to wash down my vehicle before I start, especially under the hood. You may not think a little sand is a big issue on stuff under the hood. But those little particles are often quite hard little bits that we should keep out of mechanics. After disconnecting the battery, I pop the hood, spray a little simple green, and hit it with the pressure washer on hot.
As with other motor work on this truck, you start by removing a lot of things to get at what you want to work on. Surprisingly, I never even needed to jack the truck up doing this work. The tires stayed on, but I removed the wheel well liners to get easier access to the boost tubes. Speaking of those, you will need to remove them in addition to the intake, the charge tube, the intake manifold, the fuel lines, high pressure pump, vacuum lines, AC belt, serpentine belt, Alternator, crankshaft pulley, water pump, ignition coils, drain the oil and coolant, disconnect the coolant lines, and pull the wire harness back and out of the way. I chose to cover the turbos with plastic bags to prevent any debris from falling in.
I wound up puling everything off the engine and out of the way before popping off any of the covers. If you follow the manuals to the tee, you would pop off the valve covers before pulling things off the front of the motor. Seemed like a better idea to mix both procedures together and get all the stuff out of the way prior to opening anything up. This reduces the risk of contamination entering the engine. I don’t know many people that love the stretchy belt. The serpentine was super easy to pull off. The crank pulley requires a puller to remove and an installer to put back on. No key, just a press fit. That crank bolt is torque to yield. Don’t re-use it.

With a rag laid over the intake runners, I begin to pull the engine cases off. I start with the valve covers and loosen all fasteners. Believe these were M8. Happily, these are captured bolts and you don’t need to remember where each unique one goes. There are little dabs of silicone near the front of the motor holding these on. These dabs are where the front cover meets the engine block and will require a little prying to pop them off. There are little pry points designed into the valve covers. Mine were a little tight, but I was able to coerce them off without breaking anything. It is a good idea to work your way around the valve cover to evenly pry it up. Make sure you don’t tweak the VCT actuators up front. There are a bunch of rubber seals that tend to hold on. Some penetrating oil and patience seems to work best. Inspect all seals after you pull off the valve covers. These include seals for the ignition tubes and VCT actuators. Replace anything that doesn’t look smooth. These seals press out of and into the plastic covers. Throw away the big molded seal around the periphery of the cover and replace with a new one.
The manual wants you to replace all seals on the intake manifold and under the valve covers. This is the only part I was not able to source. News flash, the intake manifold gaskets (6) underneath the valve covers seem to be on perpetual backorder. If you are lucky enough to find labor for this service near you, this part is out nationwide at the moment with no idea of when it may be restocked. My local dealer says there is a note in the system to reuse the old gasket. Fingers crossed.
After the valve covers are off, it’s time to pull the front cover. A number of M15 bolts hold it on. A few of them are good at hiding. Once removed, you will need a pry bar to break loose the RTV seal to the block. The engine oil should have been drained previously but expect a little more to come out here. Once you pull the front cover out of the engine bay, you get a real good look at this motor!!

The first thing you want to do now is to align the motor with its timing marks. Put the old crank bolt back into the crankshaft and rotate the crank clockwise to advance the engine. I used a long handle 3/8” ratchet to advance while looking for my timing marks. What you will see are bright links on the timing chain that will align with marks on the phasers themselves.
Once the engine is timed, you install “camshaft holders” (special tool) that hold your camshafts in alignment while you remove the chains. I will admit that I had to fuss a little bit to get these to slide on. I can see some stretch in my old chain and these phasers weren’t silent. Now that it is timed, it is time to remove the phasers and timing chains. Before you start pulling everything off, you need to crack those camshaft bolts loose. Whew. Mine were TIGHT. These are torque to yield bolts and wow. Make sure you have a good T55. Impact rating is required. Out with the old parts, and get ready to clean her up.

Here is where I chose to clean up all of the covers, inspect all the seals, and get them prepared to go back on.

With all the stuff removed, it is time to clean up the block and prep the surfaces. I started by wiping everything out and getting rid of any excess oil. I then scraped the engine surfaces with a scraper and large razor blade to remove residual RTV. Apparently carbide scrapers are the new thing. I still like a stiff razor blade to remove old gasket material. Prodigious amounts of brake cleaner and a scotch pad came in handy to clean these up. Once clean and bright, wipe her down with solvent to remove any residual oils.


