Baja Designs Linkable Bumper Light Kit & Triple Fog & Upfitter Relay Box & Camera Relocate Install

Disclaimer: Links on this page pointing to Amazon, eBay and other sites may include affiliate code. If you click them and make a purchase, we may earn a small commission.

OP
OP
figure1a

figure1a

Full Access Member
Joined
Apr 4, 2022
Posts
176
Reaction score
250
Location
San Diego
Yes, that all sounds correct.

I used this waterproof relay box: https://amzn.to/3tUamsQ
I used this waterproof breaker: https://amzn.to/3u07Hy3

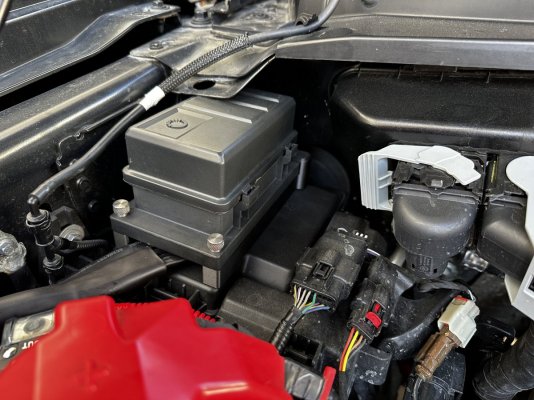
I had to make my own custom mount for the relay box. I made it fit between the Ford fuse box and the sheet metal with no extra space so that the weight of the relay box cannot pull off the fuse box lid when you go offroading (It's pretty weak—I wouldn't be surprised if a bunch of people are driving around with fuse boxes that are not completely sealed as mine can could come loose without even pulling on the securing clips. Now with my relay box on there it is not possible for the fuse box lid to come off).
 
Last edited:

navy2x

Member
Joined
Oct 21, 2023
Posts
19
Reaction score
44
Location
Virginia
Thanks again for the info.

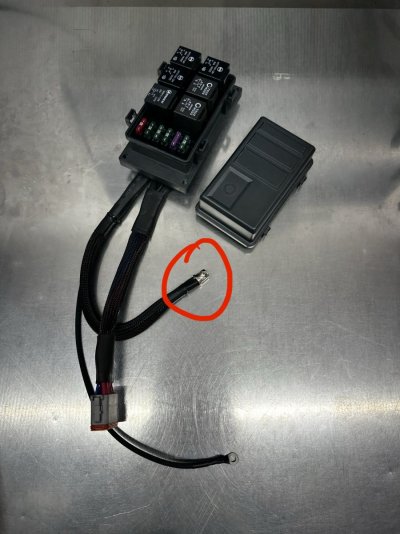
What is the connector/terminal in this pic? Looks like a ferrule but I’m not quite sure. It seems to fit perfectly in the 200A breaker in your other pics.

IMG_1024.jpeg

Also how do you like your Baja Designs linkable lights so far? One review I saw said the top part of the black housing is fading with white streak after one year. Curious about your experience.
 
OP
OP
figure1a

figure1a

Full Access Member
Joined
Apr 4, 2022
Posts
176
Reaction score
250
Location
San Diego
The connector comes with the breaker. It fits into the connection. I solder the hell out of mine so it becomes like a solid chunk of metal. Then you put the connector into the breaker and secure it with the set screw.

No fading issues. But I did replace two of the pods with XL80s to make it brighter. I made a brightness video somewhere so I just need to find it and post it. But I just bought the ADD Phantom bumper which has cutouts already in it for some Rigid light bars so all the lights in this post will be for sale really soon.
 

navy2x

Member
Joined
Oct 21, 2023
Posts
19
Reaction score
44
Location
Virginia
Did you 3D print the custom mount for the relay box? Looks awesome. Any chance you could share it if you did?
 
OP
OP
figure1a

figure1a

Full Access Member
Joined
Apr 4, 2022
Posts
176
Reaction score
250
Location
San Diego
Did you 3D print the custom mount for the relay box? Looks awesome. Any chance you could share it if you did?
Yes, 3D printed. The file is here: https://www.dananeibert.com/client/forum/Raptor-Relay-Box-Mount.stl
You will want to make sure it is printed with something that can handle high temps as it gets hot in the engine bay. A lot of 3D printer material can get soft when subjected to heat.

I used 3M VHB tape to secure it to my fuse box lid. It's the same tape that car companies use to attach badges onto cars to so it's really strong. Obviously, make sure that fuse box lid is super clean and at a decent ambient temp when you put the mount on so it will stay on permanently. Also, you can see that I have thumb screws securing the relay box to the mount (so you can remove it in the field without tools). I used these thumb screws and just self tapped them in with some pliers.

So, obviously, that mount is the perfect fit for my Raptor BUT I could see the metal flange above it being different distances on each truck as that flange is probably not a precision bend and probably has an acceptable tolerance at the factory of up to a tenth of an inch. You might have to bend yours in either direction for a good fit.

IMG_1990.JPG
 

Waterfowler41

Full Access Member
Joined
Apr 2, 2024
Posts
142
Reaction score
326
Location
Illinois
Yes, 3D printed. The file is here: https://www.dananeibert.com/client/forum/Raptor-Relay-Box-Mount.stl
You will want to make sure it is printed with something that can handle high temps as it gets hot in the engine bay. A lot of 3D printer material can get soft when subjected to heat.

I used 3M VHB tape to secure it to my fuse box lid. It's the same tape that car companies use to attach badges onto cars to so it's really strong. Obviously, make sure that fuse box lid is super clean and at a decent ambient temp when you put the mount on so it will stay on permanently. Also, you can see that I have thumb screws securing the relay box to the mount (so you can remove it in the field without tools). I used these thumb screws and just self tapped them in with some pliers.

So, obviously, that mount is the perfect fit for my Raptor BUT I could see the metal flange above it being different distances on each truck as that flange is probably not a precision bend and probably has an acceptable tolerance at the factory of up to a tenth of an inch. You might have to bend yours in either direction for a good fit.
So...definitely using your set up as inspiration for my Raptor. Starting to pull all the parts together. As far as the the relay box bracket you had 3D printed, any issues so far with the engine bay heat? I've reached out to a few folks one said he can do it in a high temp carbon fiber filament and the other is calling BS on anything 3D printed being able to handle engine bay heat. Curious how yours is working and if you have more info on it. I like how it allows the wires to pass through under it.
 
OP
OP
figure1a

figure1a

Full Access Member
Joined
Apr 4, 2022
Posts
176
Reaction score
250
Location
San Diego
So...definitely using your set up as inspiration for my Raptor. Starting to pull all the parts together. As far as the the relay box bracket you had 3D printed, any issues so far with the engine bay heat? I've reached out to a few folks one said he can do it in a high temp carbon fiber filament and the other is calling BS on anything 3D printed being able to handle engine bay heat. Curious how yours is working and if you have more info on it. I like how it allows the wires to pass through under it.
No heat issues. Been out in Borrego with it. My printer prints at 500˚F with carbon fiber—same printer that NASA, US Army, Ford, etc. use. Pretty sure since all the other plastic in my engine compartment isn't melting, my parts will be just fine. If you think about it, you can pop your hood after 8 hours driving in the desert in 100˚ weather and not get burned by anything you touch that is not directly bolted to the engine block—so all the non engine parts are not getting that hot in there.

If you 3D print parts with a crappy $100 printer using $10 nylon, yeah, they will probably melt in there.
 

Waterfowler41

Full Access Member
Joined
Apr 2, 2024
Posts
142
Reaction score
326
Location
Illinois
1. Did you combine your trigger wires from the factory aux bundle as well as the positive output for your aux lights into that single 12 pin DT connector?

2. Are you grounding your lights closer to where they are mounted?
 
Top