Anyone painted or refinished their hood vents or front grille?

Disclaimer: Links on this page pointing to Amazon, eBay and other sites may include affiliate code. If you click them and make a purchase, we may earn a small commission.

OP
OP
C

Cody Templeton

FRF Addict
Joined
Oct 29, 2020
Posts
1,486
Reaction score
1,151
Location
Des Moines, IA
Starting to do some looking around on this again. I just did a customer's steel bumpers with Rustoleum Pro Grade Bed Liner and I love the texture it came out with. It's between a plastic textured bumper finish and Line-X, so it's not too smooth, but not super bumpy. I was hoping to try and find something similar in a dark gray, that way I could do the grille, hood vents, and side vents as well as my bumpers and rock sliders.

The problem I have at this point is if I powder coat the bumpers and rock sliders the color and finish isn't gonna match anything else I do in the gray, and I'd prefer if it matched. I really do like the dark gray on the grille and thought it would be nice if the rest of the textured trim matched it. I planned to do my steel bumpers and rock sliders in the same color. I like the idea of keeping the Raptor Foundry gray look instead of going black like pretty much everyone does.
 
OP
OP
C

Cody Templeton

FRF Addict
Joined
Oct 29, 2020
Posts
1,486
Reaction score
1,151
Location
Des Moines, IA
After doing some looking around I couldn't find a company that offered a dark gray bedliner spray that would match the factory bumper/fender flares/grille. The grays I found were either like a dove gray or a battleship gray which are quite a bit lighter. I really wanted to stay with an OEM+ look. Everyone out there does black bedliner on their stuff, so I thought it would be really nice to try and keep the OEM gray color.

I wanted something I could find easily without having to go through a bunch of hoops in the case of scraping or scuffing the bumpers or rock sliders and needing to touch it up. Had I gone a custom gray textured powdercoat it would mean having to remove the parts from the vehicle and take them to get re-powdercoated without an easy way to just touch it up. I didn't want to have to do that as it's a huge chore, and costly for simple touch ups.

I decided that I would just bedliner the parts, then paint on top with the appropriate factory color. After doing some research I found the grille factory color was dark gray metallic, which made sense because that's the same color the 3M vinyl I got was for the rear emblem and it was a nearly perfect match. You can get it in Duplicolor Color Match spray cans from the parts stores as well, so it's easy to find. For the bedliner I went with Rustoleum Pro Grade black bed liner as I had just used it on a customer's steel bumpers for his Ranger and love how it sprayed and the texture it gave, and it's also easy to get locally from a lot of different stores too.

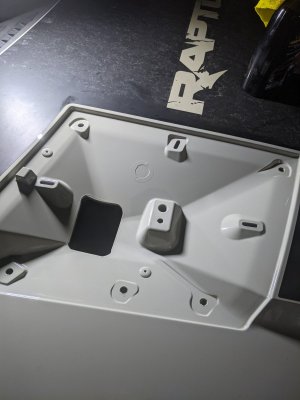
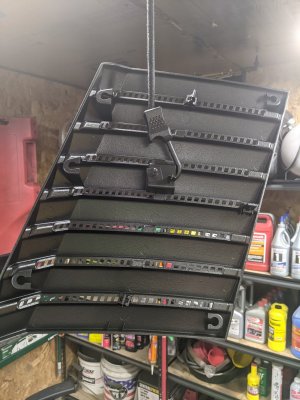
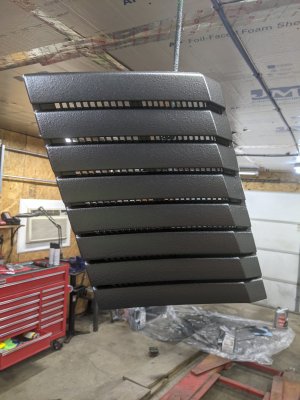
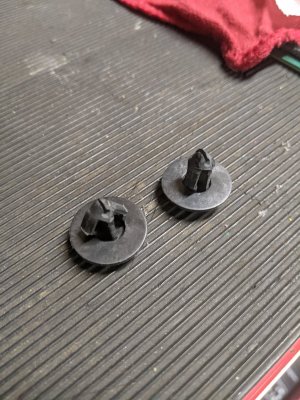
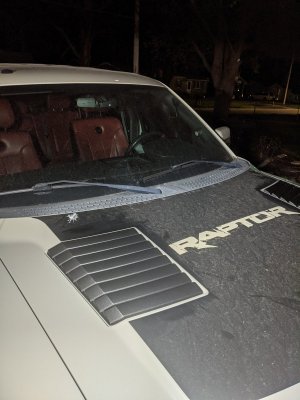
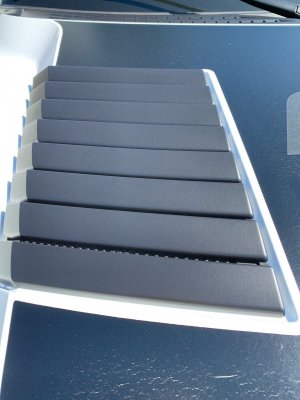
I decided I would start with the hood vents. The thing that bugged me about them is that they are the textured plastic and they had faded, so they no longer matched the matte black hood graphic. I pulled them off, scuffed them with a gray scuff pad, wiped them down with paint thinner and let them dry, and then hit them with 2 coats of bedliner followed by 3 light coats of the dark gray metallic paint. I decided to hit the front and back as well. When they were drying I took the chance to hit the area under them on the hood with some rubbing compound and wax to clean it back up. Also, I noticed the clips that held the vents to the hood had a foam washer on them that had turned into dust, so I went to the hardware store and bought some rubber washers to replace it.

Everything turned out awesome. I also pulled the grille and stripped it down to start painting it tomorrow. So far 1 can of bedliner and 3/4 can of paint has done the front and back of the hood vents, so it should be relatively inexpensive to paint all the stuff I want to do. I'd imagine I'll end up somewhere around 100 bucks in supplies to do everything. It'll also save me multiple trips to the powder coating shop as well!

PXL_20210425_021406428.NIGHT.jpg

PXL_20210425_021443928.jpg

PXL_20210425_021451350.jpg

PXL_20210425_021645598.jpg

PXL_20210425_022754326.NIGHT.jpg
 
OP
OP
C

Cody Templeton

FRF Addict
Joined
Oct 29, 2020
Posts
1,486
Reaction score
1,151
Location
Des Moines, IA
Got the grille all completely disassembled, scuffed, and cleaned. Shot it with the same Rustoleum Pro Grade Turbo bedliner and then Duplicolor Color Match Dark Gray Metallic (CX) to match the hood vents. I also did the camera holder and bracket as well.

I ordered new tan Ford vinyls to go on the letters since I had to pull the old ones off. I really like the look of it with the tan letters standing out against the dark gray grille.

The side and bottom grille brackets got scuffed and cleaned and then shot with VHT roll bar and chassis satin black. I debated doing them in the same bedliner and gray texture, but on certain things I feel it might be overkill or stand out too much, and I don't necessarily wanting the brackets to "blend" in with the grille. I feel like some things are better left to an OEM look, and the VHT roll bar and chassis satin black works perfect for that, plus it's really durable.

I was debating on replacing the 3 grille lights as mine were fairly faded. Last year I replaced all 4 of the marker lights with the Gen 2 ones because they were faded, plus I really liked the light/medium smoked look of the OEM Gen 2 markers. I've never been a fan of the completely black lens ones as I think they're kind of tacky, but being completely white/clear never jived with me either. I ended up taking them to the bench polisher and cleaning them back up to the point they looked pretty much new again. After that I took my airbrush, mixed a bit of black with some gloss clear, and sprayed a few coats. Turned out great, they now are nice and glossy again, but have a light/medium smoke look to them. I've tried Niteshades in the past and it sucks as it's about impossible to get an even coat without making the lenses look like they've been sprayed with black paint.
 

MEIRONMAN207

¿Goin somewhere...What are RU waiting 4?
Joined
Jun 26, 2019
Posts
705
Reaction score
1,523
Location
Maine
After doing some looking around I couldn't find a company that offered a dark gray bedliner spray that would match the factory bumper/fender flares/grille. The grays I found were either like a dove gray or a battleship gray which are quite a bit lighter. I really wanted to stay with an OEM+ look. Everyone out there does black bedliner on their stuff, so I thought it would be really nice to try and keep the OEM gray color.

I wanted something I could find easily without having to go through a bunch of hoops in the case of scraping or scuffing the bumpers or rock sliders and needing to touch it up. Had I gone a custom gray textured powdercoat it would mean having to remove the parts from the vehicle and take them to get re-powdercoated without an easy way to just touch it up. I didn't want to have to do that as it's a huge chore, and costly for simple touch ups.

I decided that I would just bedliner the parts, then paint on top with the appropriate factory color. After doing some research I found the grille factory color was dark gray metallic, which made sense because that's the same color the 3M vinyl I got was for the rear emblem and it was a nearly perfect match. You can get it in Duplicolor Color Match spray cans from the parts stores as well, so it's easy to find. For the bedliner I went with Rustoleum Pro Grade black bed liner as I had just used it on a customer's steel bumpers for his Ranger and love how it sprayed and the texture it gave, and it's also easy to get locally from a lot of different stores too.

I decided I would start with the hood vents. The thing that bugged me about them is that they are the textured plastic and they had faded, so they no longer matched the matte black hood graphic. I pulled them off, scuffed them with a gray scuff pad, wiped them down with paint thinner and let them dry, and then hit them with 2 coats of bedliner followed by 3 light coats of the dark gray metallic paint. I decided to hit the front and back as well. When they were drying I took the chance to hit the area under them on the hood with some rubbing compound and wax to clean it back up. Also, I noticed the clips that held the vents to the hood had a foam washer on them that had turned into dust, so I went to the hardware store and bought some rubber washers to replace it.

Everything turned out awesome. I also pulled the grille and stripped it down to start painting it tomorrow. So far 1 can of bedliner and 3/4 can of paint has done the front and back of the hood vents, so it should be relatively inexpensive to paint all the stuff I want to do. I'd imagine I'll end up somewhere around 100 bucks in supplies to do everything. It'll also save me multiple trips to the powder coating shop as well!

View attachment 167021

View attachment 167022

View attachment 167023

View attachment 167024

View attachment 167025
Any tips on removing the hood scoops? Only read some where once on the FRF that these are a PÍA to take off and very likely to break the clips that holds them? Not much else on this?
 

weimer

FRF Addict
Joined
Oct 20, 2012
Posts
1,506
Reaction score
8,188
Location
VA
Any tips on removing the hood scoops? Only read some where once on the FRF that these are a PÍA to take off and very likely to break the clips that holds them? Not much else on this?

They're not too bad to remove. Have to remove the hood liner to get the one nut off from under the hood. Then I started to pull up on one corner of the vent and used a pry tool to help release the clips. I taped off the hood around the vent so the pry tool would not scratch the paint.

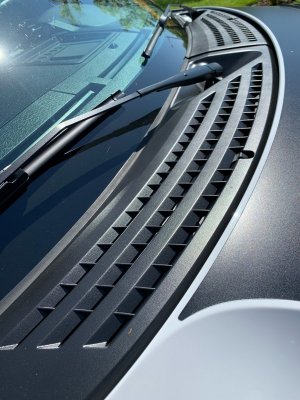
I used SEM trim paint and they came out great. Also did the cowl and wiper arms.
 

MEIRONMAN207

¿Goin somewhere...What are RU waiting 4?
Joined
Jun 26, 2019
Posts
705
Reaction score
1,523
Location
Maine
They're not too bad to remove. Have to remove the hood liner to get the one nut off from under the hood. Then I started to pull up on one corner of the vent and used a pry tool to help release the clips. I taped off the hood around the vent so the pry tool would not scratch the paint.

I used SEM trim paint and they came out great. Also did the cowl and wiper arms.
Thanks
 
OP
OP
C

Cody Templeton

FRF Addict
Joined
Oct 29, 2020
Posts
1,486
Reaction score
1,151
Location
Des Moines, IA
Any tips on removing the hood scoops? Only read some where once on the FRF that these are a PÍA to take off and very likely to break the clips that holds them? Not much else on this?

You don't have to pull the entire hood blanket, just bend it back enough to get to the 10mm nut. Take that off first. Then either use a towel or painter's tape to protect the paint and use a plastic trim tool to pry up at the corner of the vent like Weimer said. The clips are pretty resilient, but the issue is that the little foam pieces under them disintegrate, which is why I removed them and replaced with rubber washers from the hardware store. SEM trim paint is a great factory match as well. I'll be doing the cowl in the same textured gray, but the wiper arms will be done with the VHT roll bar and chassis.
 
OP
OP
C

Cody Templeton

FRF Addict
Joined
Oct 29, 2020
Posts
1,486
Reaction score
1,151
Location
Des Moines, IA
I'm gonna be doing my wiper arms and cowl trim as well. Not sure if I wanna just do SEM trim black or if I wanna do the bedliner and gray again.
 
Top