How to adjust bumper for Rigid D2 Fog lights

Disclaimer: Links on this page pointing to Amazon, eBay and other sites may include affiliate code. If you click them and make a purchase, we may earn a small commission.

justvettn

FRF Addict
Joined
Feb 9, 2012
Posts
4,316
Reaction score
890
Location
GTA
Has anyone had to adjust the bumper for the D2 Fog Lights?
I read the instructions from Rigid and lined up the bracket flush with the back of the steel support beam as instructed, drilled my holes mounted lights to bracket and now it does not fit. It looks like the bumper needs to be adjusted, pulled forward just a little to clear. The bumper has a lot of bolts behind it, just wondering which ones need to be loosened to adjust forward?
 

willis68

Full Access Member
Joined
Jul 12, 2011
Posts
661
Reaction score
157
Location
Nashville
It was a pain in my ass installing them, but I ended up mounting the lights to the bracket before I drilled my holes. That was the only way I could get them right I did not try to adjust the bumper, that may be your best way to go I think there are only 4 bolts securing the bumper however I am unsure how to adjust it
 
OP
OP
justvettn

justvettn

FRF Addict
Joined
Feb 9, 2012
Posts
4,316
Reaction score
890
Location
GTA
Thanks for the response, The instructions should read not all bumpers are aligned the same so install lights on bracket, put into position and mark your holes.

---------- Post added at 11:28 AM ---------- Previous post was at 09:43 AM ----------

I will enlarge the holes in the bracket and supporter to give a little wiggle room for adjustment, instead of messing with bumper alignment. Then I will use nuts and bolts rather then the self tapers that came with the kit.
 
OP
OP
justvettn

justvettn

FRF Addict
Joined
Feb 9, 2012
Posts
4,316
Reaction score
890
Location
GTA
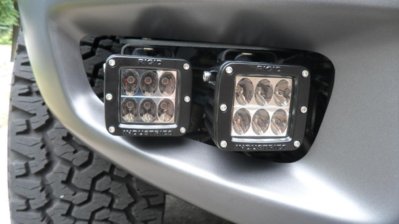
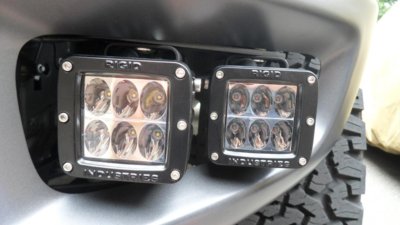
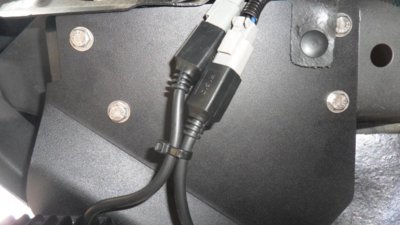
SAM_6873.jpgSAM_6872.jpgSAM_6871.jpg
This is how my lights and brackets look after enlarging the holes and using stainless hardware with nylon nuts and lock washers to prevent them from ever shaking loose or falling off.
 

iSurvive

FRF Addict
Joined
Feb 26, 2012
Posts
1,272
Reaction score
780
Location
Highlands Ranch, CO
I posted the instructions on the forum a while ago for a friend. I just found them for you. You must adjust the bumper or you'll never get the bracket to disappear.

6/25/2012

I have a few tips on the fog lights:

I think I told you to mount the lights first, then you can hold the bracket in place under the truck and test the location of the lights, make adjustments (left/right & spacing) and test again.

Follow the instructions closely to get the bracket in the right spot on the frame. Then put the bracket on and clamp it to the frame tightly. Mark the holes to drill, remove the bracket, drill the holes, mount the bracket with the clamp again, then screw in the self-tapping screws and remove the clamp.

Make final adjustments (up/down) to the lights and tighten with hex wrench.

If the front of the bracket is visible in the fog lamp opening, you will need to lower your bumper. It appears that the factory bumper install is sometimes low in the middle and high on the ends. There are two 1" nuts that hold each side of the bumper in place. Loosen the two bolts, adjust the bumper down, and re-tighten the two bolts. Repeat on the other side of the bumper.

I had to do this twice! It was perfect, then I took it on a desert track and ran it hard. The few really rough landings shifted the bumper back up and exposed the bracket. I re-lowered the bumper and REALLY tightened the 1" bolts. My recent trips to the track haven't been able to budge the bumper.

Also, you may want to replace the self-tapping screws with nuts and bolts. I replaced the two OUTER screws on each bracket - since you can reach your fingers in the open end of the frame tube to insert the nut.

Here's the end product:

3625-correct-fog-light-installation.jpg
 
Last edited:

FLA-SVT

Full Access Member
Joined
Mar 23, 2011
Posts
71
Reaction score
6
Location
Central FL
I got longer carraige bolts and just shimmed my D2's with a couple of nuts and stainless washers. so much easier.
 
OP
OP
justvettn

justvettn

FRF Addict
Joined
Feb 9, 2012
Posts
4,316
Reaction score
890
Location
GTA
I got longer carraige bolts and just shimmed my D2's with a couple of nuts and stainless washers. so much easier.

Did you not use the Rigid Raptor aluminum brackets? Can you post pictures, I am interested to see how you mounted yours.

Thanks Isurvive I will try to adjust the bumper to hide the brackets, is it two bolts per side or one each side.
I had to enlarge the holes in both the support and the brackets to give enough adjustment to move the bracket back to clear the bumper, because I had larger holes drilled I mounted them with nuts and bolts on all four corners.
 

iSurvive

FRF Addict
Joined
Feb 26, 2012
Posts
1,272
Reaction score
780
Location
Highlands Ranch, CO
Did you not use the Rigid Raptor aluminum brackets? Can you post pictures, I am interested to see how you mounted yours.

Thanks Isurvive I will try to adjust the bumper to hide the brackets, is it two bolts per side or one each side.
I had to enlarge the holes in both the support and the brackets to give enough adjustment to move the bracket back to clear the bumper, because I had larger holes drilled I mounted them with nuts and bolts on all four corners.

There are two bolts for each side of the bumper. I really had to look hard to figure out which two nuts to loosen, but I think they are the only 1" nuts. The bottom one was loosened with a 1" DEEP hex head on a short ratchet extension bar - the top nut was loosened with a 1" DEEP hex head on a long extension bar.

I loosened and moved one end, then the other. I had to be pretty forceful to move the bumper lower and keep it there.

It was pretty obvious that the ends of the bumper were higher than the middle of the bumper.
 
Last edited:
OP
OP
justvettn

justvettn

FRF Addict
Joined
Feb 9, 2012
Posts
4,316
Reaction score
890
Location
GTA
Thanks again iSurvive, I am going to mount my two 4" lights on each side of the license plate. Did you get a Raptor wiring harness with with your 20" mount? Rigid told me that all Raptor brackets come with a wiring harness for the up-fitter switches. But my first bracket for the dual 4" did not, so Rigid said they would send out a second one with the harness, and now my second one arrived yesterday with no harness.
 

iSurvive

FRF Addict
Joined
Feb 26, 2012
Posts
1,272
Reaction score
780
Location
Highlands Ranch, CO
All of my lights came with the wire harness. The only brackets I bought that had the wire harness was the 40", but it was just a simple two wire harness. The 40" light itself had the main wire harness (with switch and relay) in the box .

My Rigid Dually fog light's wire harness came with the (lights and brackets) bought as a combo kit.

My Rigid 20" had the wire harness in the light box. The bracket box only had the bracket.

Are you saying you got NO wiring harness with your 4" LEDs?

I moved my license plate so I could use the full 20" LED light bar (see below):

3652-raptor-all-lights.jpg
 
Top