GEN 2 800A+ Offroad Build

Disclaimer: Links on this page pointing to Amazon, eBay and other sites may include affiliate code. If you click them and make a purchase, we may earn a small commission.

Bark beetle

Full Access Member
Joined
Oct 29, 2016
Posts
135
Reaction score
151
Location
Northern NM
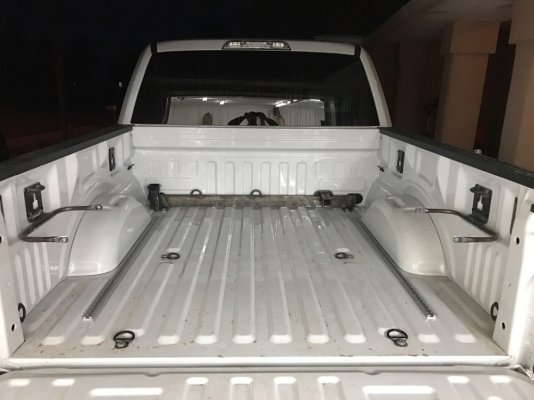
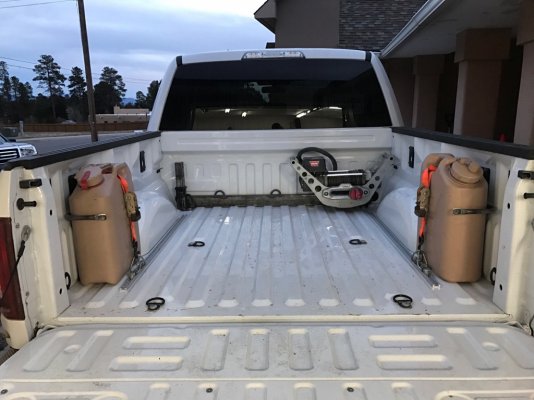
I managed to make it at least one week before the modifications started. Maybe it is a disease! First, the bed needs proper tie downs with a combo of HD rings and airline track to lock down the camping gear. Second, the bed needs mounts for the Scepter cans and the winch. The Scepter cans ended up fitting perfect behind each wheel well with a lightweight and simple mount made by modifying the box link plates and a couple ratchet straps (only one each shown).
931a1228d7cdf1116c48781897ca3e85.jpg
1dd4bbd0cc5aac199889490e4df9681b.jpg
29a3a495c28d7010b0a9c40dcf13ef72.jpg

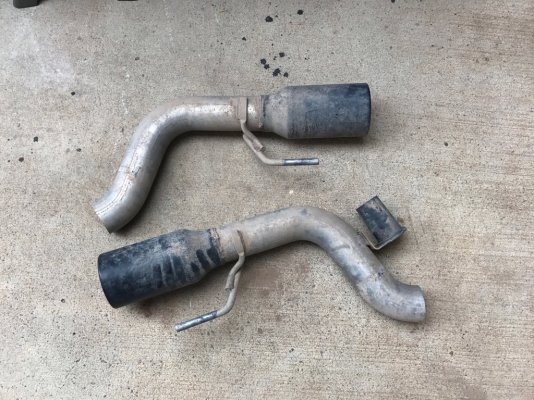
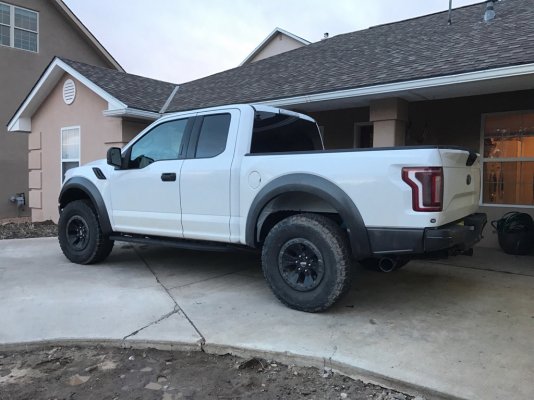
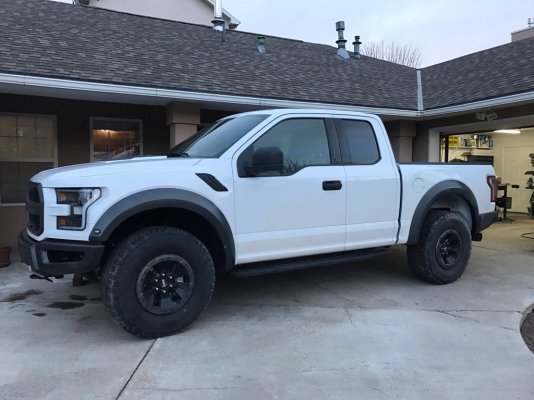
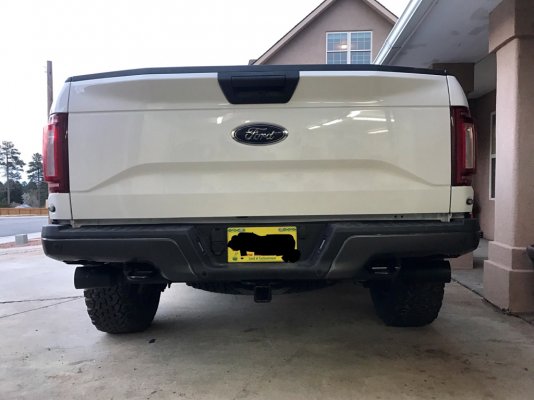
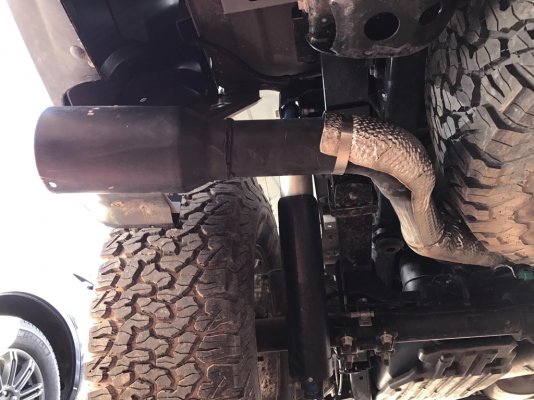
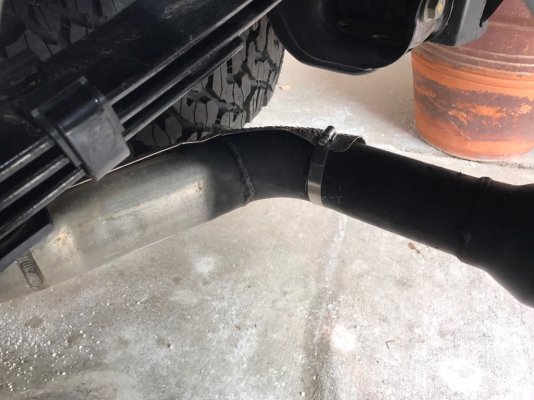
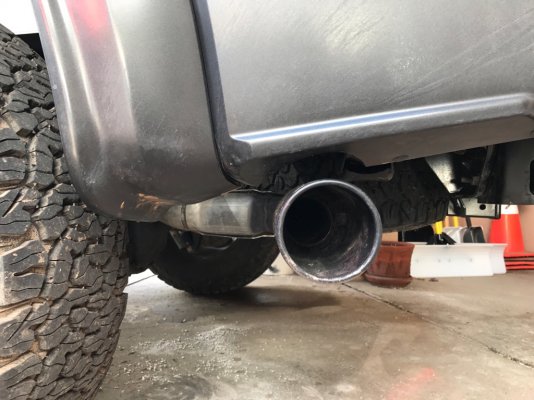
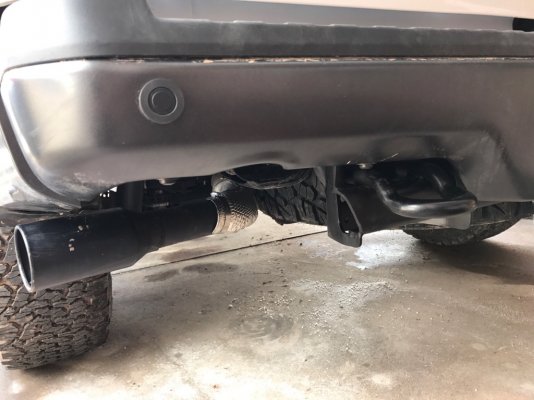
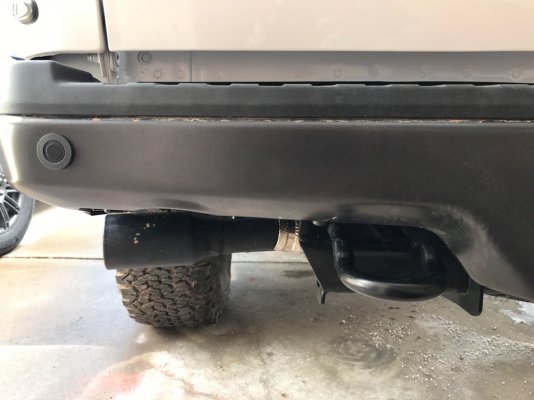
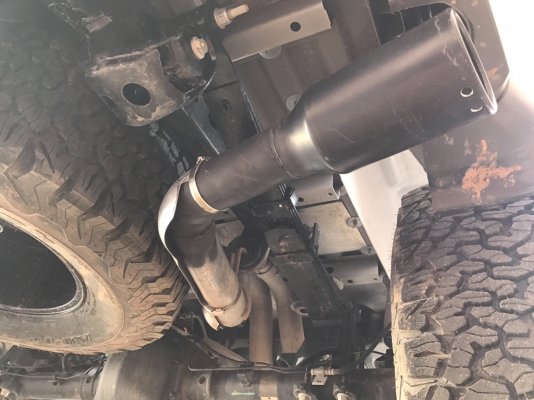
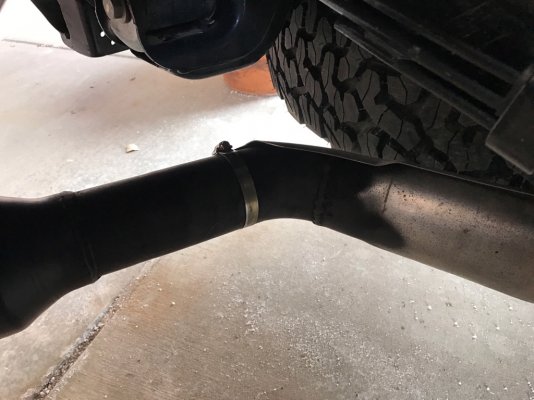
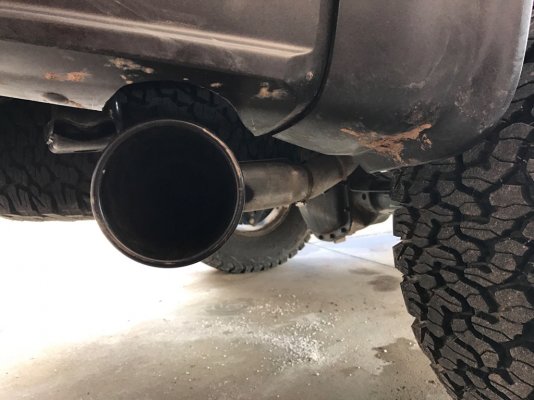
Then I accidentally packed the exhaust with mud twice in one day and I resisted the sawsall for a few days but when I looked at it today I had to start cutting. Moving the exhaust was actually pretty simple and is in a much better position for offroad. It isn't perfect but given that I only made a few cuts and 2 welds to make it happen, this should work for quite awhile. I also did a little cleanup work to the rear bumper that makes it look a little better and helps the departure angle a bunch at the corners of the truck where it is needed the most.
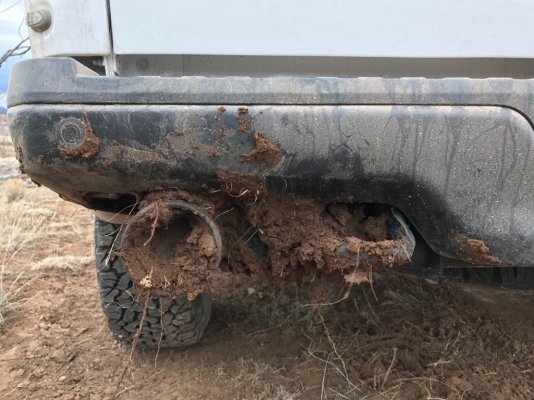
85c495e1dd239df90bf94d040ca5642f.jpg
d94ea6689b219e926045d133391ebdac.jpg
2fe4aa2cc39ed857876f6db50cdc2a72.jpg
611f7298d1bdcecaaa9cb75688a4df6c.jpg
ab9c529b966b69d1095cda2a4c74767e.jpg

When I had the tires off for the exhaust mod I couldn't resist snapping a pic of the rear travel.
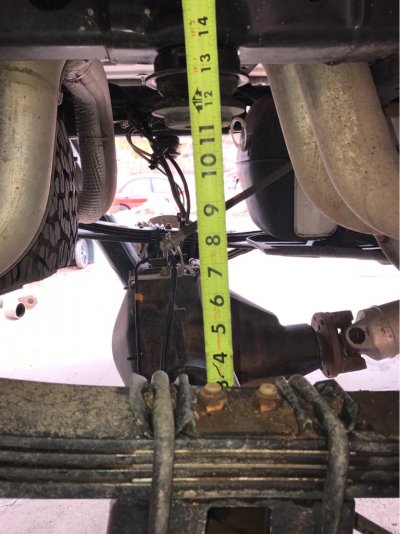
9cba96c580b2141836ef5c45f3cd7392.jpg

Seems short by an inch until you realize that the bonded rubber bushings used in the shackle resist torsion. You have to add the weight of the tires, wheels, and dynamic motion that the truck actually sees in use (or stand on the axle and jump down hard on it) and the tape gets real close to 14".

The lawyers need to be shot and I can't stand all the crap they plaster all vehicles with now, so I made them go away. This also gives a basic overview of the 800A interior that another member was asking about. No touch screen and fixed gauge info, as they are not part of the display. Doesn't bother me a bit. Still plent of lights and switches going on and too many on the steering wheel.
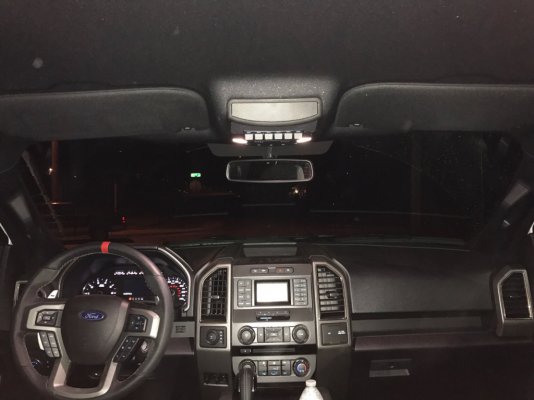
0400b111a81e318bc10c2ddae0bbd376.jpg

More will come in the next few weeks and months as I continue to modify the 800A+ for the offroad expeditions I take.

Oh yeah, I have just been reminded by an astute member that I debadged her as well. Completely forgot about that already.


Sent from my iPad using Tapatalk Pro
 
Last edited:

sher-bant

Full Access Member
Joined
Dec 21, 2016
Posts
223
Reaction score
136
Dude... you're legit hardcore!

I'm that city boy (Chicago) who's wildest ride in my new Raptor might involve some un-mowed wet grass, hitting a speed-bump at 40mph, driving over a parking block or ripping up a heavily pot-holed gravel alley.

You took off the badges!
 
Last edited:

max_Raptor

Full Access Member
Joined
Jun 23, 2016
Posts
91
Reaction score
70
This is a thread to follow :head3:

I personally dont like the look of the exhaust out the back and your mod is simple and perfect

I was personally contemplating running the aFe Rebel Series side exit but with stock tips for an OEM look

Keep us updated
 

Bullishone

FRF Addict
Joined
Aug 22, 2011
Posts
1,382
Reaction score
563
I don't like the exhaust like that, it looks way less sportier. I'm sure you don't care about the looks, but it definitely takes away from the aggressive factory rear.

Sent from my Nexus 6P using Tapatalk
 

J.Bodolay

Full Access Member
Joined
Jan 11, 2011
Posts
177
Reaction score
229
I managed to make it at least one week before the modifications started...

Outstanding post.
1. +1 photos of exhaust reroute.
2. Front receiver?
3. Power for winch at rear?
4. Enjoying the >$10K and 300Lbs saved with the '802A and SCrew delete' ?
 
Last edited:
OP
OP
Bark beetle

Bark beetle

Full Access Member
Joined
Oct 29, 2016
Posts
135
Reaction score
151
Location
Northern NM
Outstanding post.
1. +1 photos of exhaust reroute.
2. Front receiver?
3. Power for winch at rear?
4. Enjoying the >$10K and 300Lbs saved with the '802A and SCrew delete' ?


1. Here are more exhaust pics. I also cleaned up the rear bumper around the recovery loop an rewelded it with an angle versus straight down.
127001012da577459eba44fc01ebb2c6.jpg
00b137bd8f7d5260ea16dfabf2d04613.jpg
25709a5c2a7d121337459f77f5a8f5aa.jpg
ba9b6aab90316e229a5cc22aed9d510f.jpg
bde3a945c78d76696f84aff60fadcc53.jpg
659ebd591de5d1018851556b76ff8c36.jpg262d857cfcb680f9a484af148f811f15.jpgb8dd4f31816d3a0ef66a0003d40788c9.jpg


2. My goal is to figure out a front receiver with the stock bumper but I will need to pull it off to really know. I also need the stock front skidplate before I start so that I don't end up causing a conflict with those mounts.

3. Power for the winch in the rear receiver will most likely be a portable cable set that runs from the battery over the rearview mirror and along the bed when I need to use the winch. When not in use the cables live in an ActionPacker with the rest of my recovery gear. I have looked at hard wiring it but the turbo area gets really hot and would require a lot of heat shielding. I also don't use a winch that often but when I need it, I really need it! I learned the hard way with a $900 recovery bill when I was in the middle of nowhere and it took calls to several shops before we found a guy willing to come pull my Tundra out. All cases so far have been quicksand, which in my case has been most common in Southern Utah but occasionally here in Northern NM as well. Of these times, they have all been pulls from the back, not the front, as continuing forward is impossible. Another reason why I don't like hard mounting the winch to the front is the added weight to an already heavy front end. Because of the limited use and for improved weight balance, I mount the winch to the bar I fabricated opposite the gas tank in the bed. Worth noting is the battery is mounted on the passenger side while the gas tank, transfer case drop and front differential are on the driver side. On all of my Toyotas everything was on the driver's side! I had to run additional spring preload on the driver's side because of the terrible weight balance. When I am not out wheeling, the winch lives in the garage which keeps the synthetic line from deteriorating. On a dedicated rock crawler having a hard mounted winch on the front is mandatory. My RZR now serves that purpose.

4. I too love the fact that I almost have the book listed weight capacity (1000 lb) with mine at 972 lb. by comparison, this is still less than my Tacoma but with careful weight management, it should be ok.


Sent from my iPad using Tapatalk Pro
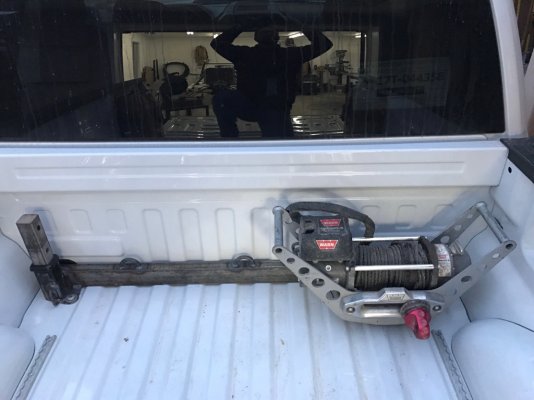
 

J.Bodolay

Full Access Member
Joined
Jan 11, 2011
Posts
177
Reaction score
229
1. Here are more exhaust pics...

Thanks much for the pictures. Really nice work getting tips out from under the bumper. Exhaust mod will be happening shortly here.

While running power for my radios in the cab, I noted the difficulty in getting heavy gauge wires to the back receiver, I'll give it another look before I go with free hanging cords.

Interested in seeing your front receiver solution.
 
OP
OP
Bark beetle

Bark beetle

Full Access Member
Joined
Oct 29, 2016
Posts
135
Reaction score
151
Location
Northern NM
Thanks much for the pictures. Really nice work getting tips out from under the bumper. Exhaust mod will be happening shortly here.


While running power for my radios in the cab, I noted the difficulty in getting heavy gauge wires to the back receiver, I'll give it another look before I go with free hanging cords.


Interested in seeing your front receiver solution.


I would be very interested in where you end up putting your radios. HAM and CB?

I took some of the dash apart today eyeballing locations for a ram ball mount and possible radio locations. I haven't purchased a new 2m yet because I am not sure if I will need a remote head unit or not.


Sent from my iPad using Tapatalk Pro
 

J.Bodolay

Full Access Member
Joined
Jan 11, 2011
Posts
177
Reaction score
229
I would be very interested in where you end up putting your radios. HAM and CB?


Radio is in center console using "Lego type" extreme Velcro to side of console. Sliding tray still clears!

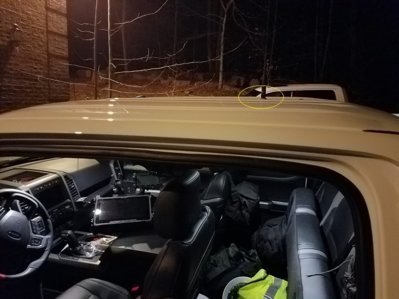
Antenna[pic#1]: Pulled rear dome light. Drilled roof just aft of light. Installed doubler as aluminum alone won't support PL-259 base. Fished cable from light to door (pull door seal) Fished down rear pillar, under seat and into console through drilled hole at back/side. Top rear of console snaps off, plenty of room to fish into center compartment.

Mike: via lower center console trim left side to hanger placed below 4WD knob.

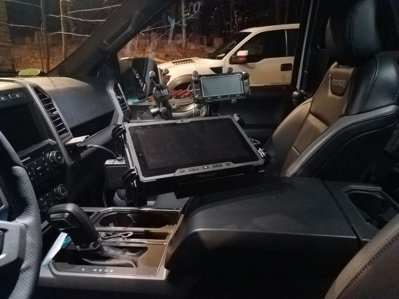
5100 Head[pic#2]: Out right center console trim to Ram-X grip mounted on Ram Floor Mount RAM No-Drill™ Laptop Mount for the 2015 - 2017 Ford F-150 & Transit Connect - RAM-VB-195-SW1 | RAM Mounts
Left Ram-X grip is for cell phone.
Alternate plan was: Ram X grip cup holder mount.

Ext Speaker: same as head, secured to mount.

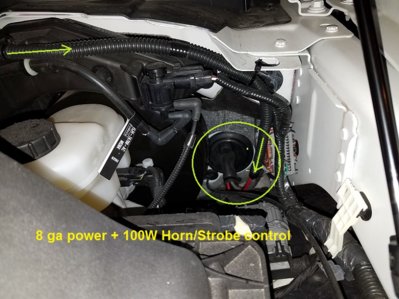
Power[pic#3]: 8 ga from battery to firewall across top to drivers side and into the cable boot that goes thru fire wall. Secure above pedals and below steering to center and into console via left site trim.

CB: Not in '17. On '11 it is on side of console between shifter and my knee.
 

Attachments

  • Radio2.jpg
    Radio2.jpg
    172.7 KB · Views: 547
  • Radio1.jpg
    Radio1.jpg
    152.9 KB · Views: 511
  • Radio3.jpg
    Radio3.jpg
    192.4 KB · Views: 512
Last edited:
Top