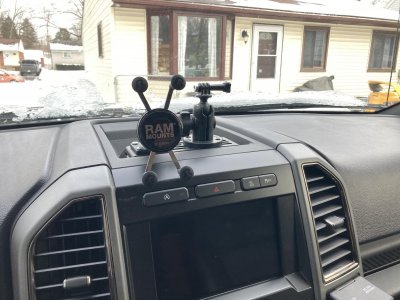
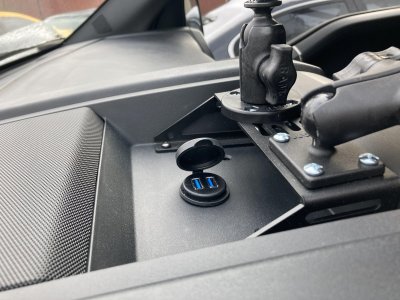
While I Have the Dash Apart...

Disclaimer: Links on this page pointing to Amazon, eBay and other sites may include affiliate code. If you click them and make a purchase, we may earn a small commission.

OP
OP
Drifter

Drifter

Full Access Member
Joined
Aug 29, 2018
Posts
62
Reaction score
33
Location
Florida
The USB cables plug into your stock sync 3 brain via a mini usb cable.

You could, in theory, use a mini usb splitter make plugged into the sync, to two standard USB... run one up to your hub on the tray and then use a standard USB to mini usb female adapter and plug your stock ports back into that. I don’t think there is a technical reason why that wouldn’t work and everything would be unseen behind the dash. You just may not want to try to overload things by trying to charge 4 devices at once off of it.

@Guy I tried to do this but the mini USB didn't fit securely into the back of the sync module. It may have worked, but as hard as I drive her I didn't want the connector. wiggling loose down the road.
 
OP
OP
Drifter

Drifter

Full Access Member
Joined
Aug 29, 2018
Posts
62
Reaction score
33
Location
Florida
Did you figure out how to route the wiring down to the SYNC USB ports? I just installed mine but skipped the USB pass through because I was not able to figure out a reasonable routing option.

I am trying to do something similar here...and am still struggling with getting power to a second Sync3 USB hub (that I am installing under a BuildRight Mount). Splitting the USB is easy, but adding a "new" power supply for the Sync3 USB Hub is where I am stuck. So looking for any update on this thread/project....that I can apply to my project. thx!
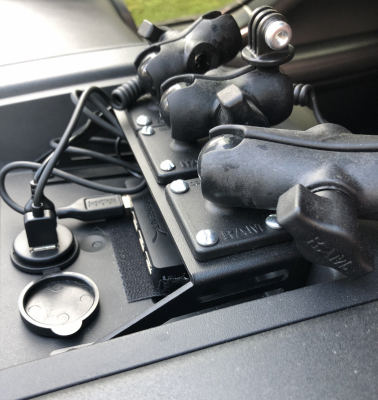
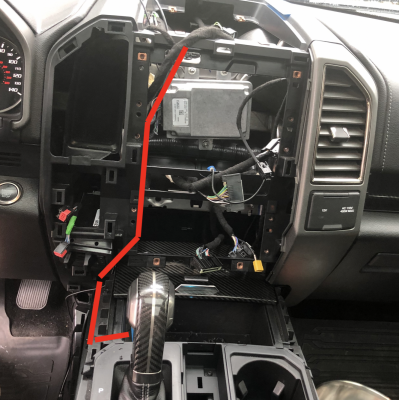
Not sure if the same as what you guys are going for, but here is what I did:

BRI 1.png

The USB ports are mounted just forward of the BRI mount, with the USB Hub velcro'd under it. The wires are better cleaned up now and tucked under the mount, routed to com out the side and out to the Ram arms.
USB Ports: https://www.amazon.com/gp/product/B06WWNZ18N/?tag=fordraptorforum-20
USB Extensions: https://www.amazon.com/gp/product/B014RWATK2/?tag=fordraptorforum-20
USB Hub: https://www.amazon.com/gp/product/B00BWF5U0M/?tag=fordraptorforum-20

BRI 2.png

I didn't think there would be much interest in this so I didn't take any pictures of the routing, but the red line is how I ran the USB cords. I essentially wrapped 3' USB cords in wire loom to protect against any friction (some sharp metal back there) and dropped them from the top of the dash down behind the support arms and duct work, routed down toward the driver side footwell. I then brought it along the driver side of the console and tapped a hole into the center tray. I had to get my arms behind the dash from the driver side footwell to accomplish the routing: total pain in the **** as it's tight back there with some sharp edges.

I wrapped the USB wires from the dual port in loom and plugged them into the 3' extensions, wrapping those connections in electrical tape. The excess was coiled and tucked into the open space under the center dash panel after the radio, screen, and other dash & trim panels were installed. There is plenty of room for this and the excess play was extremely helpful in giving enough room to reinstall everything; I'll be extremely thankful for it when I have to take the center dash panel off again in the future.


BRI 3.png

The hole now has a rubber grommet to clean up the look and the data blocker is taped up out of the way with double-sided tape. One of the cords goes directly into the sync port: this is the one I plug into my phone running Carbridge over Sync (allows me to play nav, movies, TV, YouTube, etc. on the Sync screen). The other runs to a data blocker: this is the one the USB Hub is plugged into and the data blocker prevents sync from giving me the "USB Hub not supported" message every time.

USB Data Blocker: https://www.amazon.com/gp/product/B01CVMAK2M/?tag=fordraptorforum-20


BRI 5.png

All in all I'm extremely happy with it. For about $40, a couple of beers, and an hour or so of work, I now have a really clean dash, can close the center console tray, and have the ability to swap out RAM mounts and USB power supplies at will for whatever I'm getting into.

Again, not sure if that's what you guys are looking for, but I hope it helps. If you have any questions don't hesitate to ask and I'll try to help any way I can. I hope to get a new 12" Pheonix tablet screen soon; when I take it all apart again to instal that I will take better pictures and post here.
 
OP
OP
Drifter

Drifter

Full Access Member
Joined
Aug 29, 2018
Posts
62
Reaction score
33
Location
Florida
I like how you did it but I don’t think I want to take that much apart to run that USB Wire!
Hahaha funny you say that- neither did I! I thought I could find an easier way but kept running into roadblocks and having to take more apart- the whole thing started with installing my BuiltRight mount and taking out the center dash.

Honestly, it wasn’t that hard (would have been easier if it had been the first project of the day instead of the last several beers in) and the end result was worth it.


Sent from my iPhone using Tapatalk
 

Rapteroid

Member
Joined
Feb 20, 2019
Posts
17
Reaction score
6
Location
California
Maybe you could tell us in what order your removed each piece, I would love to use the screen for movies etc and if you know the right order and parts list you could help us out or we might just have too many beers and end of with a kenwood in there LOL or Alpine double din
 

ayoustin

Full Access Member
Joined
Jul 31, 2018
Posts
166
Reaction score
259
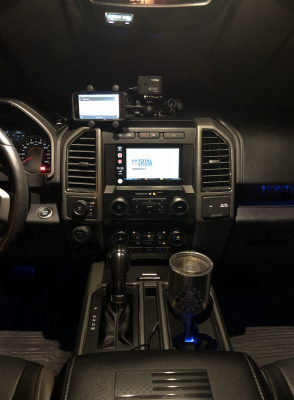
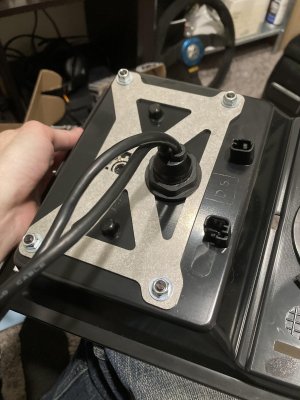
Just finished up a similar install on my truck. Went with the Builtright dash mount and their underside reinforcement plate. Was just barely able to squeeze the USB extension inside of the reinforcement. I bought the same extension that Drifter linked above. The reinforcement isn't necessary but I figured why not, it's only $15 and I'd rather only do this once.

Dash 1.jpg

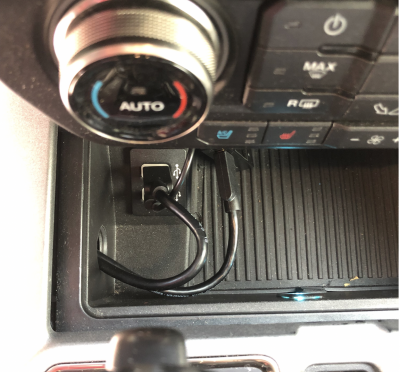
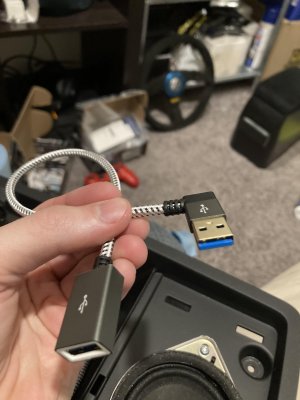
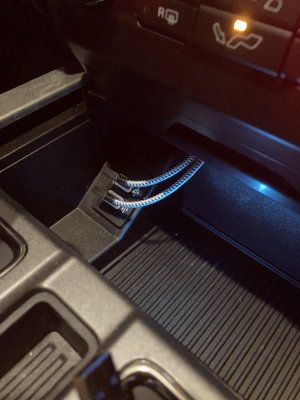
I don't have a round hole in the side of my cubby like Drifter does, I'm not sure if it's a year difference thing or if he added that but I didn't want to tear apart more of my dash than I needed to and drill holes. Luckily I found a rectangular slot in the back of the cubby, it's in the back top left corner, I could only see it by sticking my phone into the cubby and taking a photo. After trying 3 different cables I found one slim enough to fit through the slot without having to cut anything and had the added bonus of them having 90° ends. Here's the cables I bought:
https://www.amazon.com/gp/product/B01M0LD9L5/?tag=fordraptorforum-20

Dash 5.jpg

Dash 4.jpg

I didn't feel I needed more than 2 ports on the top of the dash so I didn't add any expanders or anything like drifter. As far as cable routing goes, it all just drops straight down behind the radio and meets the slim 90° cables behind the cubby. The one thing that I didn't anticipate was because of where the USB bulkhead extension comes through the reinforcement it's in the same space as the dash reinforcement bracket that's directly below the dash tray so before I could reinstall the dash tray I had to remove the bracket and clearance it with a dremel, not a ton of work but removing the bracket is a royal pain. In the end though I'm happy with the finished result. I'm just mounting my phone and a gopro for the moment; may add more in the future.

Dash 2.jpg

Dash 3.jpg
 

GCATX

King Dingaling
Joined
Oct 6, 2018
Posts
9,134
Reaction score
26,094
Location
Central Texas
Not sure if the same as what you guys are going for, but here is what I did:

View attachment 119956

The USB ports are mounted just forward of the BRI mount, with the USB Hub velcro'd under it. The wires are better cleaned up now and tucked under the mount, routed to com out the side and out to the Ram arms.
USB Ports: https://www.amazon.com/gp/product/B06WWNZ18N/?tag=fordraptorforum-20
USB Extensions: https://www.amazon.com/gp/product/B014RWATK2/?tag=fordraptorforum-20
USB Hub: https://www.amazon.com/gp/product/B00BWF5U0M/?tag=fordraptorforum-20

View attachment 119959

I didn't think there would be much interest in this so I didn't take any pictures of the routing, but the red line is how I ran the USB cords. I essentially wrapped 3' USB cords in wire loom to protect against any friction (some sharp metal back there) and dropped them from the top of the dash down behind the support arms and duct work, routed down toward the driver side footwell. I then brought it along the driver side of the console and tapped a hole into the center tray. I had to get my arms behind the dash from the driver side footwell to accomplish the routing: total pain in the **** as it's tight back there with some sharp edges.

I wrapped the USB wires from the dual port in loom and plugged them into the 3' extensions, wrapping those connections in electrical tape. The excess was coiled and tucked into the open space under the center dash panel after the radio, screen, and other dash & trim panels were installed. There is plenty of room for this and the excess play was extremely helpful in giving enough room to reinstall everything; I'll be extremely thankful for it when I have to take the center dash panel off again in the future.


View attachment 119962

The hole now has a rubber grommet to clean up the look and the data blocker is taped up out of the way with double-sided tape. One of the cords goes directly into the sync port: this is the one I plug into my phone running Carbridge over Sync (allows me to play nav, movies, TV, YouTube, etc. on the Sync screen). The other runs to a data blocker: this is the one the USB Hub is plugged into and the data blocker prevents sync from giving me the "USB Hub not supported" message every time.

USB Data Blocker: https://www.amazon.com/gp/product/B01CVMAK2M/?tag=fordraptorforum-20


View attachment 119965

All in all I'm extremely happy with it. For about $40, a couple of beers, and an hour or so of work, I now have a really clean dash, can close the center console tray, and have the ability to swap out RAM mounts and USB power supplies at will for whatever I'm getting into.

Again, not sure if that's what you guys are looking for, but I hope it helps. If you have any questions don't hesitate to ask and I'll try to help any way I can. I hope to get a new 12" Pheonix tablet screen soon; when I take it all apart again to instal that I will take better pictures and post here.

What's going on with your sync screen? Some kind of hack?
 
Top