sj-CHI
Full Access Member
I recently completed a fairly large (by my standards) wiring project on my 2014 Raptor and along the way documented the process, parts, and learnings I went through.
This project got started when like many of you I got frustrated with having too few auxiliary switches for the lights and accessories I have on my truck. I also wanted to do some custom wiring features that would take some engineering and lastly my plan was to allow for expandability.
I decided on the Bussmann RTMR Fuse and Relay box as the base for my new system. It's a great foundation for fuses and relays that offers lots of expansion and customization. I found a resource online that builds boxes with all the accessory and switch wires ready to go. After receiving the box I ended up tearing it apart and starting from scratch. Nothing against the person that built it, in fact the work was very high quality, I just wanted to do it different and upgrade some of the accessory wires to 10ga. This required me to purchase a bunch of specialized tools and materials to re-build the fuse box. In retrospect I should have built the fuse and relay box myself from the start and I would have saved some money.
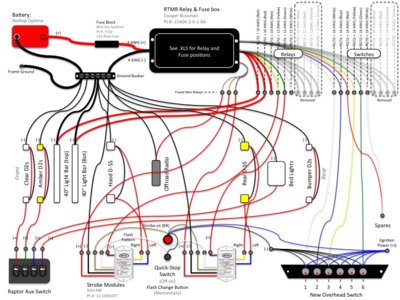
I developed a wiring plan to accommodate all my accessories (sorry about the rough PowerPoint drawing).
1. Front D2s -- clear
2. Front D2s -- Amber
3. Front light bar (top)
4. Front light bar (bottom)
5. Hood lights (just added these, D-SS Sideshooters)
6. Rear bumper lights
7. Rear facing lights above bed (Amber)
8. Bed cargo lights (new)
9. Compressor
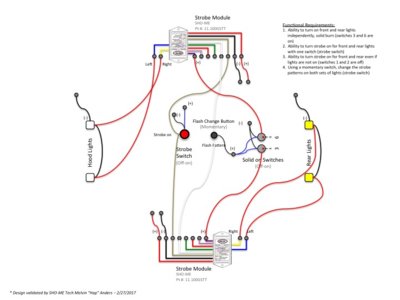
One of the functions I planned was a strobe feature that would allow me to strobe my front hood lights and rear facing amber lights (above the bed). I wanted to be able to hit a switch that would allow the strobes to fire even if the hood and rear lights were off. Additionally, I wanted the same switch to work if either or both of the lights were on. For this I turned to Able Manufacturing and purchased two of their SHO-ME modules. I got in touch with Able and they helped tweak the wiring to meet my requirements.
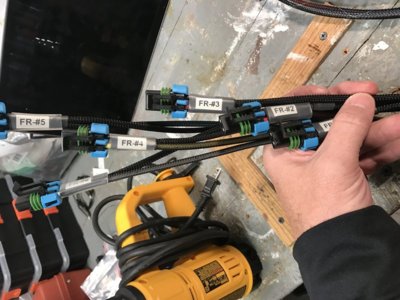
The whole fuse box and various connections needed to be waterproof so I decided to use Metrics’s-Pack 280 connectors. I picked up some good tips from a guy who documented his own build and put a ton of detail into the process (DIY Bussmann RTMR Fuse Block, Part 1 – Introduction | Bodenzord). The connectors would allow me to remove the whole Bussman box fairly easily if needed.
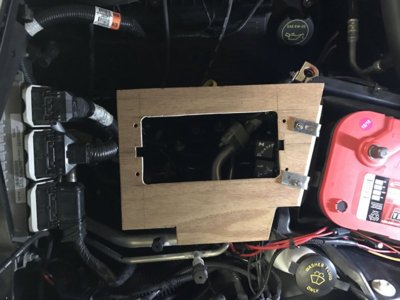
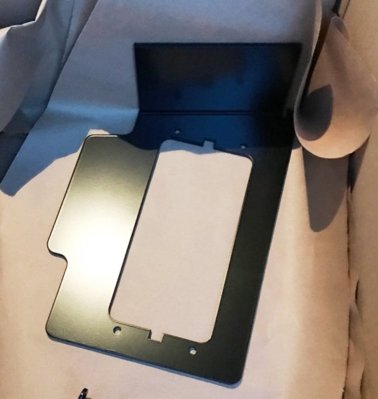
I needed a way to mount the fuse box in the truck. I wanted it under the hood but didn’t want to interfere with any other truck functions and I wanted a clean install that could be removed if needed. I built a mock up of the bracket first in cardboard and then out of wood. My brother in-law had his company turn the wood mock up into a 3D CAD document that could be taken to a local fabricator. He found a shop that could fab the piece out of aluminum and powder coat it for us. The end product is a very clean, strong but lightweight mounting bracket that gets bolted to the battery box.
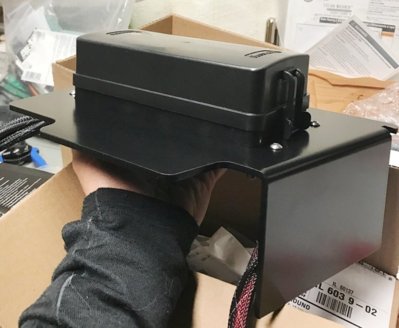
I finished up the Fuse box build, mounted it to the new bracket and started adding ground busbars and a fuse holder for the master fuse. Note: all the small Metri-pack connectors are crimped, soldered and finished with adhesive lined heat shrink for durability.
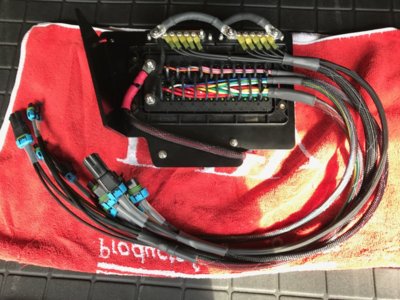
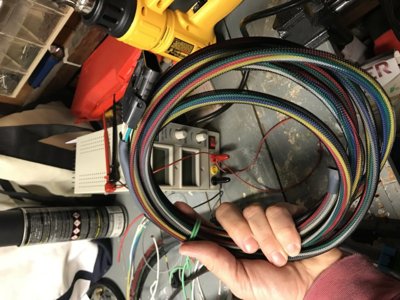
The switch harness and connector for under the hood is completed.
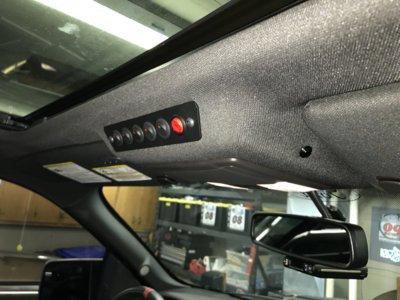
Early on I decided to use a 6 position switch plate and chose one from Crown Offroad. I like the overhead location for the switches and I was able to source a solid red switch for my strobe function that would fit cleanly in the Crown plate. Finally I needed to find a momentary switch that I could use to change the strobe pattern. Initially I wanted to incorporate that in the red strobe rocker switch (off - on, momentary). Maybe this type of rocker exists but not int the form I wanted. I opted for a small bullet push button that I mounted to the right of the switch plate.
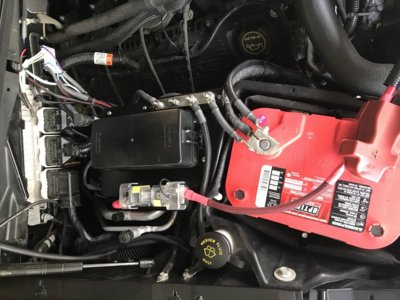
Finally time to install the whole build in the truck and finish all the connections. I made up 4ga battery cables and ground connections for the frame and negative battery terminal and bolted my setup to the battery box. I taped into the passenger seat fuse box (fuse 34) for a switched power source and dremeled the cover to allow it to all close up.
The end product took longer than expected and I know there are cheaper ways to accomplish what I built but I had a plan that I wanted to see through and the challenge was fun! Next project…..
This project got started when like many of you I got frustrated with having too few auxiliary switches for the lights and accessories I have on my truck. I also wanted to do some custom wiring features that would take some engineering and lastly my plan was to allow for expandability.
I decided on the Bussmann RTMR Fuse and Relay box as the base for my new system. It's a great foundation for fuses and relays that offers lots of expansion and customization. I found a resource online that builds boxes with all the accessory and switch wires ready to go. After receiving the box I ended up tearing it apart and starting from scratch. Nothing against the person that built it, in fact the work was very high quality, I just wanted to do it different and upgrade some of the accessory wires to 10ga. This required me to purchase a bunch of specialized tools and materials to re-build the fuse box. In retrospect I should have built the fuse and relay box myself from the start and I would have saved some money.
I developed a wiring plan to accommodate all my accessories (sorry about the rough PowerPoint drawing).
1. Front D2s -- clear
2. Front D2s -- Amber
3. Front light bar (top)
4. Front light bar (bottom)
5. Hood lights (just added these, D-SS Sideshooters)
6. Rear bumper lights
7. Rear facing lights above bed (Amber)
8. Bed cargo lights (new)
9. Compressor

One of the functions I planned was a strobe feature that would allow me to strobe my front hood lights and rear facing amber lights (above the bed). I wanted to be able to hit a switch that would allow the strobes to fire even if the hood and rear lights were off. Additionally, I wanted the same switch to work if either or both of the lights were on. For this I turned to Able Manufacturing and purchased two of their SHO-ME modules. I got in touch with Able and they helped tweak the wiring to meet my requirements.

The whole fuse box and various connections needed to be waterproof so I decided to use Metrics’s-Pack 280 connectors. I picked up some good tips from a guy who documented his own build and put a ton of detail into the process (DIY Bussmann RTMR Fuse Block, Part 1 – Introduction | Bodenzord). The connectors would allow me to remove the whole Bussman box fairly easily if needed.

I needed a way to mount the fuse box in the truck. I wanted it under the hood but didn’t want to interfere with any other truck functions and I wanted a clean install that could be removed if needed. I built a mock up of the bracket first in cardboard and then out of wood. My brother in-law had his company turn the wood mock up into a 3D CAD document that could be taken to a local fabricator. He found a shop that could fab the piece out of aluminum and powder coat it for us. The end product is a very clean, strong but lightweight mounting bracket that gets bolted to the battery box.


I finished up the Fuse box build, mounted it to the new bracket and started adding ground busbars and a fuse holder for the master fuse. Note: all the small Metri-pack connectors are crimped, soldered and finished with adhesive lined heat shrink for durability.

The switch harness and connector for under the hood is completed.

Early on I decided to use a 6 position switch plate and chose one from Crown Offroad. I like the overhead location for the switches and I was able to source a solid red switch for my strobe function that would fit cleanly in the Crown plate. Finally I needed to find a momentary switch that I could use to change the strobe pattern. Initially I wanted to incorporate that in the red strobe rocker switch (off - on, momentary). Maybe this type of rocker exists but not int the form I wanted. I opted for a small bullet push button that I mounted to the right of the switch plate.

Finally time to install the whole build in the truck and finish all the connections. I made up 4ga battery cables and ground connections for the frame and negative battery terminal and bolted my setup to the battery box. I taped into the passenger seat fuse box (fuse 34) for a switched power source and dremeled the cover to allow it to all close up.

The end product took longer than expected and I know there are cheaper ways to accomplish what I built but I had a plan that I wanted to see through and the challenge was fun! Next project…..


