Putco Red Blade 92010-60 Group Buy!

Disclaimer: Links on this page pointing to Amazon, eBay and other sites may include affiliate code. If you click them and make a purchase, we may earn a small commission.

OP
OP
KryptosXLayer2

KryptosXLayer2

Full Access Member
Joined
Aug 29, 2017
Posts
101
Reaction score
46
Location
Charlotte, NC, USA
I received my Red Blade light bar and I am in process of installing it now. Some of you might hate me for saying it was plug and play and then receiving the poor instructions included with it from 1/25/17 which coincidentally is my birthday, go figure. I called Nick back at customer service (800-247-3974, Nick - Ext 300 in case you have any questions I've not mentioned after this) and he gave me a better set of instructions I've amended a little and provided below plus a video Putco did for the 2018 F-150. All the other videos are for 2015's and they don't have LED tail lights, trailer detection, or a tailgate step bar guide, so this helps with everything except the last part, so I'm going to explain what I did about the step bar guide in a moment:


Basically follow that video and this below to match up wires for the Raptor. We can't plug and play with the bars that were JUST sent but I was told that maybe in another batch, they will have a Y-harness and that will allow them to be installed directly by plugging in to the 4-pin harness, no splicing required. This is what Nick expected these new bars to be, but said the wiring looked identical to the regular (yellow) Blade light bar, and that's a shame.

Here's the instructions Nick sent me via email:

Please follow these directions on the Blade installations of the 2015+ F150s

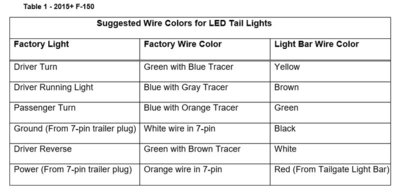
Begin installation by cutting the supplied 4-pin plug from all wires on the light bar. Follow wiring option 3 of cutting the red power wire with the heat shrink sleeve. Cut the red wire 3” from the driver box. Use supplied heat shrink sleeve to enclose the end of the short wire that you just cut. Pull the other end of red wire that was cut out of the wiring harness sleeve. You will notice that the wire will be connected to the other red wire that comes out of the driver box. This will be the power wire that will supply the power to the light bar.

7-Pin Trailer Harness
Attach the red power wire from the light bar to the orange wire in your 7-pin trailer harness. Attach the black ground wire (with in-line fuse) to the larger white wire in the 7-pin trailer harness.

Driver’s Side Tail Lamp
Run yellow, brown, and white wires from the light bar into the opening behind the driver’s side tail lamp. Connect the wires from the light bar to their respective wires in the factory wiring harness.

Passenger Side Tail Lamp
Run the green wire from the light bar into the opening of the passenger side tail lamp. You may need to extend this wire in order to reach to the passenger side tail lamp. Connect the green wire to the respective wire in the factory harness.

Under Dash Bridge Wire
Cut a 6” piece of wire for the bridge wire underneath the driver’s dash. Follow the ‘Additional Wiring Instructions’ on the instruction sheet for the bridge wire installation

Once installation is complete, verify that all light bar functions are working correctly.

Table 1 - 2015+ F-150

(see attached image for table)

If you'd prefer to see this in PDF form to print, it is located here (this is Nick's document from Putco, just amended to remove details about the Super Duty that doesn't apply to us and is just confusing).

Regarding the tailgate step bar guide, you know what, I've beat my head against the wall thinking about this for so many months, I'm just going to remove it and hopefully it won't shift while I'm using it. I haven't finished the installation yet and tried the step but when I do I'll edit this and tell you if there is any worry with it off, but I was told by Nick that it only helps prevent the tailgate from moving like 1/16" while you are using the step, and if that's the case, I'll just remember not to use it while I'm actually tailgating and drinking, but likely won't notice any movement if that's the case anyways!

Hope this helps, sorry for getting anyone to think it would be a simpler install than it is if you received one of the early shipments and hopefully those who order later will have an easier time installing, good luck and enjoy it!
 

Attachments

  • RaptorWiring.jpg
    RaptorWiring.jpg
    51.1 KB · Views: 47

4x4TruckLEDs.com

Supporting Vendor
Supporting Vendor
Joined
Jul 18, 2017
Posts
2,975
Reaction score
1,387
Thanks for the write up. SInce it's a new product Im guessing they are re-using the old instructions which they most likely included.

Everybodys orders have shipped BTW you should have all received tracking #s
 

hazeleyes

FRF Supporting Member
Supporting Member
Joined
Nov 28, 2017
Posts
25
Reaction score
14
Location
Middle TN
I received my Red Blade light bar and I am in process of installing it now. Some of you might hate me for saying it was plug and play and then receiving the poor instructions included with it from 1/25/17 which coincidentally is my birthday, go figure. I called Nick back at customer service (800-247-3974, Nick - Ext 300 in case you have any questions I've not mentioned after this) and he gave me a better set of instructions I've amended a little and provided below plus a video Putco did for the 2018 F-150. All the other videos are for 2015's and they don't have LED tail lights, trailer detection, or a tailgate step bar guide, so this helps with everything except the last part, so I'm going to explain what I did about the step bar guide in a moment:


Basically follow that video and this below to match up wires for the Raptor. We can't plug and play with the bars that were JUST sent but I was told that maybe in another batch, they will have a Y-harness and that will allow them to be installed directly by plugging in to the 4-pin harness, no splicing required. This is what Nick expected these new bars to be, but said the wiring looked identical to the regular (yellow) Blade light bar, and that's a shame.

...

Hope this helps, sorry for getting anyone to think it would be a simpler install than it is if you received one of the early shipments and hopefully those who order later will have an easier time installing, good luck and enjoy it!

Thanks so much for this -- I tried installing mine the other day but gave up when I discovered that the green wire is way too short to feed into the passenger side taillight.

I am debating waiting for a better solution (the Y harness you mentioned would be it) versus just going ahead with the current bar, now that there's a better set of instructions! Lol

Today's project looks like it's going to be my tonneau cover instead, as that's a higher priority for me, and FedEx shows it's being delivered today!
 
OP
OP
KryptosXLayer2

KryptosXLayer2

Full Access Member
Joined
Aug 29, 2017
Posts
101
Reaction score
46
Location
Charlotte, NC, USA
Thanks so much for this -- I tried installing mine the other day but gave up when I discovered that the green wire is way too short to feed into the passenger side taillight.

I am debating waiting for a better solution (the Y harness you mentioned would be it) versus just going ahead with the current bar, now that there's a better set of instructions! Lol

Today's project looks like it's going to be my tonneau cover instead, as that's a higher priority for me, and FedEx shows it's being delivered today!

Here's my added instructions for that part - use the rest of the brown wire that I cut off completely because I refuse to have this bar on all the time as I mentioned in the other thread.... I did FORScan changes to make the parking lights my DRL and they would make this bar run in the dim setting all day and night, whereas I wanted this thing for higher visibility for turning, stop, and reverse only. There's plenty of extra brown wire to run to the other taillight, but if you'd rather keep it, I remember there being enough of just about every other color too depending on how you run the wires.

I thought about waiting until the plug and play version came out as well (probably should have because I might have had a second person around and wouldn't have damaged my tailgate by removing it by myself!!!), but it isn't worth waiting for, and I'll tell you why. Even if the plug and play was to be truly that, I would still want to hide the wiring and not have it just connected to the harness with the Y adapter plugged in all the time. Furthermore, the bar still needs wiring to the reverse since the 4-pin harness doesn't give that, and I don't know what it would need for 12V power in that case with the red wire, so if it required to be tapped into the 7-pin, you would still have to do the wiring under the dash which takes no time at all.

My point is.... That's still a lot of wiring once you spend time waiting for it to arrive and it won't be nearly as clean or tucked away as this was! Enjoy it and good luck, don't drop your tailgate like I did, and get help carrying it if you plan on removing it!
 

Desoto

Member
Joined
Apr 15, 2018
Posts
14
Reaction score
8
I installed mine today as well. For the jumper wire under the dash, my pin 1 wire was more of a brown color on my 2018. Not a huge issue but just trying to update the instructions moving forward. I didn’t remove the tailgate step bar guide. I created spacers of 8 mm thickness. Automotive double sided tape and use the bar snap mounts instead of mounting the light bar directly to the paint. (Hopefully this will work long term.) The guide for the wire taps was helpful however I apparently can’t read and missed it. Nothing a multimeter couldn’t fix. I actually didn’t mind not having a plug and play unit bc I don’t want the harness 4 pin plugged in at all times. And I cut the brown wire as well so that it’s not running all the time.
 

Attachments

  • D9D03A20-C8A2-423B-90F3-F1C862A53E4B.jpg
    D9D03A20-C8A2-423B-90F3-F1C862A53E4B.jpg
    72.3 KB · Views: 43
  • 516D7246-7085-4BE9-95AF-3A27C7C6938F.jpg
    516D7246-7085-4BE9-95AF-3A27C7C6938F.jpg
    72.3 KB · Views: 42
  • 66EFA56C-B98F-4CD8-9A0D-C0E6A9195744.jpg
    66EFA56C-B98F-4CD8-9A0D-C0E6A9195744.jpg
    61 KB · Views: 43
OP
OP
KryptosXLayer2

KryptosXLayer2

Full Access Member
Joined
Aug 29, 2017
Posts
101
Reaction score
46
Location
Charlotte, NC, USA
I installed mine today as well. For the jumper wire under the dash, my pin 1 wire was more of a brown color on my 2018. Not a huge issue but just trying to update the instructions moving forward. I didn’t remove the tailgate step bar guide. I created spacers of 8 mm thickness. Automotive double sided tape and use the bar snap mounts instead of mounting the light bar directly to the paint. (Hopefully this will work long term.) The guide for the wire taps was helpful however I apparently can’t read and missed it. Nothing a multimeter couldn’t fix. I actually didn’t mind not having a plug and play unit bc I don’t want the harness 4 pin plugged in at all times. And I cut the brown wire as well so that it’s not running all the time.

Looks great @Desoto, sorry I didn't get back to you earlier but wasn't able to this weekend. Glad you got everything sorted out without me in the way, haha! How does the bar look close up being raised off the body? I actually ran a half-inch line of the grey 3M body tape the entire length of the bar, so I know that's not coming off any time soon, I wondered how just using four of those 5" strips and raising it off the body would work if it was lifted a bunch to clear the tailgate step guide.
 

Desoto

Member
Joined
Apr 15, 2018
Posts
14
Reaction score
8
No worries. I knew it was a holiday weekend and I knew a response was going to be delayed. Should have read the thread a little more closely bc everything was spot on. That’s what I get for skimming through the thread. Anyways I took some pics. The ones from the side are a little crappy bc it’s hard to get a good angle.
 

Attachments

  • 9076C300-5C98-47D0-84FD-B91D24C1A63E.jpg
    9076C300-5C98-47D0-84FD-B91D24C1A63E.jpg
    45.8 KB · Views: 49
  • 37BDCAAA-6B1C-47F9-9919-D59CFB96DC37.jpg
    37BDCAAA-6B1C-47F9-9919-D59CFB96DC37.jpg
    48.3 KB · Views: 48
  • EF27D616-543F-4CC1-8BCF-0EAB10D1D6DC.jpg
    EF27D616-543F-4CC1-8BCF-0EAB10D1D6DC.jpg
    159.3 KB · Views: 50

Chayse

Full Access Member
Joined
Sep 12, 2012
Posts
334
Reaction score
73
Location
SE PA
is there any reason we can't get the 7 pin to 7 pin trailer extension from Amazon and make all connections there instead of the factory wiring?
 
OP
OP
KryptosXLayer2

KryptosXLayer2

Full Access Member
Joined
Aug 29, 2017
Posts
101
Reaction score
46
Location
Charlotte, NC, USA
is there any reason we can't get the 7 pin to 7 pin trailer extension from Amazon and make all connections there instead of the factory wiring?

Yes, read the wiring notes I was given from Nick at Putco. The 7 pin doesn't get power unless something is connected to it, and once something is connected like you're saying, the truck thinks that connector = trailer, and will bug the crap out of you on the dash. It isn't ideal to say the least.
 
Top