PD1744's Build

Disclaimer: Links on this page pointing to Amazon, eBay and other sites may include affiliate code. If you click them and make a purchase, we may earn a small commission.

CoronaRaptor

FRF Addict
Joined
Dec 17, 2012
Posts
28,961
Reaction score
31,191
Location
CANADA
BED STIFFENER BRACKETS

Installed a set of these this weekend. I went with some cheap eBay specials. These parts are so simple, I really couldn't justify paying a premium for them. If they suck, oh well. Lesson learned. But figured I'd roll the dice.

So far though, my first impressions are great. I paid like $38 bucks for them. Delivery was fast. They came from Cali, but for sure made in China. Packaging was great, fasteners were nice, parts were beefy with a nice powder coat, and even the installation instruction were very good.

Fit was also perfect and install was simple though made more difficult because I had to remove my bed extender. I've done a lot of wrenching in my life, but thanks to the snow-less, salt-less area I live in, have never had to bust out the torch out to get the job done.... Until now. The nut that holds the bed extender on one side was seized and, oh yeah, they are round. Got it done though. Also trimmed away a little of the spray in bed liner to make sure the mating surface was flat.

View attachment 327635

I initially thought my bed was already tweaked because the gaps between the tailgate and bedsides are very uneven. Nearly touching on the driver side and wide on the passenger. Also the tailgate protrudes out past the edge of the bedside and doesn't seem to latch very securely on the driver side.

The hope was that these parts would remedy this issue and square everything back up, but after install it turns out that, yes the bed is tweaked, but not in the traditional way like I thought. I think the normal fatigue causes the bedsides to splay out at the top after rough play and brackets like these will remedy that. However after installing these, the gaps look identical to how they looked prior to install. Not only that, but the gaps are uniform all the way down. That shows me the the tailgate is shifted off-center. There's no L-R adjustment that I can identify, so that tells me the bed is actually out of square. I'll need to check that and see if I can figure out how to square it back up if that's possible.

Anyway, after all the recent work, we'll be going into our event in less than two weeks, with a lot more confidence. Now time to pay out all this work and investment.
There should be a piece of rubber either inside the tailgate connector (round thing where it slides onto). I'm not sure, but if the rubber is missing, it stays on one side or if the rubber is not seated properly, it stays on the other side. Check that out, I just fixed this on my sons older f150 (2003).
 
OP
OP
PD1744

PD1744

Full Access Member
Joined
Jan 21, 2020
Posts
294
Reaction score
605
Location
SC
There should be a piece of rubber either inside the tailgate connector (round thing where it slides onto). I'm not sure, but if the rubber is missing, it stays on one side or if the rubber is not seated properly, it stays on the other side. Check that out, I just fixed this on my sons older f150 (2003).

Will take a peak. Thank you sir!
 
OP
OP
PD1744

PD1744

Full Access Member
Joined
Jan 21, 2020
Posts
294
Reaction score
605
Location
SC
Quick update. Sitting a little over 207K miles. Checked into the thing above and really couldn't quite figure out what @CoronaRaptor was trying to help me out with. However, I did loosen the bed and bump it around a little bit and it seemed to help. The gaps seem to be closer to uniform side to side now, but the driver side latch still doesn't seem fully engage with the striker so the gate still sits a little back from the edge of the bed side. I adjusted the striker and it helped a little bit but still not perfectly flush.


FRONT END CLUNK!!

After almost two years of living with a suspension clunk on my passenger front side, I'm happy to say that I've finally solved the issue and it has to be possibly the most satisfying fix I've ever done. I did notice that the clunk significantly improved when I first put fresh shocks up front. The majority of the time, I was looking at the lower shock bolt and continued re-tightening those things whenever the clunking got bad. Eventually this didn't seem to help any.

After a lot of research I decided to order a replacement top-hat and spring insulator, but just as I placed that order a thought occurred to me. When I assemble the coilovers off of the truck, I torqued that top nut down with spring tension on it. So not really a true or accurate torque. And then, once you put the weight of the truck on the shock, it more than likely relieved the spring force on the assembly and created enough of a gap to allow play at the upper shock mount. I thought I might as well check and see how tight these nuts were while they where mounted on the truck. Nothing to lose here and easy enough to check. Once I was in there and able to visibly see these things turn, I knew right away it was my issue. It's a little tricky, as the shaft will spin, so you need to hold the top of the shaft with an 8mm and turn the nut with 17mm and you have to deal with the shock mount studs in the way. A pass through socket set would be very handy here. I don't own one. But all I did was hit it with my lighter duty impact driver and it was enough to do the trick. Was elated to go on the first clunk-free drive. I was almost at a tipping point when I drove my cousins Gen 2 and felt how amazing and quite it drove. Makes sense to me now why some people clunks go away when they move to aftermarket coilovers. Anyway, that was a long way of saying, re-tighten these nuts while on the the truck if you have a clunky suspension. So happy to have solved this issue.

All that said, I'll soon be removing my Eibach's and selling them to help pay for some goodies I snagged for the holidays. Though with lead times these days, who knows when I actually see them. At that time, I'll probably flatten the pinch seams, though I honestly don't have the need to with this particular tire and wheel set-up, and re-assemble the stock coilovers with stock springs and the new top hat and insulator.


BRAKES

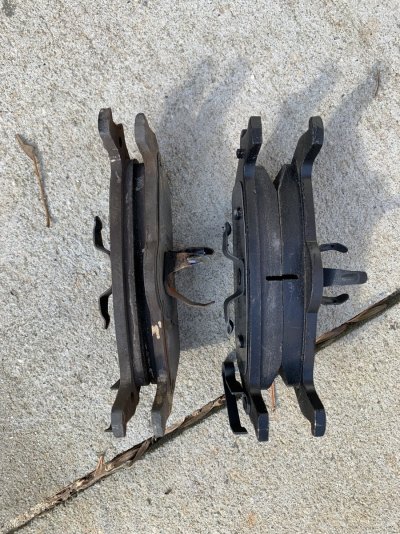
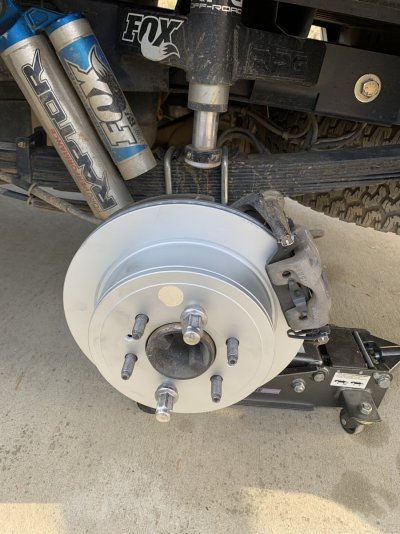
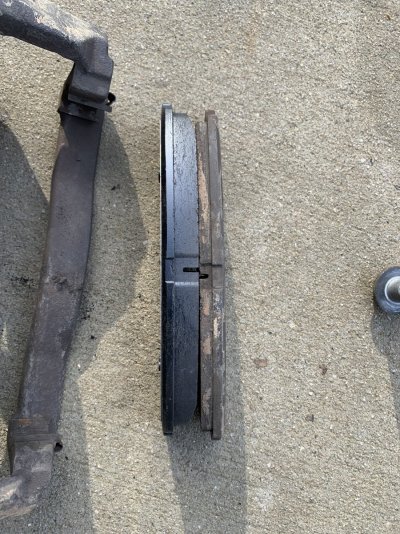
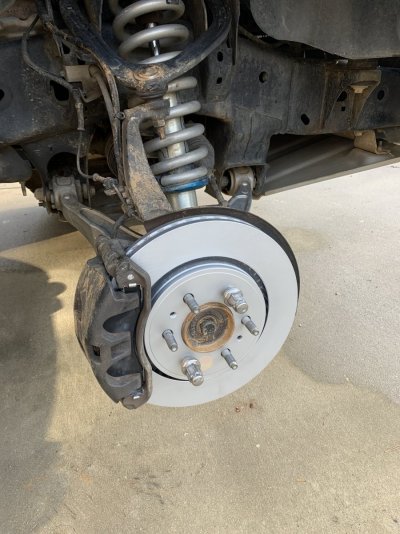
Did a brake job, but was more out of circumstance. A while back I ordered a set of brakes to put on my father-in-laws truck but they didn't make it in time and I had to buy parts locally to perform the job. So I had an extra set of brakes. I noticed that his stopped incredibly and mine, not so much. They were really bad when I first got the truck and managed to get some improvement by flushing the fluid, but lately they have been pretty terrible. My guess is that they were glazed from our little track excursion. Was hesitant to change them because the components on there look really nice (drilled and slotted rotors) and the parts I had order for my FIL's truck aren't what I would have ordered for my own, but figured I'd do the job anyway since I already had the parts. There appeared to be decent pad left on the old stuff and the rotors weren't warped or anything. I didn't inspect the pad for glazing, but the face of the rotors were like glass.

IMG_8156.JPG

IMG_8157.JPG

IMG_8158.JPG

IMG_8159.JPG

I still don't feel like it stops like his, but it's a significant improvement. I also have much more weight/running gear than he does.

Tried to troubleshoot a short in my cargo light circuit. Was unsuccessful. I know it worked at one time. Went out before the GJ and has never worked since. Also half troubleshot a short or ground issue I have with my driver turn signal circuit that makes it light up when the truck is off (like when all the courtesy lights come on at unlock). I have it working for now, but haven't really identified the root cause as to why it is intermittent on that side.

All for now. Waiting game on the new goodies.
 

Steven_Born

Active Member
Joined
Oct 18, 2019
Posts
51
Reaction score
63
Location
Albuquerque, NM
So I finally got time to try tightening this hardware, I forgot how hard it is to access this in the truck. I don't know if I actually was able to get any real torque on it but the truck does seem quieter. I really appreciate you sharing this info and other items with us.
 
OP
OP
PD1744

PD1744

Full Access Member
Joined
Jan 21, 2020
Posts
294
Reaction score
605
Location
SC
So I finally got time to try tightening this hardware, I forgot how hard it is to access this in the truck. I don't know if I actually was able to get any real torque on it but the truck does seem quieter. I really appreciate you sharing this info and other items with us.

Glad you got to take a peek. Hopefully it helps. As a tip, you can jack up the side you're tightening by the arm or run it up a ramp to load up the suspension a little bit more, then climb up on a step ladder and access it from the top through the engine bay. Use a deep well 17mm socket, a long extension, and in impact driver or lighter duty impact wrench. It's much easier this route! But to do it correctly, I would pull the coilover, compress the spring enough to bottom the nut out on the thread and use thread locker and proper torque.

I finally also fixed my tailgate. Now the gaps look good and the it's flush with the bedsides on both sides. All the info I needed was actually in my last post, I just wasn't thinking through it properly. The fact that the latch was fully engaging on the passenger side was the ticket. I needed to push the striker on that side toward the front of the vehicle, to give the driver side the room to catch. After that, no rattles (I could shake the gate on the drivers side before and it would jiggle like crazy because it wasnt' latched), good gaps, and flush gate. Everything fit so tightly, that I had to go back and re-adjust my release because it felt like so much tension on it when you went to pull it. Another satisfying, simple fix.

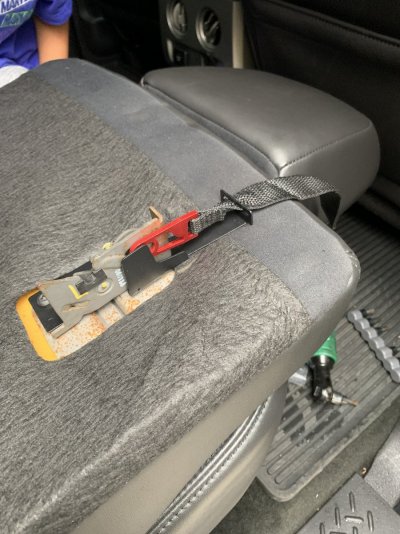
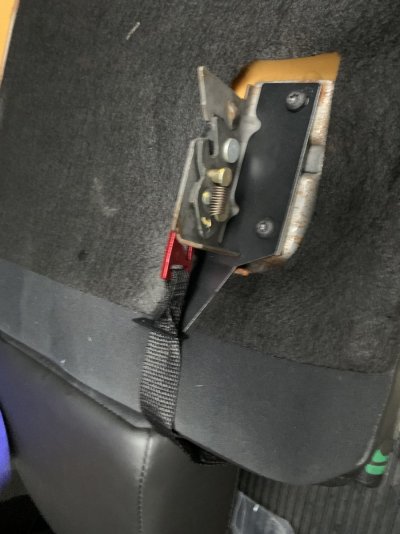
Added a couple cheap, no-name rear seat releases, having my little man (5 year old) spinnin' wrenches. Took a few minutes. Easy, cheap, satisfying.

IMG_8197.JPG

IMG_8198.JPG

Also having issues with burned out LED's on my front side mirror lights. I do not recommend these. Engine build took a tiny step forward this week too. Check out that thread for progress.
 

Steven_Born

Active Member
Joined
Oct 18, 2019
Posts
51
Reaction score
63
Location
Albuquerque, NM
It just amazes me how much work you get done on the truck. I tried all sorts of con torsion techniques to tighten the bolts and finally ended up using my pass through socket racket set and placing a 5/16 on the top side of the shock. The challenge was getting enough room to hold one side while trying to tighten the other. I might try this again with a friend to help hold to see if I can get any more torque on the assembly.

I installed that seat release on my 2014 and honestly never used it again once it was installed. On my old F350, I stored all sorts of stuff behind the seat but so far on the Raptor I really have only placed stuff in the bed and bed boxes.

I am glad you were able to solve the tailgate issue, these sorts of rattles drive me nuts.
 
Top