My BD S2 Reverse Light Kit Install

Disclaimer: Links on this page pointing to Amazon, eBay and other sites may include affiliate code. If you click them and make a purchase, we may earn a small commission.

OP
OP
Gerald

Gerald

Full Access Member
Joined
Sep 2, 2019
Posts
440
Reaction score
813
Location
Houston
Now that the tailight is off, you disconnect the wire harness to the tailight and then set the tailight aside for later re-installation. Here is the pic of the S2 wire harness pieces again as a reminder of which branch goes up into the tailight area.
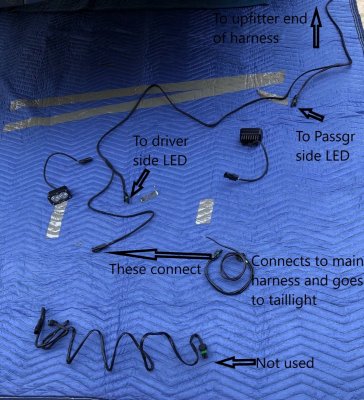
Various Pieces.jpg

On the branch that goes into the tailight area, it's really only the side by side "vampire" connector wire that goes up to the tailight wires. The wire with the grounding eyelet stays below and mounts to a grounding stud that is depicted well in the instructions.
 
Last edited:
OP
OP
Gerald

Gerald

Full Access Member
Joined
Sep 2, 2019
Posts
440
Reaction score
813
Location
Houston
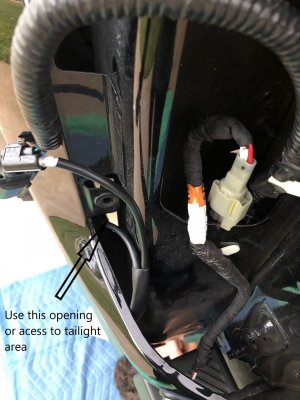
Here is a pic that shows the harness coming up into the tailight area. The arrow show a good opening or access to bring the harness up.

Tail Light 2.jpg

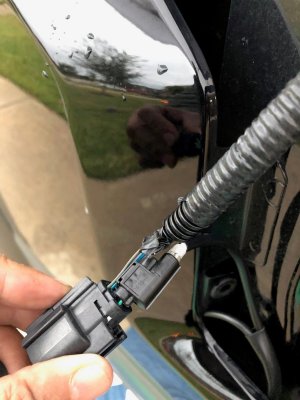
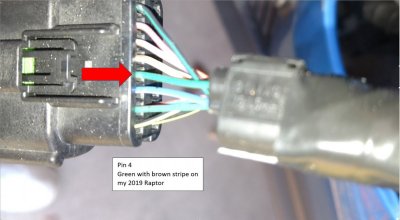
The existing tailight harness has a round corrugated sleeve that needs to be pulled back and cut some to make room for the vampire connector. At least mine did. The instructions again were pretty clear on which of the 6 wires is the reverse light wire and that is the one to attach the vampire to. But again to be safe I hooked up a voltmeter to make sure I had selected the correct wire. Once confirmed, I place the existing reverse wire carefully in the vampire connector and then closed the connector until you hear the little satisfying click that the connector closed all the way. Here is a better pic to see the vampire connector installed onto the main taillight harness.

Tail Light 4.jpg

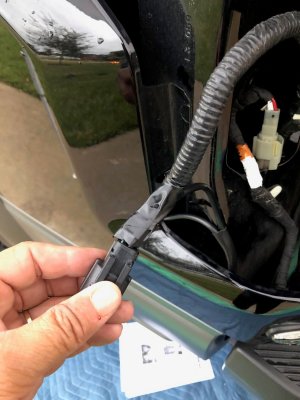
Here is another pic showing the final installation and taped up. The vampire connector is under the tape.

Tail Light Connected and taped.jpg

Then put the grounding eyelet on the grounding stud below the truck per the instructions. Before closing things up, I did a test by putting the Raptor in reverse and confirmed the lights came on. Success!!:chewie:
 
OP
OP
Gerald

Gerald

Full Access Member
Joined
Sep 2, 2019
Posts
440
Reaction score
813
Location
Houston
Then I re-installed the tailight assembly back onto the truck which was very easy. Got under the truck and starting putting zip ties all over to keep the harnesses up where they belong. Did another test to show the lights worked when placed in reverse and when the upfitter switch was turned on. Success!!:happy160:.
 

4x4TruckLEDs.com

Supporting Vendor
Supporting Vendor
Joined
Jul 18, 2017
Posts
2,963
Reaction score
1,382
The grounding point was also a bit tricky.

There's a better grounding point on the left side, much easier to use :) Any nut actually works as long as it's bolted to the chassis. You don't have to use a nut that has wires behind it already. Tip for future installs :)

Also, another tip a customer of mine gave me. To adjust the sides of the S2 lights, so you can angle them, just remove the bolt on the exhaust bracket. This will let you move the exhaust tip out of the way a bit, giving you room to get an allen key in there. Works great.

Also, while your wire path worked behind the tail light... you can actually follow the existing factory wires down inside the opening. You can just go right through there. Not that your method didn't work, but another tip should you ever need to do future work on your truck.

And yes, the first time you pull the tails off they are a pain. As you do it more and more it's much easier. I mean, how often will you actually pull them off? Probably never. Me though. I'm pulling mine off at least 2-3x a month because we're constantly testing things. I also pull mine off when I install my bed stabilizers before an off-road event (i don't keep them installed normally as I have a swing case that gets in the way)
 

Refugio

Full Access Member
Joined
Jul 7, 2019
Posts
182
Reaction score
94
Location
South Texas
I guess I should mention that I have a 2019 SCREW. I think there might be some subtle differences between years. Anyway, here is the mounting location, as specified in the instructions I received.

View attachment 134476

For some reason, in reading other installs, I had thought that the mounting bracket was mounted on the underside surface of the bumper. See picture below where the arrows show a potential bolt and a hole. Maybe that is the case for 2017 or 2018 versions. For my 2019, the mounting bolt is the picture above. Anyway, the bracket would not work in either of those two locations in the bottom picture.

View attachment 134478
Actually I did mount my S-2’s on the underside of bumper.
I used the supplied bolts, spacers and washers.
Directly into the hole as shown above.
This position ends up with the lights mounted directly inbetween the exaust tip and the hook.
No modifications of bracket needed and no removal of OEM bolts required.

Bottom line.... really no right way or wrong way to mount the lights. To each their own.
 

GR8Ride

Full Access Member
Joined
Feb 17, 2019
Posts
444
Reaction score
201
Location
Upstate New York
Great job Gerald! Can’t wait till it warms up some to do mine and I will be following your write up step by step!
Very much appreciated!!


HAPPILY EVER RAPTOR
 

northerner77

Active Member
Joined
Dec 12, 2018
Posts
80
Reaction score
26
Location
Michigan
So I got everything installed and my truck will on turn the S2’s on when I flip the aux switch. I’m using the 4x4truckleds harness. I unhooked the vampire clip and tried again, no dice. Think I got a bad harness from Baja? It must be the small vampire harness because the lights work when I flip the aux switch?
 
OP
OP
Gerald

Gerald

Full Access Member
Joined
Sep 2, 2019
Posts
440
Reaction score
813
Location
Houston
There's a better grounding point on the left side, much easier to use :) Any nut actually works as long as it's bolted to the chassis. You don't have to use a nut that has wires behind it already. Tip for future installs :)

Also, another tip a customer of mine gave me. To adjust the sides of the S2 lights, so you can angle them, just remove the bolt on the exhaust bracket. This will let you move the exhaust tip out of the way a bit, giving you room to get an allen key in there. Works great.

Also, while your wire path worked behind the tail light... you can actually follow the existing factory wires down inside the opening. You can just go right through there. Not that your method didn't work, but another tip should you ever need to do future work on your truck.

And yes, the first time you pull the tails off they are a pain. As you do it more and more it's much easier. I mean, how often will you actually pull them off? Probably never. Me though. I'm pulling mine off at least 2-3x a month because we're constantly testing things. I also pull mine off when I install my bed stabilizers before an off-road event (i don't keep them installed normally as I have a swing case that gets in the way)

Thanks! Appreciate the tips. Makes my decision a little easier to go back in and straighten up (level) the passenger side S2. I'll try to remove the bolt on the exhaust bracket so I can move it a bit to get the allen wrench in there to tighten it up. And I'm sure the tips will help the next person in their install.
 
OP
OP
Gerald

Gerald

Full Access Member
Joined
Sep 2, 2019
Posts
440
Reaction score
813
Location
Houston
Actually I did mount my S-2’s on the underside of bumper.
I used the supplied bolts, spacers and washers.
Directly into the hole as shown above.
This position ends up with the lights mounted directly inbetween the exaust tip and the hook.
No modifications of bracket needed and no removal of OEM bolts required.

Bottom line.... really no right way or wrong way to mount the lights. To each their own.

Ahh........ I think I see what you mean. There was some interference when I positioned the bracket on the holes on the underside. Maybe the initerference would have been eliminated with the spacer. I was just moving the bracket around on those two holes without the spacer and it didn't appear that it would mount without the interference. Glad your install worked out as well! And don't tell my wife that multiple different ways can work just fine. I keep telling her it's my way or it's wrong. :angels2:
 
Top