I did a writeup on my install at SVTO, but I'll repost it here:
I bit the bullet and installed a mobile rig in my Raptor today. I'd been running with a handheld (HT) but ended up wanting more range, so I stepped up to a mobile rig; the
ICOM IC-208h
I chose this for a handful of reasons, but the main one was its very small remote mountable faceplate / readout. This feature allowed me to mount the actual radio hidden away, and yet still have full access to all readouts and buttons. Pretty trick.
After digging around online to see what others have done (surprisingly very few seem to have installed a dual bander in an 09+ F150; I did see one very clean install where the guy installed the radio under the seat zipped tied to the coils. I looked into that, but I didn't see near enough room, especially for cooling or ventilation. I wonder if he didn't have power seats?). I looked at what options I had for power accessibility, speaker / fan / heatsync clearance, dataport access... I ended up deciding to install the radio on the rear of the center console, just under the 12v power adapter and AC vents.
I installed it backwards to allow for access to the power, antenna and dataports with little trouble (I left the speaker facing down).

For now, I'm using a cheepie cig adapter to power the radio. I might go hardwired at some point, but for now this works just fine.

(using the cig adapter for a radio like this is generally frowned upon since they rarely supply enough juice. I checked and ours are 20amp fused. This radio comes with 15amp fusing, so a circuit designed and wired to pop at 20 is plenty good. I replaced the stock 20amp with an OEM 15amp to keep things consistent.)
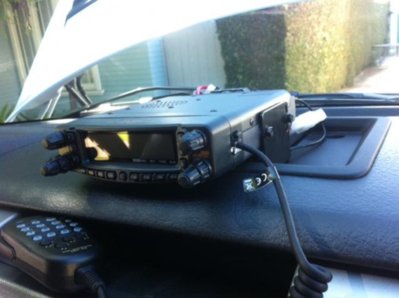
I chose to intall the head unit right above the upfitter switches and just below the sync ports. I have full access to everything this way, as does my passenger. Here's how I made it happen...
I started by lifting out the hill decent/Off Road mode/upfitter switch panel. Pulling straight up (gentle slight barely rock back and forth) on this will release the small clips and out it comes. There are three press-to-disconnect connectors; take a pic of them or make a note of which goes where, since two of them can fit in eachother's slot.
There's a plastic trim panel that will need to come out next. Its the small strip maybe 1.5in tall located just under Sync. It also just pulls out as its only held on by two clips. Here's a crappy pic of part of it:

I then pulled out the trim piece that covers the shifter box. This comes out surprising easily, just by lifting up on it and working around the shifter lever. If you need some extra space, you can fire the truck up, engage the parking brake, apply the brake, shift to drive and lift the panel straight up and out.

I popped a hole in the bottom of the trim piece for the head unit and mic wires. This hole is completely hidden if I ever decide to remove this stuff


(By the way, the ICOM uses an ethernet cable to connect to the mic. I was able to extend the included cable just by adding another ethernet cable and a coupler.)
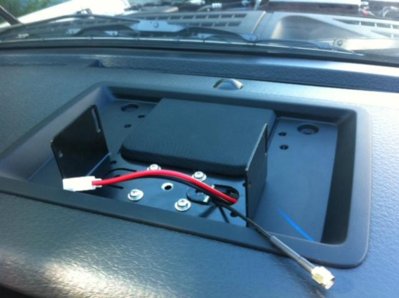
For the head unit mount, I fabbed up a bracket out of some scrap metal. This took some tweaking to get right; I forgot to take a pic of the final product, but here it is mid way. (The final version ended up in a stick figure lightening bolt sort of shape, jutting toward the upfitters before going up vertically)


Here I cut a little channel for the mic and head unit wires

(Again both holes are totally out of sight if I ever decide to undo all this.)
And here's everything put back together


It really looks nice and clean in there. Almost like that area was designed for it.
The antenna install was completed last month, but here's those pics and notes again as well:

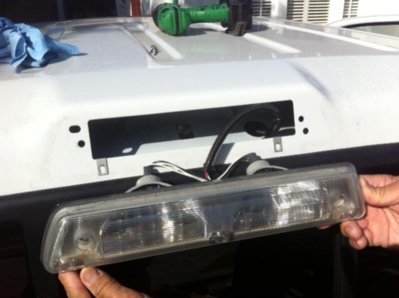
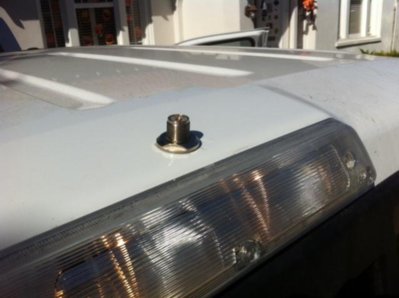
These two set screws and pressure plate are amazing. These are the only things holding the mount in place (no holes drilled anywhere). Once installed and cinched down, I was able to grab the base of the antenna and rock the truck back and forth a bit. That's how secure this mount is.


Here's the parts list for the antenna setup:
Antenna:
Comet SBB-7NMO
Mount:
Diamond K412SNMO
Note; The mount comes with a 13.5ft lead which turns out to be around 3 feet too short to reach the radio as installed in this location. You'll need a jumper / extension cable if you plan to install your radio in a similar location.
As for the routing, I took a pretty straight forward approach; I went down under the truck, up and over the gas tank, tied to the diff breather tube then came into the cab thru a pressure relief grommet hidden under the kick plate, back behind the driver seat. Then it was a simple matter of connecting my extension cable, hiding the extra under my WeatherTech floor mats, and bringing the lead up along side the center console.
The whole install for both antenna and radio took maybe 4 hours, with two of those hours tied up in just staring at things, trying to figure out how to do this cleanly and minimize holes.. Now to figure out how to use the damn thing... :doh: :spinning:
73s


