kindofblue
Member
Hi everyone,
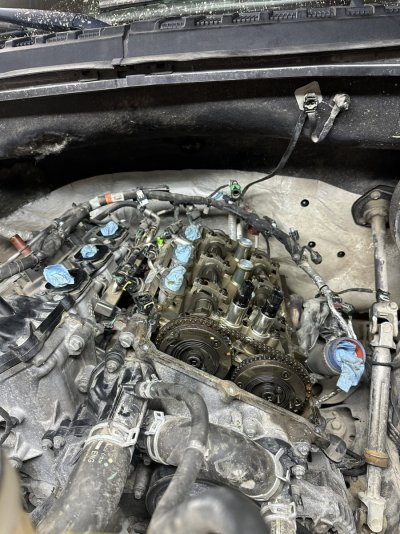
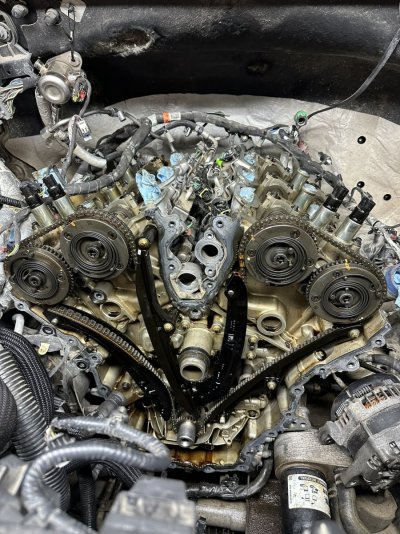
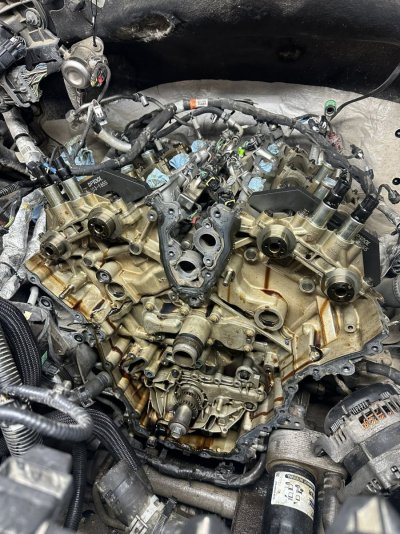
As the title says, I just completed a cam phaser job in my garage by myself. I hope that sharing my experience with you can help you out if you decide to go down this path yourself. Feel free to ask questions and I would be glad to respond.
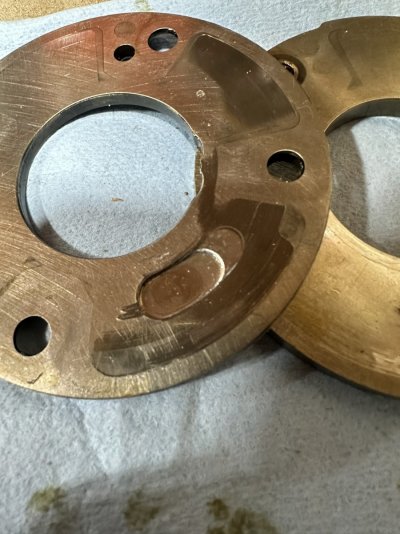
My truck: 2018, 97k miles. Phasers had been replaced twice under warranty before I purchased the truck used. They were last done in November of 2020 with 30k miles on the clock. The phasers that I took out were HL3Z-CD phasers. I replaced them with ML3Z phasers (the ones provided to Ford from the new supplier). The bank 2 intake cam phaser was completely taco'd - enough that while setting the engine to TDC there were periods in the rotation that the phaser was rotating but the camshaft wasn't.
Total parts cost was ~$700 and included replacing the water pump, thermostat, belts, my leaking (cracked) LH valve cover, and of course all required parts that are designated as one time use (seals, o rings, HP fuel pump mounting bolts, harmonic balancer bolt), as well as the timing chains and tensioners for good measure.
I ordered parts and materials based on Ford's customer satisfaction bulletin. Once again, I ordered the LATEST phaser design: ML3Z-6256-A, ML3Z-6C525-A. There have been discussions back and forth on whether or not these are simply a cosmetic change or a mechanical change - I have it on good authority that there IS a mechanical difference between these and HL3Z-CD phasers. If you are having this job performed under warranty (lucky!), I would recommend insisting that the dealer uses ML3Z phasers.
It took me about 40 hours all together. I would consider myself fairly handy and competent, and at no point felt over my head, I just take my time when I do anything mechanical really. I’d rather take my time than mess something up on my daily. Constantly referencing a video / the service manual definitely takes time, too.
I had to backtrack once - I misunderstood the service manual’s instructions on how far to press in the oil pump electrical connector seal on the front cover. Luckily I realized this before I started it and it dumped oil everywhere. Unfortunately, it was after I had everything pretty much buttoned up, so I had to disconnect coolant hoses and remove intake piping again. Had it not been for this backtrack, and my trouble with the AC belt (see below), my total time into this job would have likely been ~30-36 hours.
Largest hang-ups:
1) Pressing the aforementioned seal with a socket instead of the proper seal installation tool. This just sucks, plain and simple. I had to press it from underneath the truck.
2) The AC belt of all things, kept wanting to slip off the compressor pulley using zip tie installation method. Whoever invented stretch belts should be shot. I finally got it on one groove off, I ended up getting it on properly by feeding my old belt underneath the new one on the compressor pulley to get it to jump into place.
3) The cold side snap-ring retained intercooler pipe didn’t want to seat. I ended up dropping the intercooler and removing the elbow from the cold side pipe to get it seated onto the intercooler.
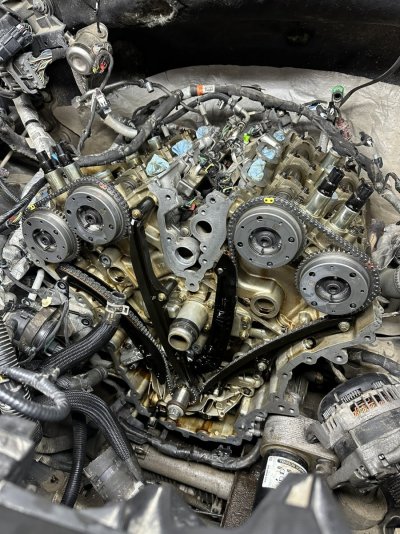
4) I took my time locking the cams into place. The phaser pictured below (intake driver’s side) was so loose that I had to press the tool on to the exhaust cam and then rotate the other cam backwards to get it locked into place. I couldn’t believe how worn it was. As I was spinning the engine to TDC I was watching that cam not move while the phaser and the rest of the cams were.
My biggest takeaways to share:
1) The valve covers and front cover are extremely difficult to break free. Take your time and don't be afraid to put force behind your prying. Make sure all bolts are loose obviously.
2) The service manual states that you have 4 minutes following RTV application to the front cover to install it and torque the first six bolts to their initial torque setting. I recommend a few test tries prior to applying RTV as it is a bit of a pain to get it all lined up in a timely manner.
3) The phaser bolts are TP55 (Torx PLUS). The torque spec on them is extremely tight. I used the vice-grip method shown in the below video, and I did have to press downwards on the cam locking tool to prevent it from coming upwards and potentially being rotated off of the camshafts. For best results you should have a very long torque wrench.
4) A digital torque wrench that is capable of doing degrees is strongly recommended. There are a BUNCH of bolts that have a lb ft + degree torque spec. On important bolts such as the phaser bolts, I wouldn't want to be estimating what 150 degrees is.
5) Ensure that when you are re-installing the timing chains that you have all of the slack on the tensioner side. You may need to rotate the crank slightly to achieve this. If the non-tensioner side has slack, you risk jumping time.
6) Take your time with surface prep. Having to re-do the front cover would suck.
7) If I were to do this again, I would remove the high pressure fuel pump to injector rail rigid fuel line instead of just removing it from the pump and trying to get it out of the way of the valve cover.
8) Unfortunately I either pinched the RH valve cover gasket or cracked the valve cover when I reinstalled it. I patched it up with RTV from the outside, waiting on the replacement. Either way, I attribute this to the difficulty involved with installing it, with the HP fuel line in the way, and a substantially more amount of harnesses as compared to the LH side, and is why I recommend just removing that line. Another thing you can do to ease installing the RH valve cover is to unplug the harness that runs behind it from the PCM to give it more slack.
9) Christmas tree wire retentions suck and I hate them. It's not a giant deal if you break one or two. I managed to only break one, I think!
10) I didn't have a harmonic balancer install tool - I heated up the part of the balancer that slides onto the crank and it slid right on with zero issue. I used the old bolt to ugga-dugga it on the rest of the way, and then installed and torqued the new bolt. You don't need to get a special tool to torque down that bolt, nor should you put that torque onto your timing chains - take your old serp belt, wrap it around the alternator and balancer, and then double it up and tuck the excess underneath the balancer to make your own balancer locking solution. The belt will take the force of you torqueing down that bolt and prevent the balancer from moving while you do.
11) The stud that holds the battery cable & transmission cooler lines to the bottom of the front cover sucks to get out. I didn't bother trying to reinstall it - I zip-tied them.
12) Ford, for all of their shortcomings, did some things under the hood extremely well. Harnesses are designed in such a way that you don't have to do any guessing of which wire goes where when you are plugging everything back in. It all kind of just falls into place. Same with the coolant hoses.
13) The alternator bolt (not the stud) has a threaded dowel insert at the rear that retains itself onto the block well. I threaded the bolt in a few turns and gave it a few whacks with a mallet to push that backwards and allow the alternator to be freed from the block. I still had to wiggle it back and forth to remove it and get it back on the block.
The resources I used:
1) Service manuals from www.alldata.com
2)
3)
All in all, it went smooth and I’m ecstatic to have saved $4300 (dealer quoted $5k). Would I do it again? Yeah! I could probably do it in half the time now.
Cheers guys!
As the title says, I just completed a cam phaser job in my garage by myself. I hope that sharing my experience with you can help you out if you decide to go down this path yourself. Feel free to ask questions and I would be glad to respond.
My truck: 2018, 97k miles. Phasers had been replaced twice under warranty before I purchased the truck used. They were last done in November of 2020 with 30k miles on the clock. The phasers that I took out were HL3Z-CD phasers. I replaced them with ML3Z phasers (the ones provided to Ford from the new supplier). The bank 2 intake cam phaser was completely taco'd - enough that while setting the engine to TDC there were periods in the rotation that the phaser was rotating but the camshaft wasn't.
Total parts cost was ~$700 and included replacing the water pump, thermostat, belts, my leaking (cracked) LH valve cover, and of course all required parts that are designated as one time use (seals, o rings, HP fuel pump mounting bolts, harmonic balancer bolt), as well as the timing chains and tensioners for good measure.
I ordered parts and materials based on Ford's customer satisfaction bulletin. Once again, I ordered the LATEST phaser design: ML3Z-6256-A, ML3Z-6C525-A. There have been discussions back and forth on whether or not these are simply a cosmetic change or a mechanical change - I have it on good authority that there IS a mechanical difference between these and HL3Z-CD phasers. If you are having this job performed under warranty (lucky!), I would recommend insisting that the dealer uses ML3Z phasers.
It took me about 40 hours all together. I would consider myself fairly handy and competent, and at no point felt over my head, I just take my time when I do anything mechanical really. I’d rather take my time than mess something up on my daily. Constantly referencing a video / the service manual definitely takes time, too.
I had to backtrack once - I misunderstood the service manual’s instructions on how far to press in the oil pump electrical connector seal on the front cover. Luckily I realized this before I started it and it dumped oil everywhere. Unfortunately, it was after I had everything pretty much buttoned up, so I had to disconnect coolant hoses and remove intake piping again. Had it not been for this backtrack, and my trouble with the AC belt (see below), my total time into this job would have likely been ~30-36 hours.
Largest hang-ups:
1) Pressing the aforementioned seal with a socket instead of the proper seal installation tool. This just sucks, plain and simple. I had to press it from underneath the truck.
2) The AC belt of all things, kept wanting to slip off the compressor pulley using zip tie installation method. Whoever invented stretch belts should be shot. I finally got it on one groove off, I ended up getting it on properly by feeding my old belt underneath the new one on the compressor pulley to get it to jump into place.
3) The cold side snap-ring retained intercooler pipe didn’t want to seat. I ended up dropping the intercooler and removing the elbow from the cold side pipe to get it seated onto the intercooler.
4) I took my time locking the cams into place. The phaser pictured below (intake driver’s side) was so loose that I had to press the tool on to the exhaust cam and then rotate the other cam backwards to get it locked into place. I couldn’t believe how worn it was. As I was spinning the engine to TDC I was watching that cam not move while the phaser and the rest of the cams were.
My biggest takeaways to share:
1) The valve covers and front cover are extremely difficult to break free. Take your time and don't be afraid to put force behind your prying. Make sure all bolts are loose obviously.
2) The service manual states that you have 4 minutes following RTV application to the front cover to install it and torque the first six bolts to their initial torque setting. I recommend a few test tries prior to applying RTV as it is a bit of a pain to get it all lined up in a timely manner.
3) The phaser bolts are TP55 (Torx PLUS). The torque spec on them is extremely tight. I used the vice-grip method shown in the below video, and I did have to press downwards on the cam locking tool to prevent it from coming upwards and potentially being rotated off of the camshafts. For best results you should have a very long torque wrench.
4) A digital torque wrench that is capable of doing degrees is strongly recommended. There are a BUNCH of bolts that have a lb ft + degree torque spec. On important bolts such as the phaser bolts, I wouldn't want to be estimating what 150 degrees is.
5) Ensure that when you are re-installing the timing chains that you have all of the slack on the tensioner side. You may need to rotate the crank slightly to achieve this. If the non-tensioner side has slack, you risk jumping time.
6) Take your time with surface prep. Having to re-do the front cover would suck.
7) If I were to do this again, I would remove the high pressure fuel pump to injector rail rigid fuel line instead of just removing it from the pump and trying to get it out of the way of the valve cover.
8) Unfortunately I either pinched the RH valve cover gasket or cracked the valve cover when I reinstalled it. I patched it up with RTV from the outside, waiting on the replacement. Either way, I attribute this to the difficulty involved with installing it, with the HP fuel line in the way, and a substantially more amount of harnesses as compared to the LH side, and is why I recommend just removing that line. Another thing you can do to ease installing the RH valve cover is to unplug the harness that runs behind it from the PCM to give it more slack.
9) Christmas tree wire retentions suck and I hate them. It's not a giant deal if you break one or two. I managed to only break one, I think!
10) I didn't have a harmonic balancer install tool - I heated up the part of the balancer that slides onto the crank and it slid right on with zero issue. I used the old bolt to ugga-dugga it on the rest of the way, and then installed and torqued the new bolt. You don't need to get a special tool to torque down that bolt, nor should you put that torque onto your timing chains - take your old serp belt, wrap it around the alternator and balancer, and then double it up and tuck the excess underneath the balancer to make your own balancer locking solution. The belt will take the force of you torqueing down that bolt and prevent the balancer from moving while you do.
11) The stud that holds the battery cable & transmission cooler lines to the bottom of the front cover sucks to get out. I didn't bother trying to reinstall it - I zip-tied them.
12) Ford, for all of their shortcomings, did some things under the hood extremely well. Harnesses are designed in such a way that you don't have to do any guessing of which wire goes where when you are plugging everything back in. It all kind of just falls into place. Same with the coolant hoses.
13) The alternator bolt (not the stud) has a threaded dowel insert at the rear that retains itself onto the block well. I threaded the bolt in a few turns and gave it a few whacks with a mallet to push that backwards and allow the alternator to be freed from the block. I still had to wiggle it back and forth to remove it and get it back on the block.
The resources I used:
1) Service manuals from www.alldata.com
2)
All in all, it went smooth and I’m ecstatic to have saved $4300 (dealer quoted $5k). Would I do it again? Yeah! I could probably do it in half the time now.
Cheers guys!


